
Blocks
Rapido 3.X introduced a new extensibility framework called Blocks, which (as the name implies) is all about breaking Rapido into smaller blocks and working with them. We’ve taken our largest templates – e.g. the Master template – and divided it into smaller parts (Blocks) which are then arranged in a flexible structure that determined where in the layout they should be rendered.
On a technical level, a Block is a simple C# object with clean, predefined properties. Each Block can also contain a list of other Blocks – this makes it easy to rearrange content; moving a block from right to left inside a header is a simple matter of changing the SortId parameter on the Block, and moving it elsewhere in the template is easily done by changing a single parameter in an .Add() method.
So why use Blocks? The main advantage is that your custom code is placed in separate Blocks-templates – this makes it much easier to upgrade to a new -Rapido version down the line, and much easier to maintain the custom codebase for future you.
Other advantages include:
- Use Blocks as a rendering engine: A block can optionally include a Template (Razor helper), which helps split huge templates into smaller, more maintainable parts. A block can also contain a Design with a RenderType (row, column, grid) – a small rendering engine handles adding the necessary mark-up. A small library of globally available components can also be used, ensuring a consistent design for common functionality.
- For easy layout configuration: Blocks provide a very clean and configurable structure for templates. It’s easy to move things around by changing the properties on a block, or by adding it to a different Block list. And you can do it without changing the standard Rapido templates, which makes it easier to upgrade down the line.
Confused? Don’t worry. The best way to learn about using blocks is by… using blocks!
10 step Quick Start
Ok, no more talking – here’s everything you need to know to get started immediately. You are expected to have basic knowledge of C# and simple objects. Make sure you are running Rapido 3.1+ and Dynamicweb 9.5+. Check the <head> node of the Master template to see your version – if nothing is stated there your version is too old.
Here’s Blocks in 10 steps:
- All blocks are written in Custom__blocks.cshtml template files – these files are located next to the templates they extend, e.g. in the Templates/Designs/Rapido/MasterBlocks folder.
- All templates with custom Blocks must contain a reference to another template with a Blocks structure – in this case the Master template, which contains a structure with the ID “Master”:
- If you use an IDE with code hinting (e.g. Visual Studio), make sure the Custom_Blocks template references both Blocks and Components:
- Start by writing a Block definition – remember an ID and a SortID:
- To use the block, add it to a Blocks structure – the first property in .Add() has shortcuts for base extensibility points for the Master, ProductList, and Checkout templates:
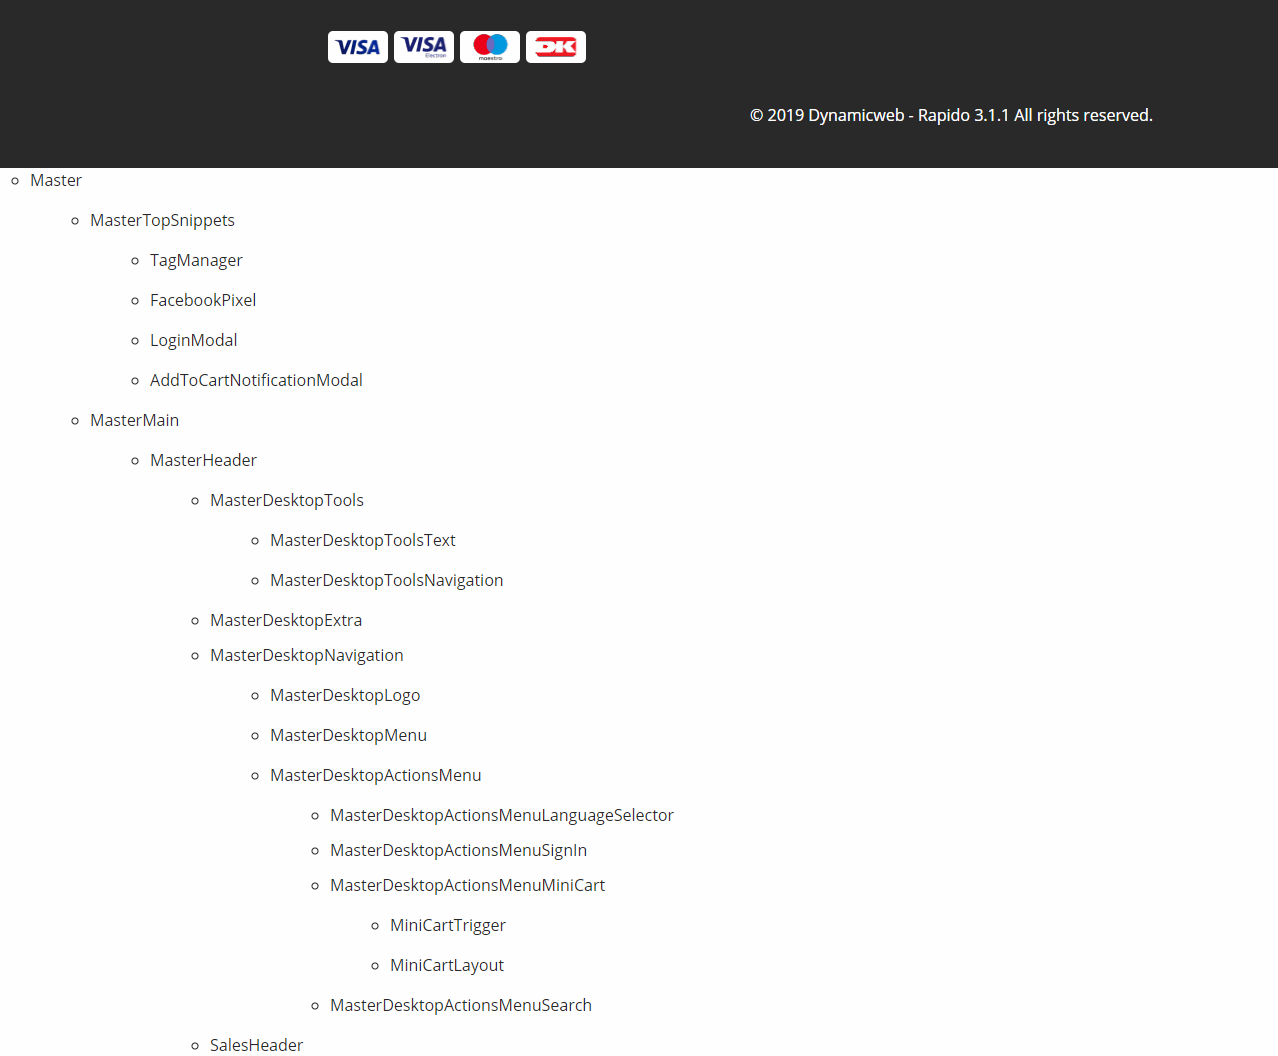
- You can use the GetBlocksStructure() method to render a tree structure with the extensibility points available for a blocks template – try with @masterPage.GetBlocksStructure() inside the <body> tag of the Master template. The output should look something like Figure 3.2:
- The simplest way of rendering a block is using a RenderType on it – e.g. Row, Column, or Table. Think of the RenderType as a wrapper – we use this whenever we want to enclose other things inside a container:
- Another option is using components – small, reusable parts like buttons, checkboxes, stickers, etc. Components are available globally, which ensures a consistent design despite their configurability.
- You can add /components to your solution URL to see the components documentation for your version (Figure 4.2)

- Finally, you can use the Template property to reference a helper method with markup – this is typically done when you need to solve a local task using non-reusable and slightly more complicated markup:
Two features are a little more advanced and require some explanation:
- Building a Blocks structure can be done in both static and dynamic manner. For an example of the static approach, see Master.cshtml – for the more dynamic approach see the templates in eCom/Product/Blocks. The dynamic approach is useful for a highly configurable solution, but the price is that your code becomes much more confusing to understand. Use with care.
- You can instruct the rendering engine to skip blocks inside a structure and do the rendering yourself – this is useful when you want to wrap content inside custom markup. To do so:
- Set the property SkipRenderingBlocksList to true inside block definitions
- Add a Template property which references a helper method
- In that helper method, reference which subBlocks you want to render, then call the RenderBlockList() method inside the wrapper markup