
Digital warehouse
Digital warehouse allows you to publish downloadable files instead of products, which certain users can then use/download.
Sign up
The digital warehouse is available to certain users. To access the warehouse and its products, they must sign in using a sign in page.
To create this page:
- Create a new page and thereafter create a paragraph called sign up
- Then, attach an extranet app to the paragraph (Figure 2.1)
- In the Show settings, select Login
- Save the settings
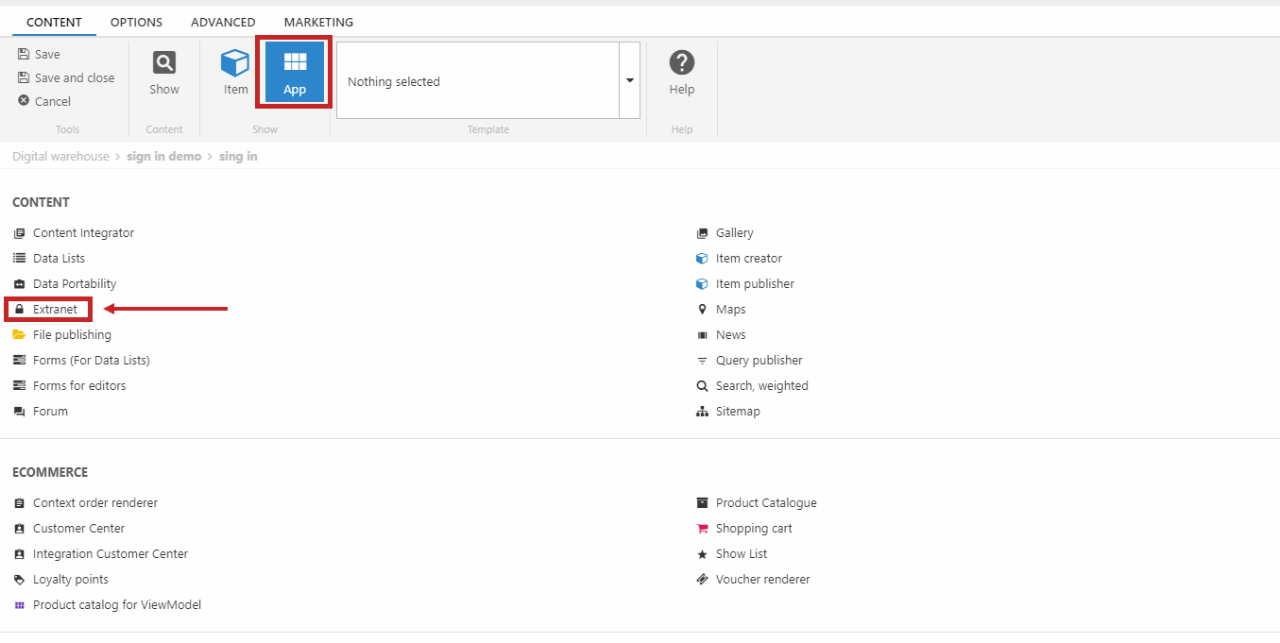
The show settings appear after you have attached your extranet app to your paragraph.
Now it's time for you to change the templates used on your sign up page:
- Locate the login settings as shown on (Figure 2.2)
- Change the login template from the login.html to the login.cshtml razor file
- Then change the password recovery template to the PasswordRecovery.cshtml file
- Set the password reset template to the PasswordRecovery.cshtml file as well
- Lastly, choose where your users should be redirected to after logging in (usually the frontpage)
- Save the settings

Now that you have set your templates, it's time to configure the permissions for the users on your website
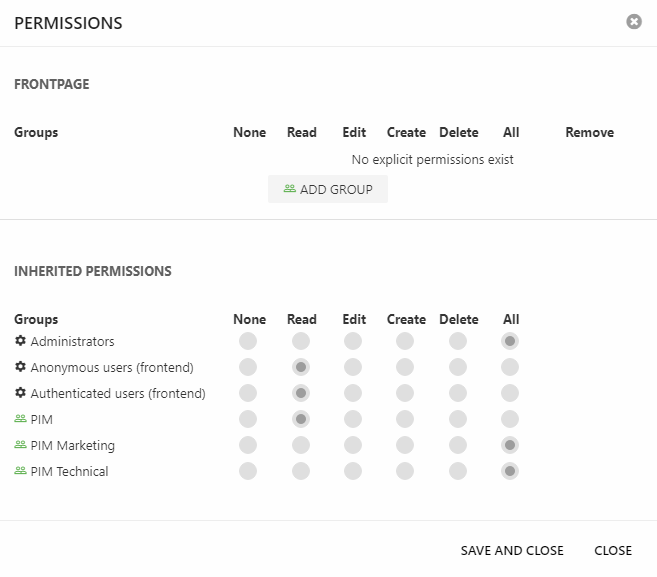
- Right-click on your sign-up page and click permissions
- Make sure the permission settings match the picture below
Now, anonymous users are able to sign up your page.
Digital assets
The purpose of the digital warehouse, is to enable the users to publish downloadable files to their solution. The files published can then be used/downloaded by the respective users of the system. Ideally, this feature should only be available to logged in users on your solution. The reason behind this is, that most companies would like to have a relation with the users who use their content, for promotional or other activities.
You can add files to your digital warehouse by following the steps below:
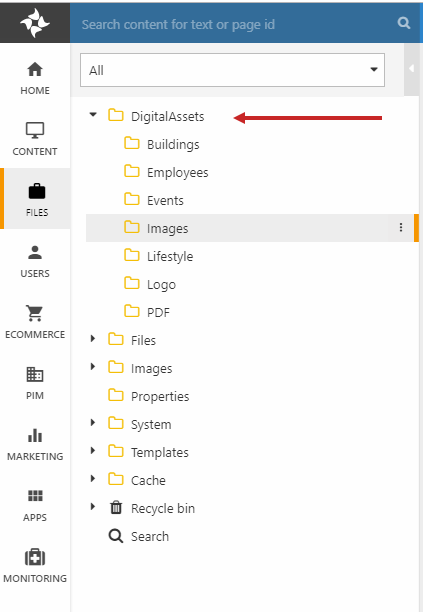
- Click on your files node from the area menu
- Locate digital assets and click on it
- Create a folder inside of it for images or other files as shown on (Figure 3.2).
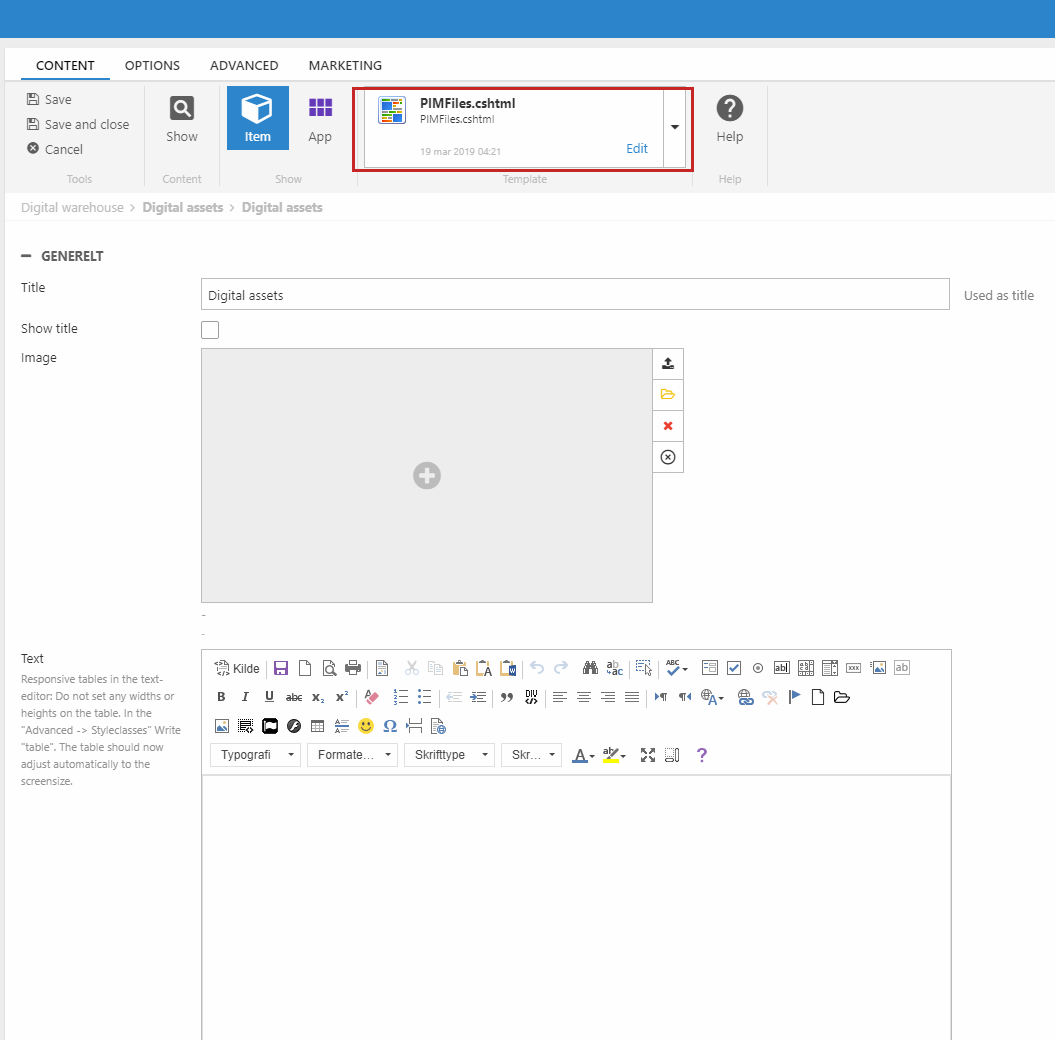
Now it's time for you to set up your page with paragraphs:
- Go to your desired page
- Locate '' New paragraph '' and click it
- Choose paragraph as the paragraph item type
- Name it something appropriate
- Locate the template selector at the ribbon, and pick PIMFiles.cshtml as shown on (Figure 3.3).
- Save it
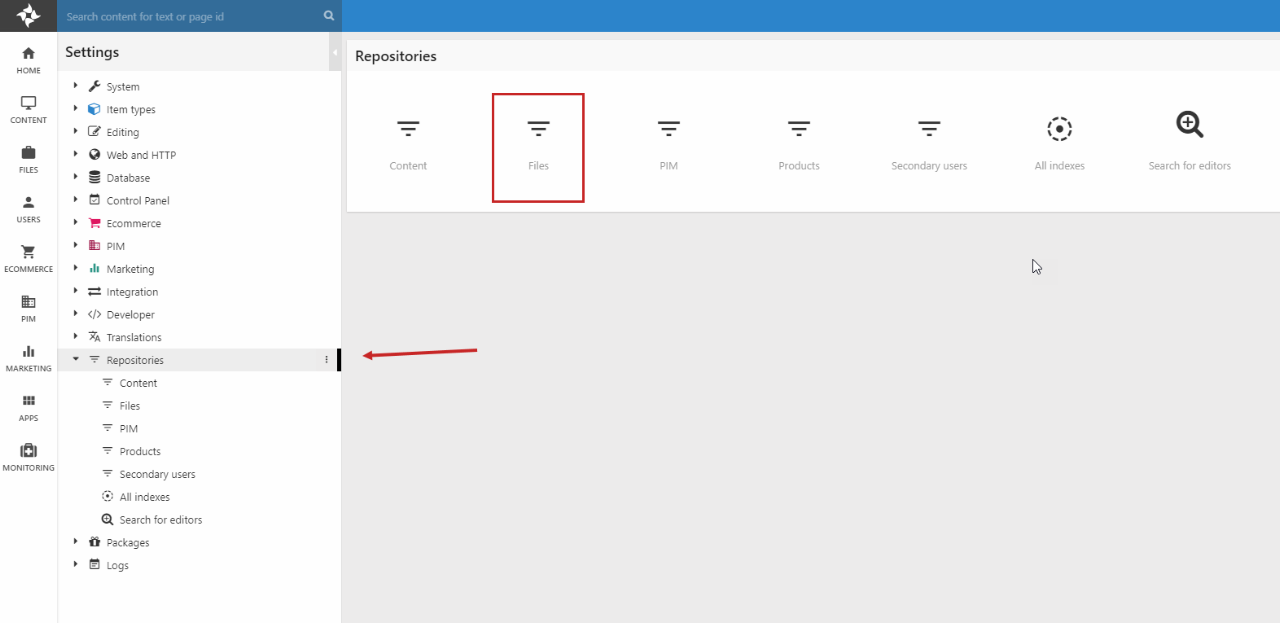
To set up your files repository follow the steps listed below:
- Click on the settings from the area menu
- Locate repositories from the tree node
- Click on files as shown on (Figure 4.1).
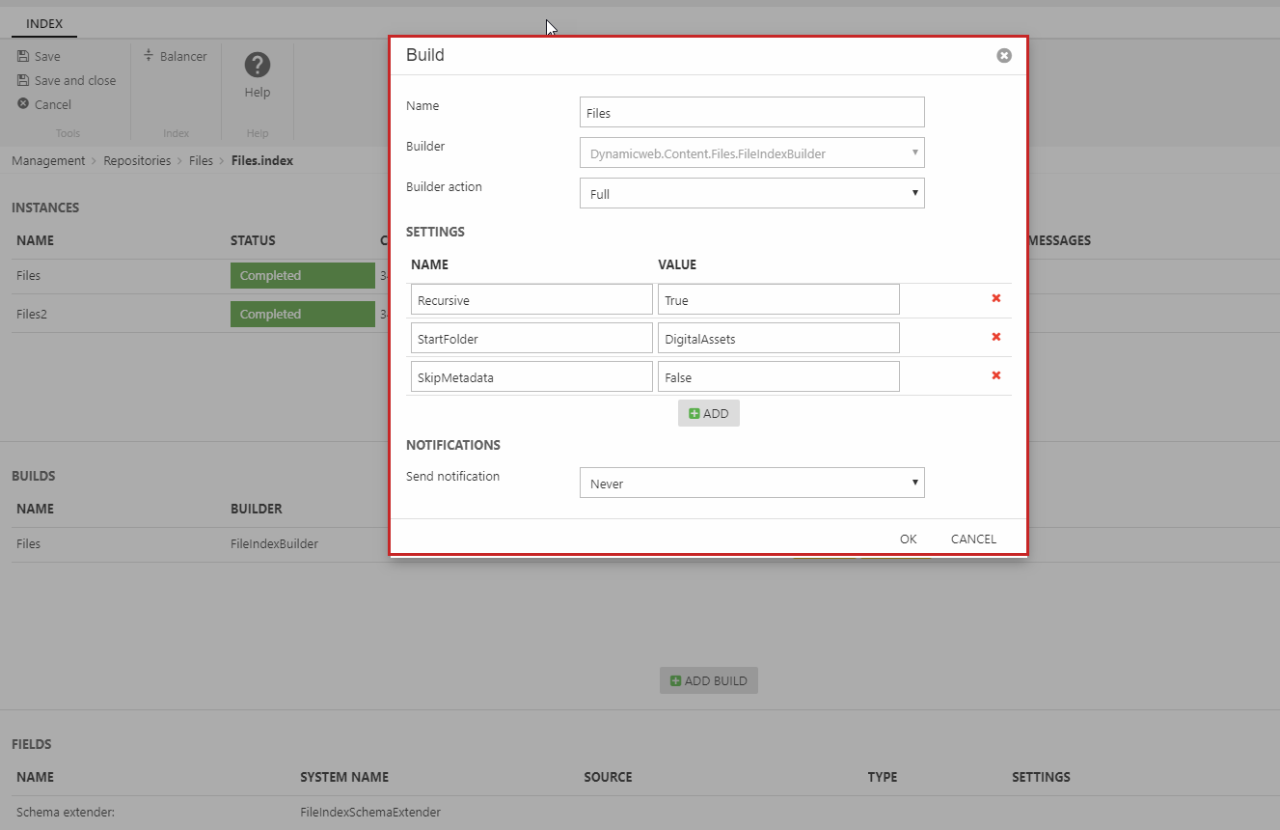
After entering the files repository, the index needs to be set up for your files. Follow the steps below to set up the index:
- Locate add build and click it
- Hereafter, the build settings needs to be modified
- For the recursive field choose true as the value
- The value of StartFolder should be set to DigitalAssets
- SkipMetadata should be set to false
- Click ok when your settings match the picture below (Figure 4.2).
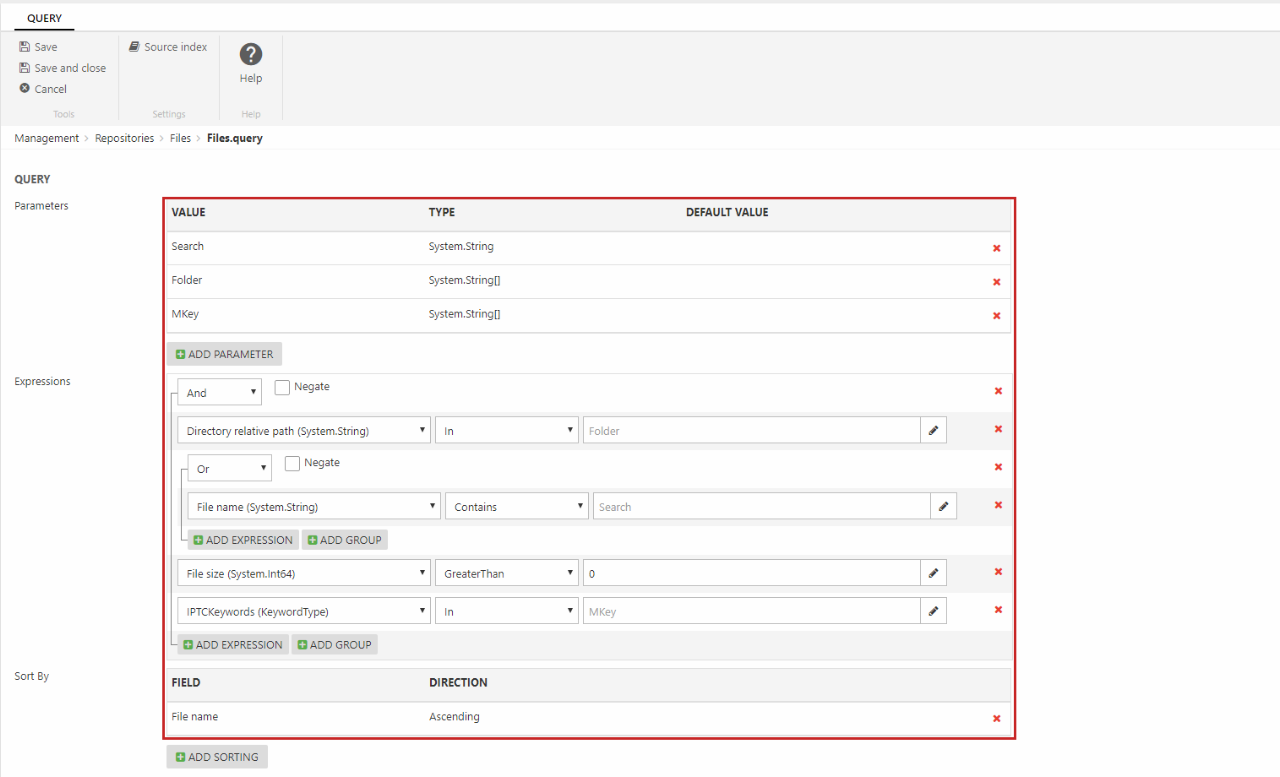
The next step is setting up the query for the page:
- Click add query and name it something appropiate
- Pick the data source
- Replicate the settings as shown on (Figure 4.3).
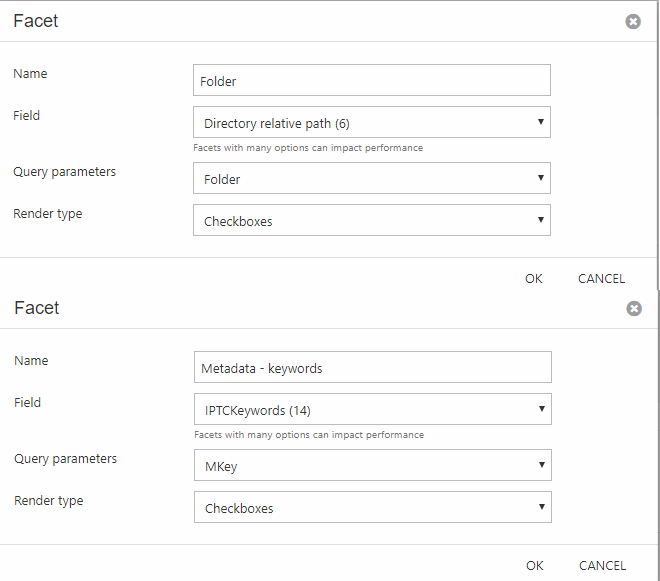
When the query is set up correctly, it's time to configure the facets for the site:
- Click on the settings from the area menu
- Go to your repositories and click on files
- Click on add facets from the ribbon bar
- Name it, and choose the query you made before
- Two facets needs to added , one for the folder and another for the metadata
- Replicate the settings shown on (Figure 5.1)
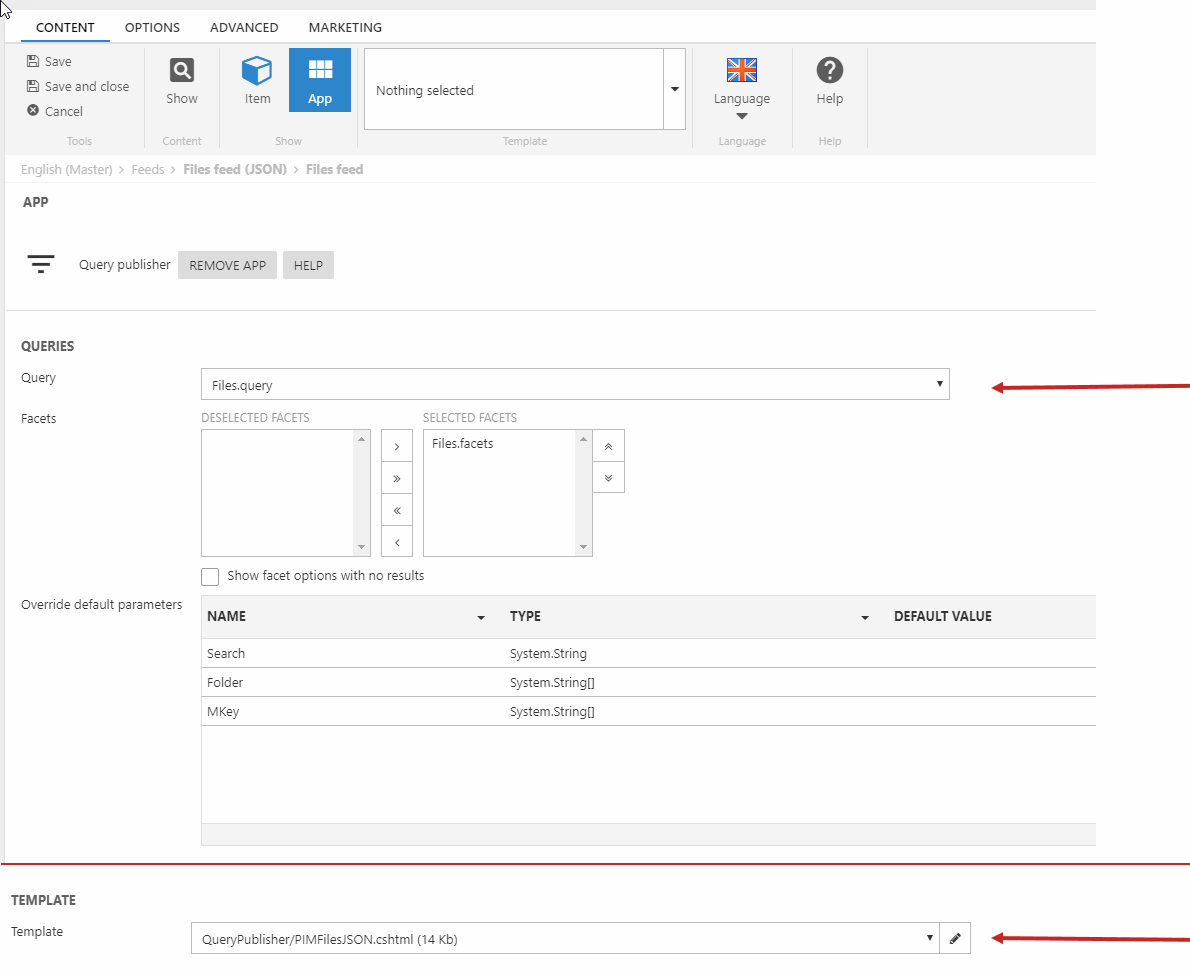
To set up your files feed correctly, follow the steps listed below:
- Under content, click on the feeds folder
- Create a paragraph and name it something appropriate
- Click on the item publisher and use the query publisher app as shown on
- In the query settings, use Files.query as shown on (Figure 5.2)
- Afterwards select the file under the facet settings
- Scroll down to the template settings and choose PIMFilesJSON.cshtml as shown on (Figure 5.2)
Products
To set up the products correctly, these elements must be configured in the right way:
- Product index
- Query
- Facets
A comprehensive guide explaining how it should be done, is found here
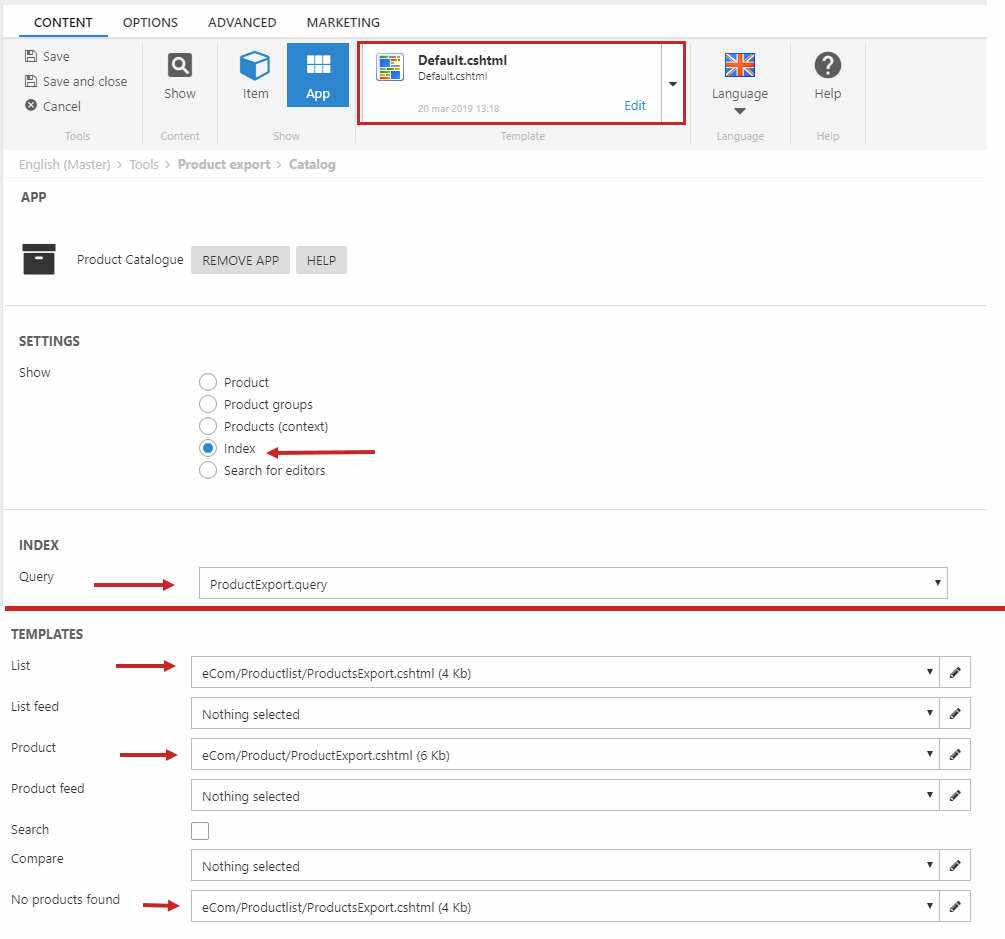
Product export feed
The product export feed should also be set to the correct settings. Follow the steps below to configure it:
- Under content, click on the tools node
- Then locate product export and click it
- Make a paragraph and attach the product catalogue app to it
- Select default.cshtml as the template from the ribbon as shown on (Figure 7.1)
- In the show settings select index
- Under the index settings choose ProductExport.query as shown on (Figure 7.1)
- Lastly, scroll down to the template settings and select the ProductsExport.cshtml for the three different template dropdowns as shown on (Figure 7.1)
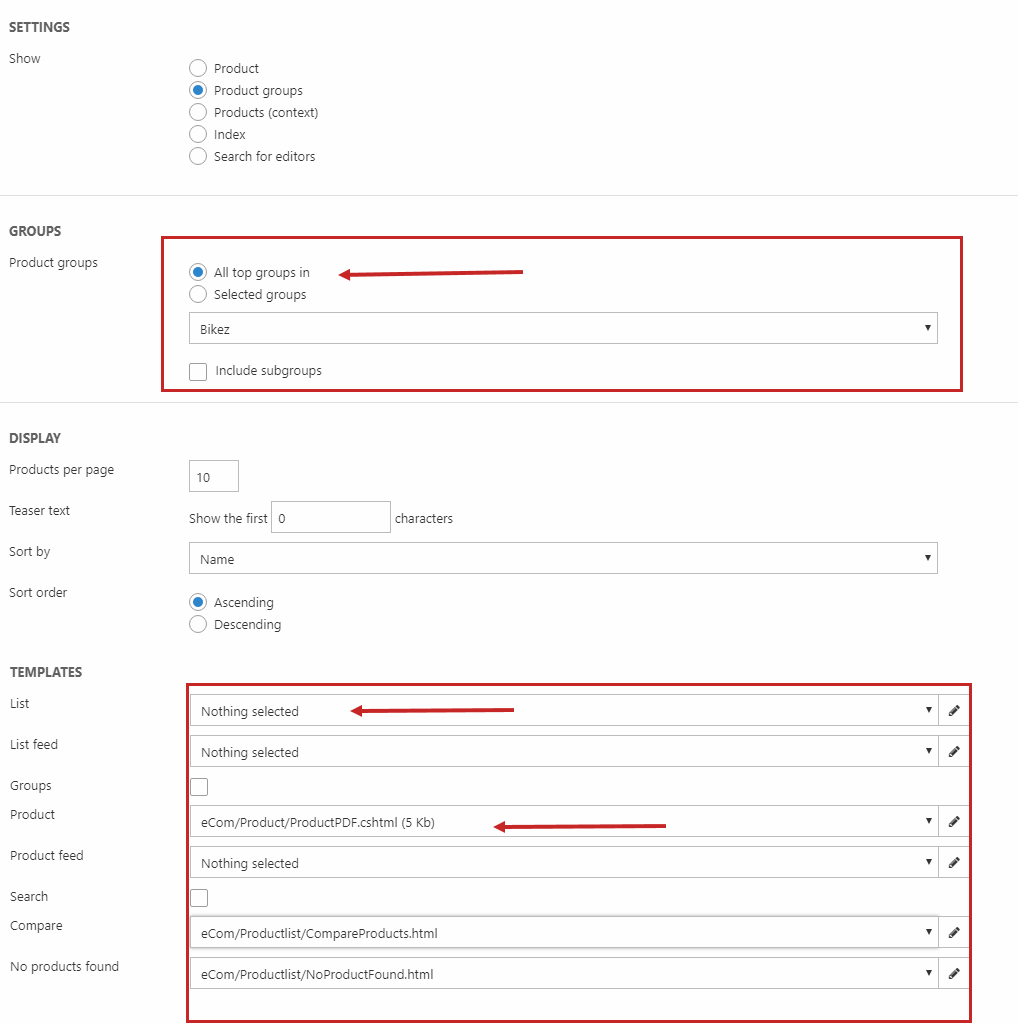
PDF for product page
In order to enable the users to download a pdf of their selected digital assets in the product page, follow these steps:
- Click on the content node from the area menu
- Then locate the tools folder and click on it
- Enter the PDF folder and create a paragraph in it
- Attach the product catalogue app to your newly created paragraph
- Under the groups settings select all top groups in then, select your shop from the dropdown
- Lastly, make sure the right templates are selected - look at (Figure 8.1)
- The list template should be empty
- The product template should be the ProductPDF.cshtml razor file
- When the settings match (Figure 8.1), save and close
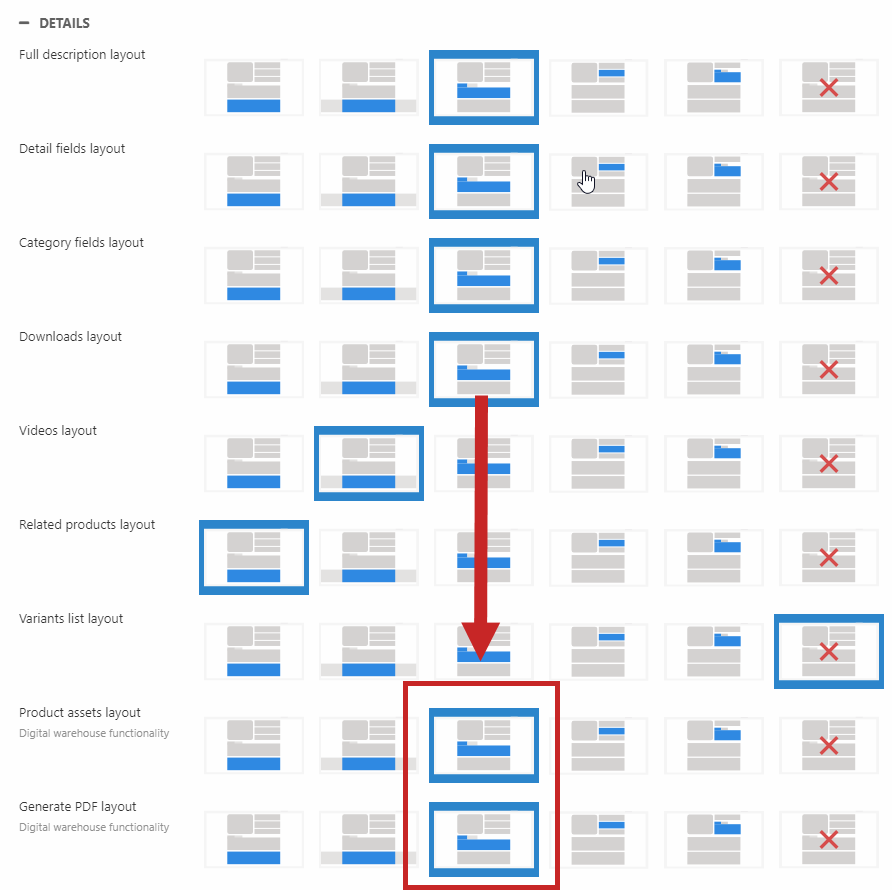
The product page must be configured correctly, for the digital warehouse to serve it's purpose. Therefore, it is essential that the right layout settings are chosen, for your product assets and the PDF layout. Follow these steps to configure it properly:
- Enter the website settings
- Scroll down to the product page tab and click on it
- Scroll down to the details settings and open it
- Locate ''product assets layout'' and ''generate pdf layout''
- Select the options in the middle as shown on (Figure 9.1)
- Save the settings
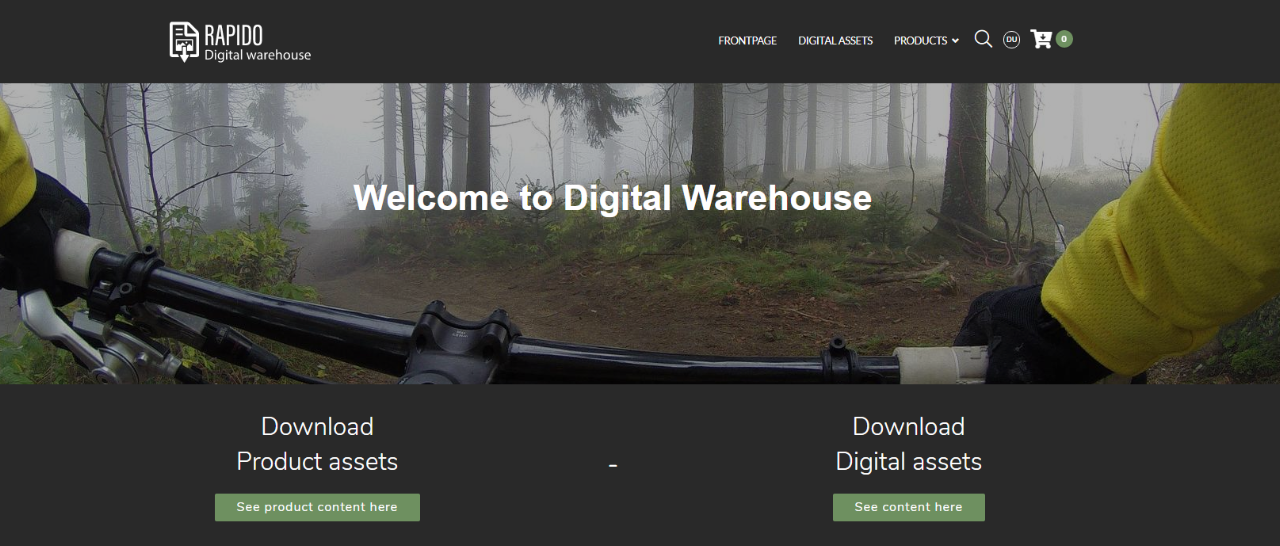
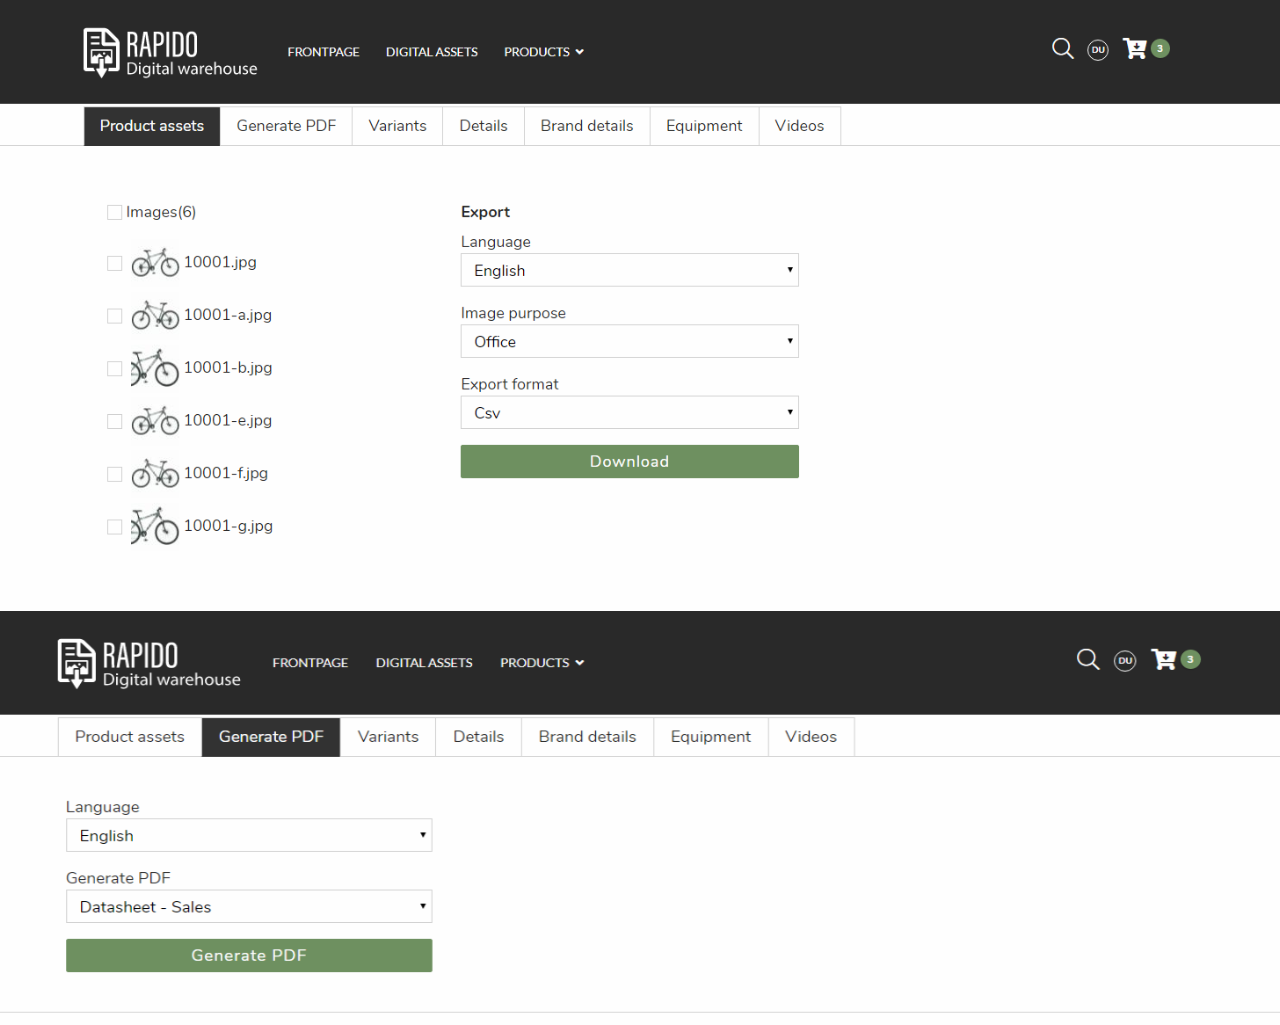
After selecting the settings shown above, the front-end should look something like the picture shown below (Figure 9.2).
Permissions
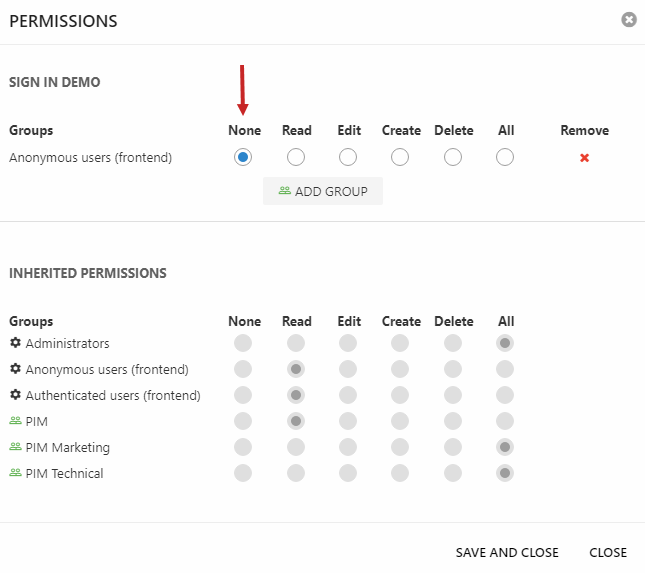
To configure the permissions for the users on your website, follow these steps:
- Right-click on your sign-up page and click permissions
- Locate add group and click it
- Then click on System roles > Anonymous users (frontend)
- Lastly choose none from the permission settings as shown on (Figure 10.1)
Only logged in users will be able to view the content on your page now.
These restrictions on the page permissions should be applied to the following pages:
- Frontpage
- Digital assets
- Products
Download cart set up
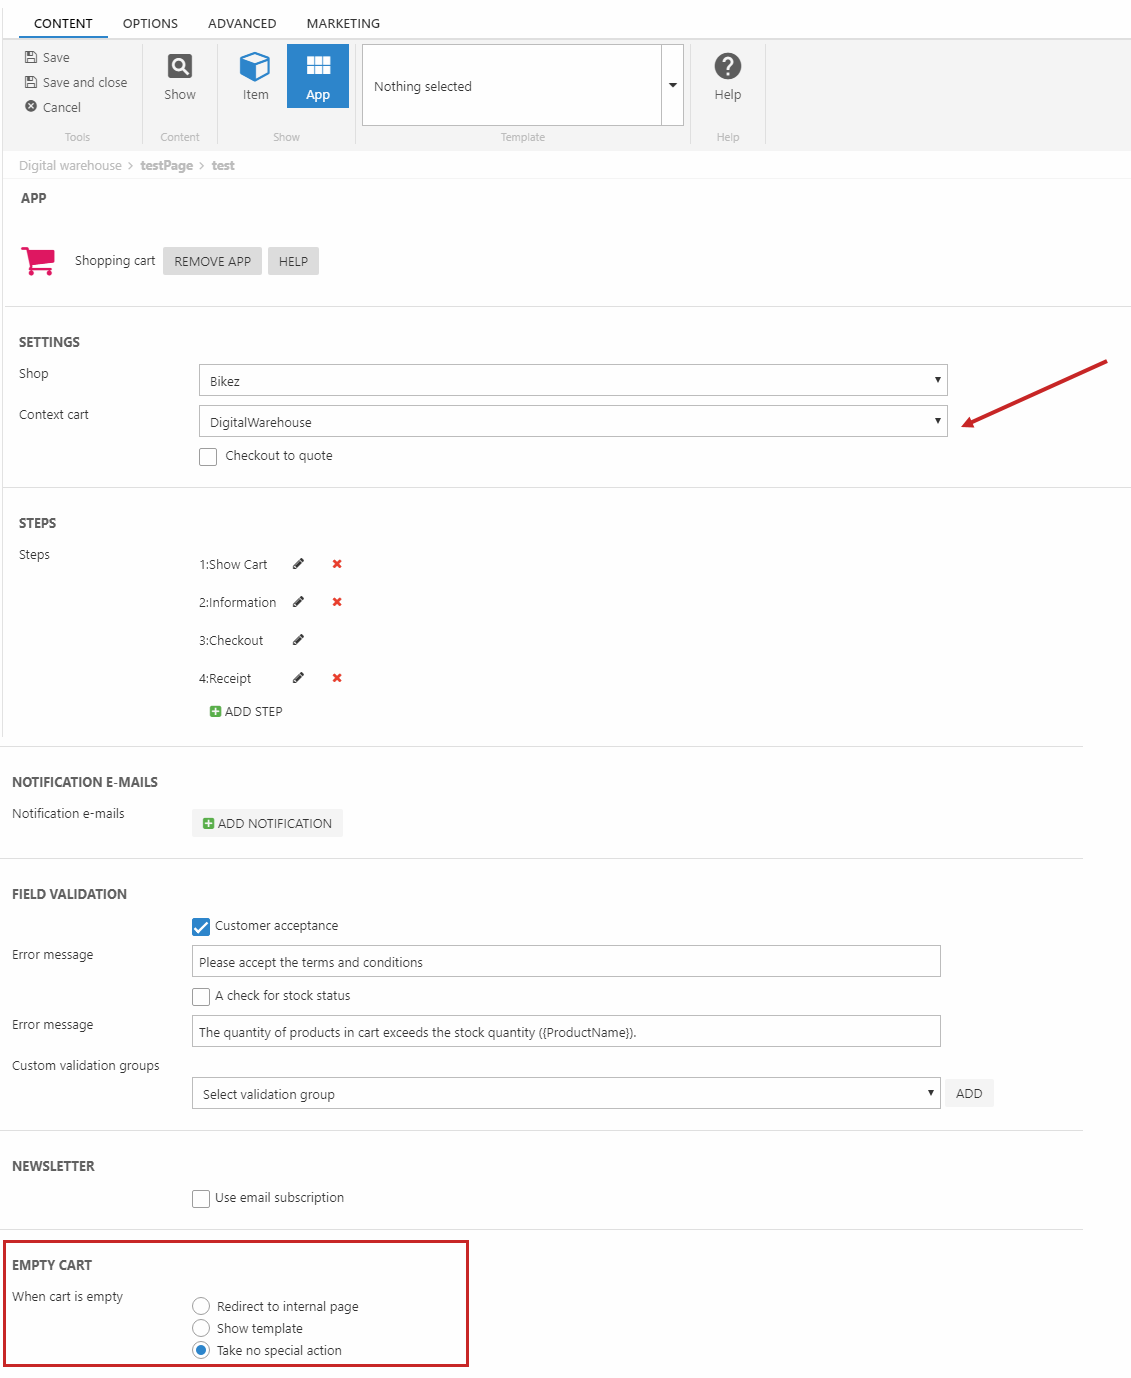
To set up your download cart, create a new page with an appropriate name, and afterwards a paragraph on that page. Attach the shopping cart to your page, and follow the steps below to configure the settings correctly:
- Choose your selected shop in the shop settings
- In the context cart field pick DigitalWarehouse
- Configuer the steps you want, or use the default settings
- Scroll down to the empty cart settings
- Pick the event that should happen if no items appears in the cart
- See picture (Figure 11.1) for references
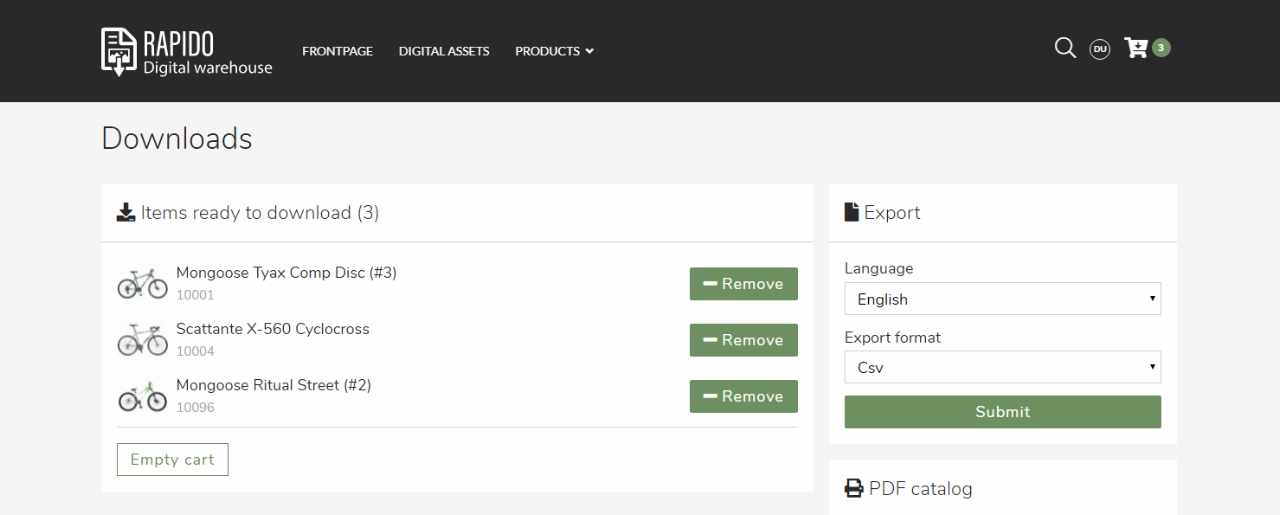
After setting up your download cart, the end product should look something like this in the front-end (Figure 11.2).
Layout
The website settings allows the user to modify different layout elements for the digital warehouse, such as showing/hiding elements from the navigation, product list and product page, disabling PDF generation, adding special digital warehouse buttons, etc.
With digital warehouse, there are a couple of settings that must be configured in a specific way for it to work:
- Hide the regular cart, favorite, and profile options in navigation items and in the sign in dropdown
- Hide the favorite button, price, and stock/shipping information from the product page and product list(s)
- For all product list views, show the Add to download button, but hide the regular Add to cart and View buttons
Below, each step is described in more detail.
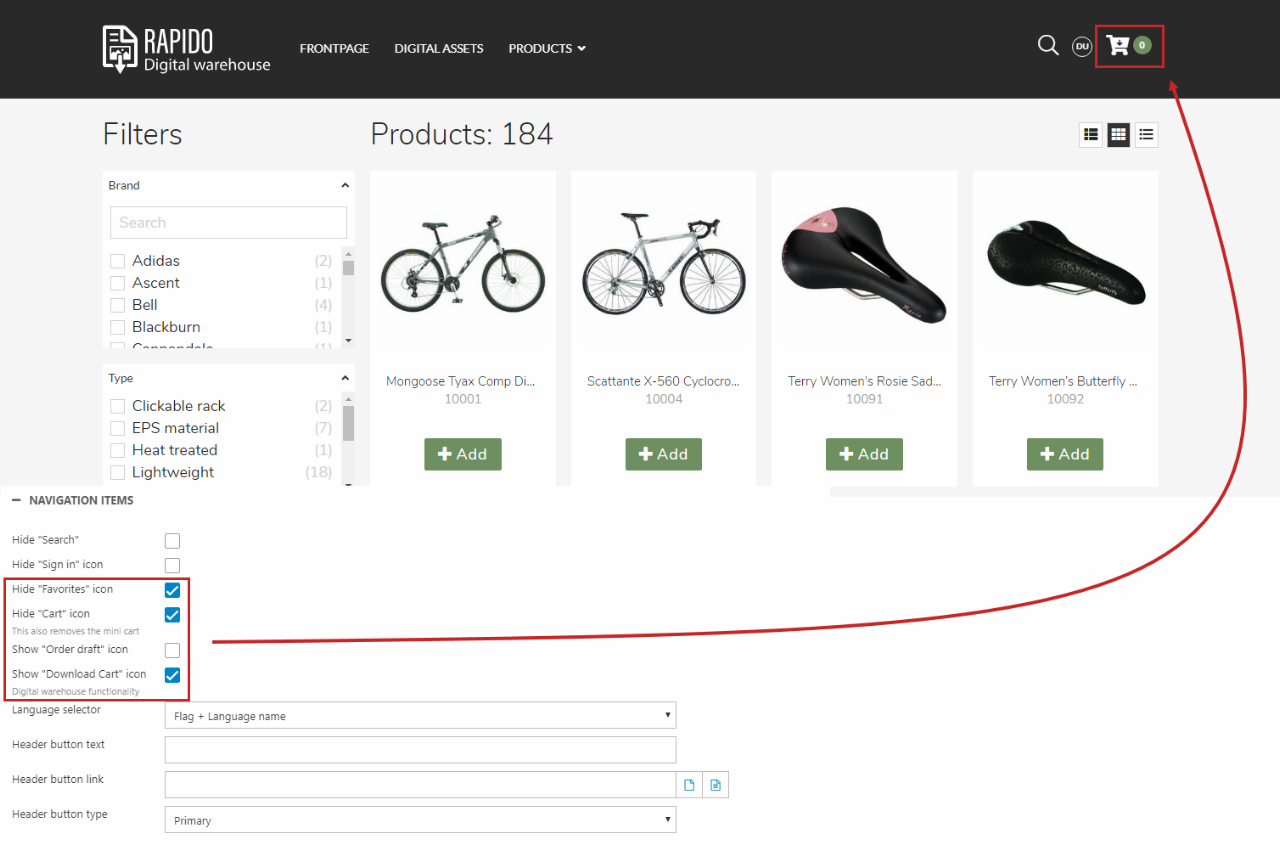
To disable/enable the desired icons from the navigation follow these steps:
- Go to the website settings for navigation items in the layout tab
- Disable the favorites icon and hide the cart icon
- Show the download cart
- Save the settings, and see the difference in the front-end
- Check if the navigation items match the picture below (Figure 12.2).
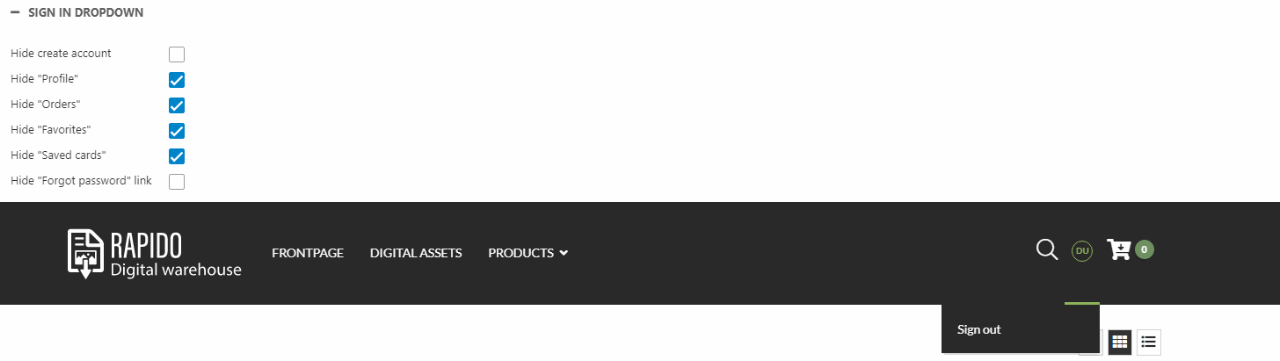
You can also modify the show/hide settings for the sign in dropdown (Figure 12.3) for the following elements:
- Create account
- Profile
- Orders
- Favorites
- Saved cards
- Forgot password link
For the digital warehouse, you should apply the following:
- Hide ''Profile ''
- Hide ''Orders ''
- Hide ''Favorites ''
- Hide ''Saved cards ''
- Save the settings
If the settings are applied correctly, the sign in dropdown should look like Figure 12.3.
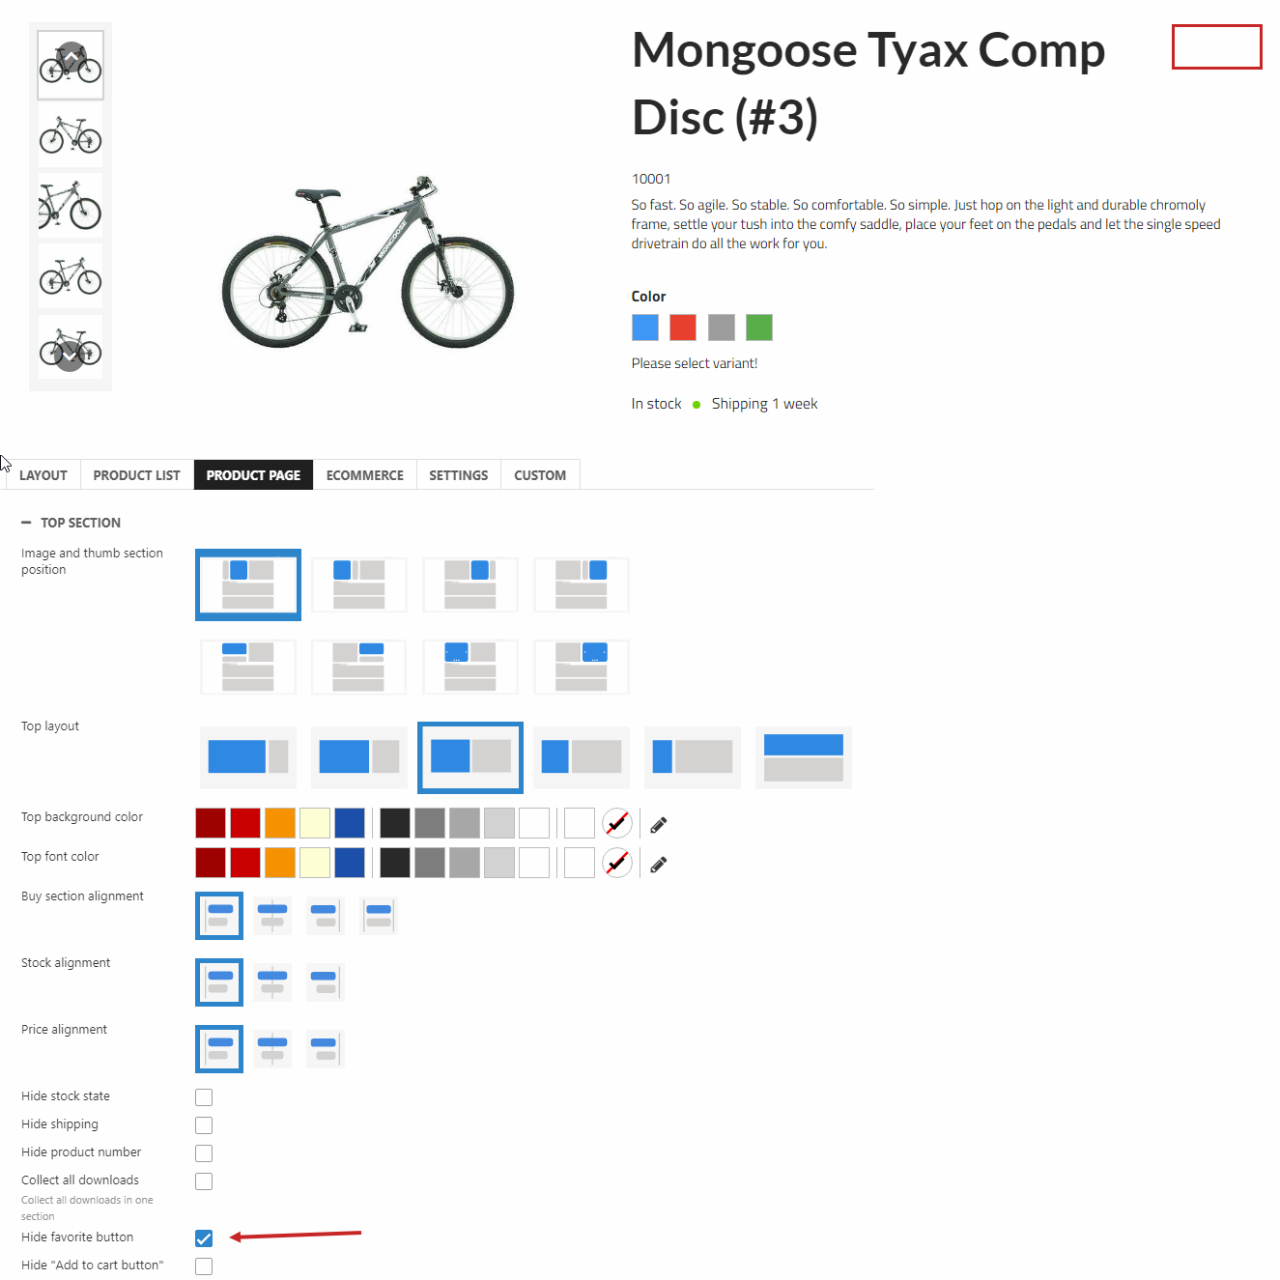
To set up your product page correctly, the favorite button must be hidden. Follow the steps listed below to configure it:
- Go to the website settings for the top section in the product page tab
- Scroll down to the Hide favorite button checkbox and tick it
- Save the settings
- Check your frontend to see if the button has disappeared as shown on Figure 13.1
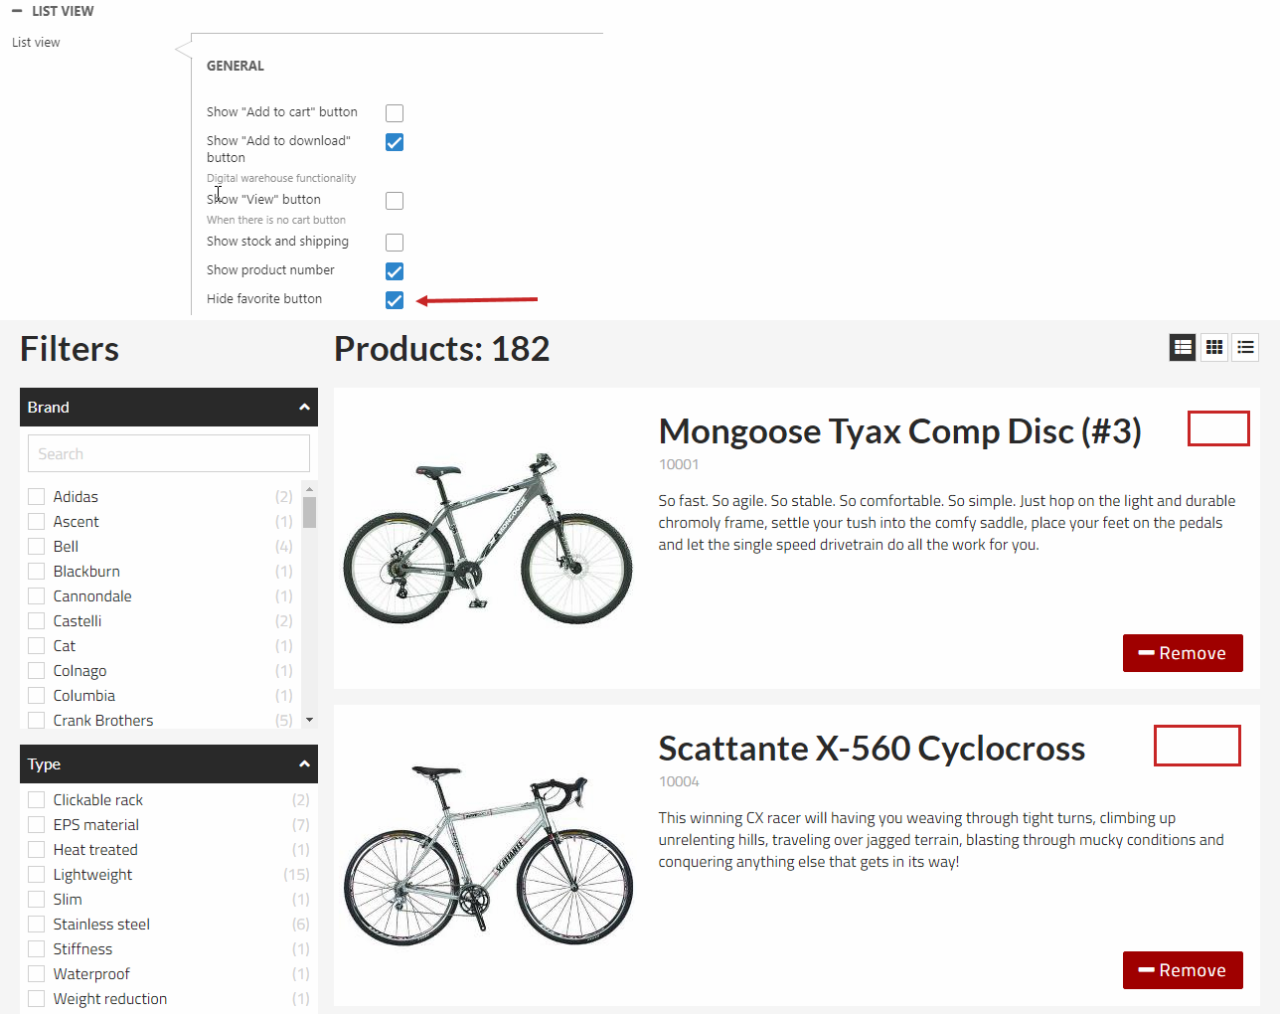
The favorite icon should also be disabled from the product list. Applying these settings is straightforward, follow the steps below:
- Go to the website settings for the list view in the product list tab
- Under General, check Hide favorite button (Figure 13.2)
- Save the settings, and see if the front-end has hidden the favorite button
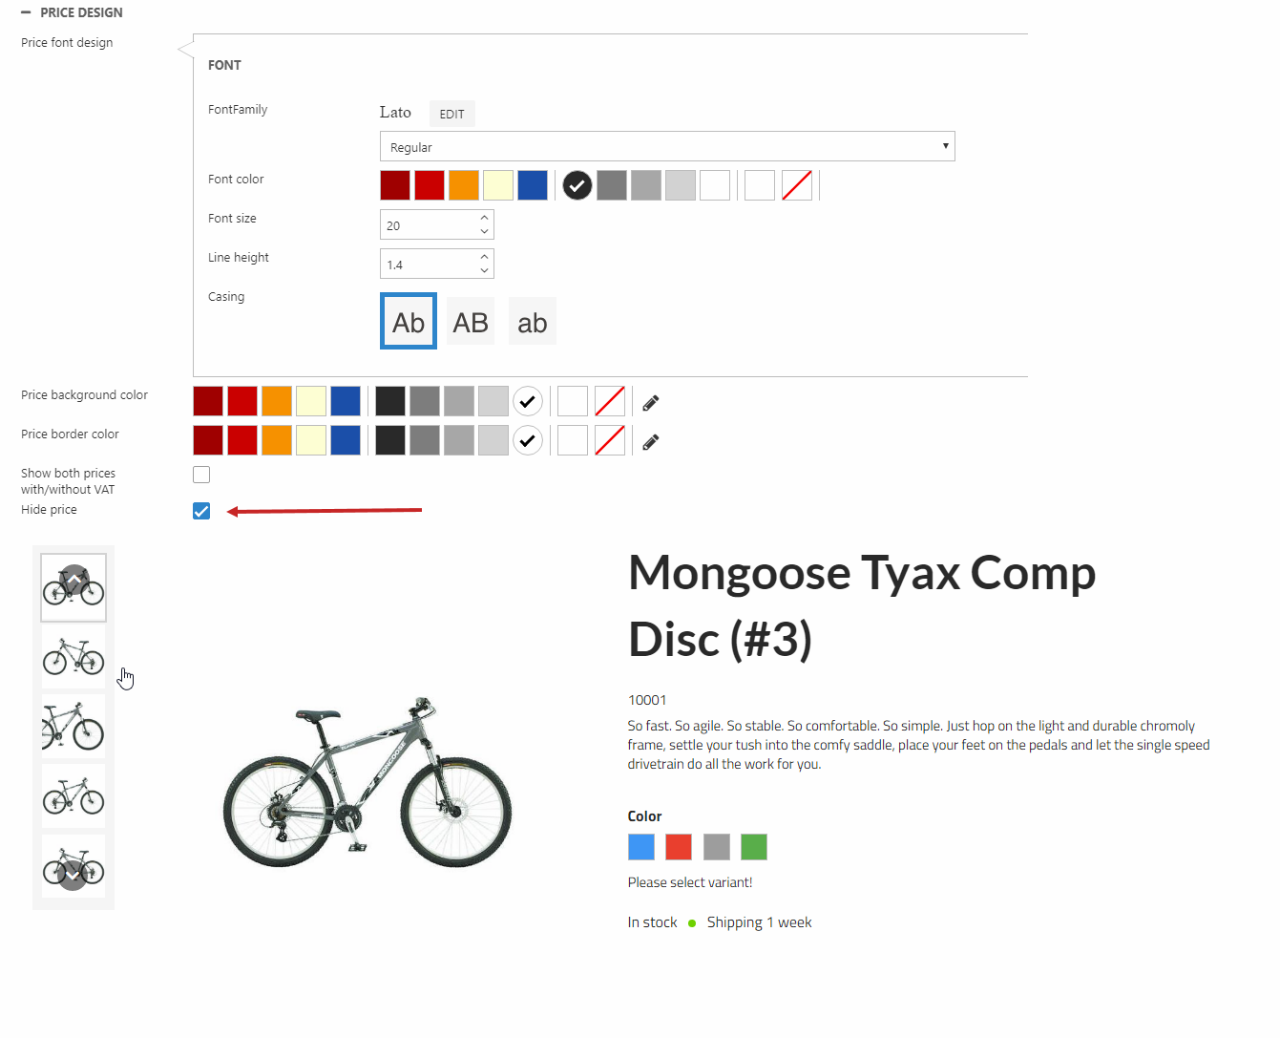
The purpose of the digital warehouse is to provide the users with files they can use for promotion or other activities. Therefore, a price should not be present when the users view the files that are uploaded to the solution. To remove the pricing, please follow these steps:
- Go to the website settings for price design in the product page tab
- Tick the Hide price checkbox (Figure 13.3)
- Save the settings
- Check the frontend and make sure the price is hidden from the product page
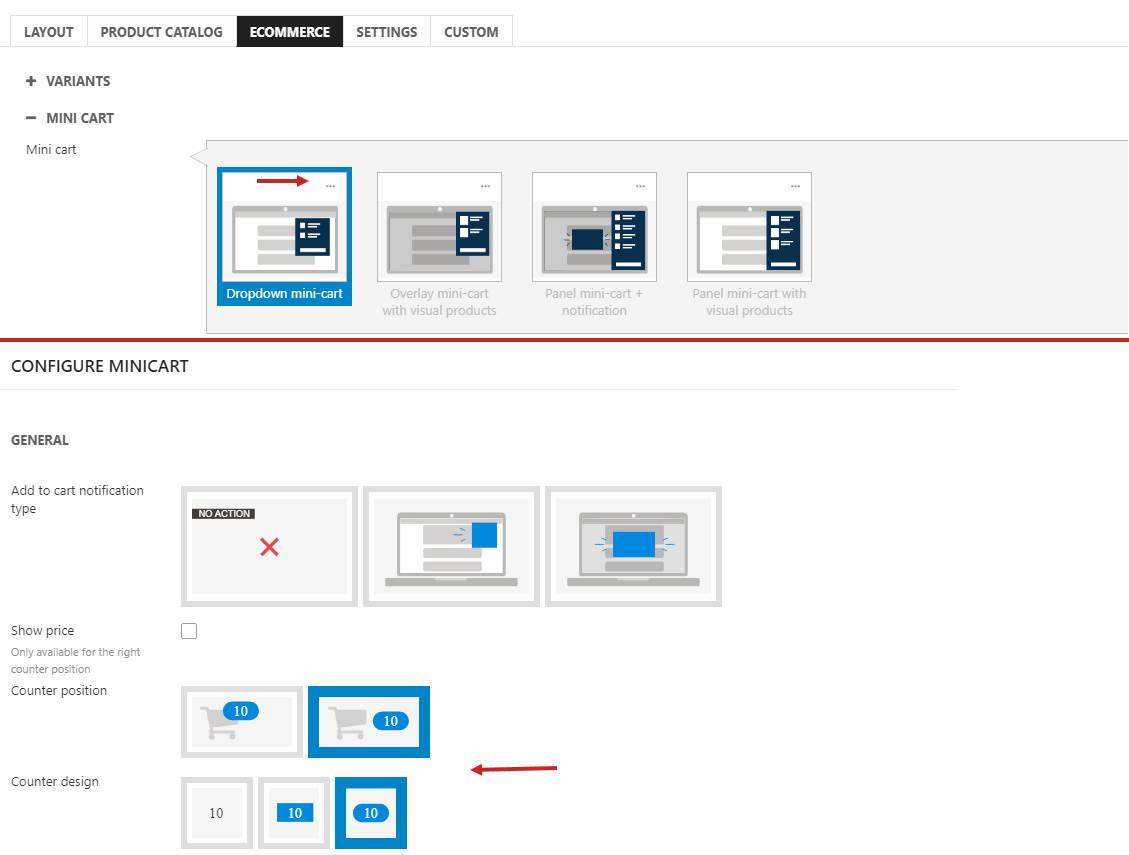
You can also change the appearance of the mini cart counter.
- Enter the website settings for the mini cart in the ecommerce tab
- Open the settings for the preset you already use (Figure 14.1)
- Here you can change the counter position, counter design and background/font color
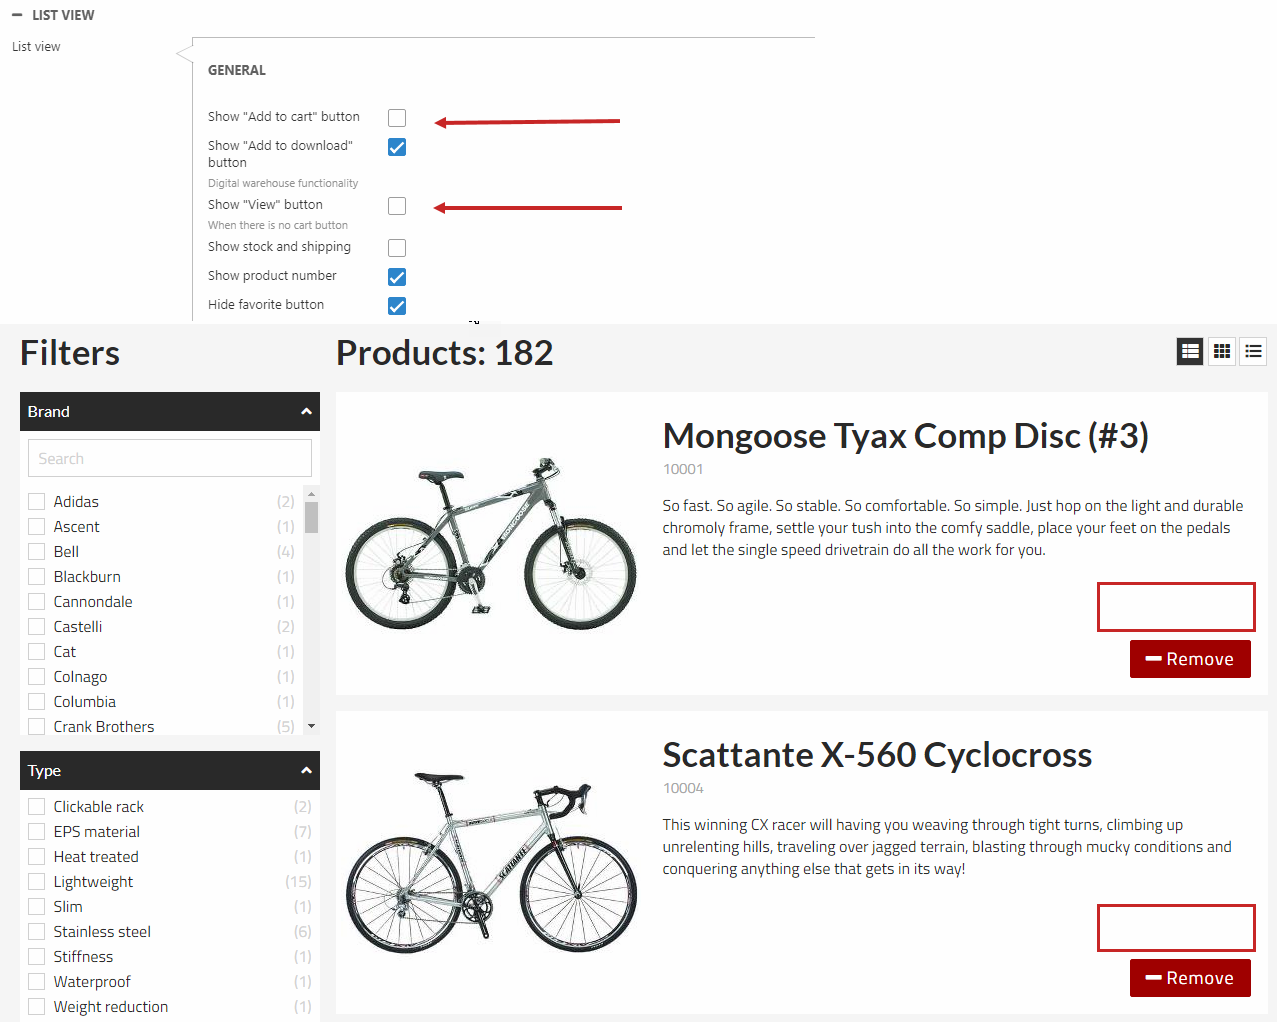
List view
The settings for the list view must be set correctly for the digital warehouse. Therefore, the Add to cart and View buttons should be hidden, since they serve no purpose here.
- Go to the website settings for list view in the product list tab
- Make sure the checkboxes for Show "Add to cart" button and Show "View" button are unchecked
- Save the settings
- Check the frontend to see if the buttons have disappeared as shown in Figure 15.1
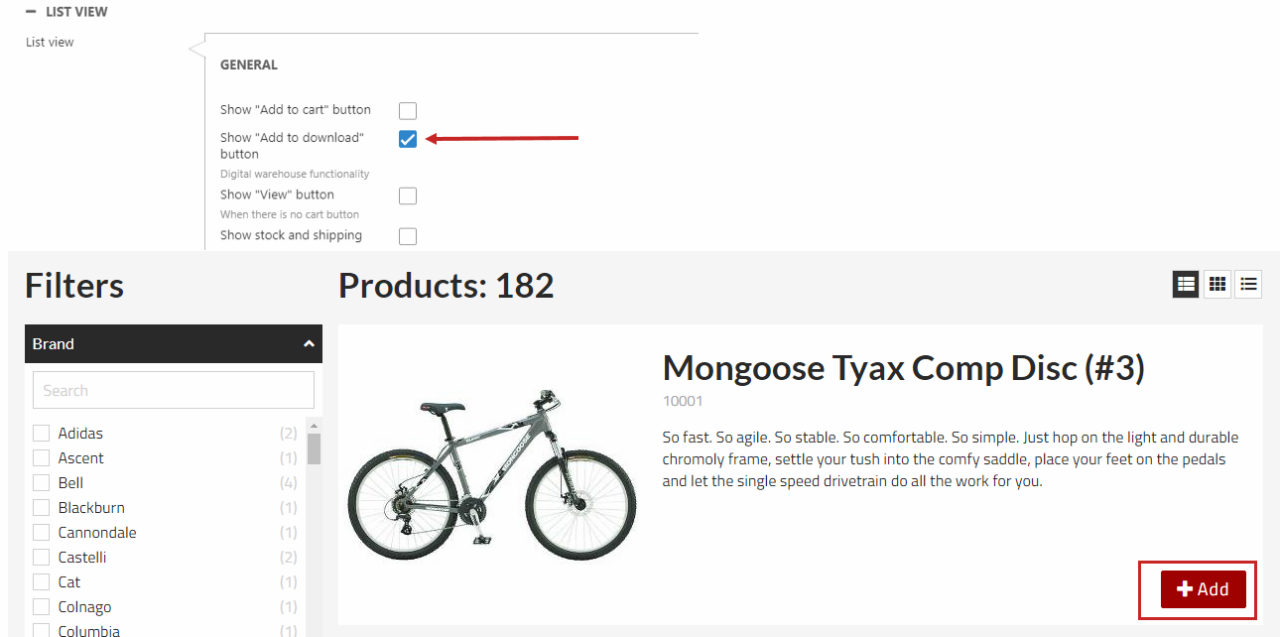
Now to add enable feature that actually makes your solution a digital warehouse. To add the needed functionality to your digital warehouse, an Add to download button is essential for your solution to work properly. This button enables the user to download multiple files in the format they want.
- Still in the list view settings, tick the Show "Add to download" button checkbox so it is enabled
- Save the settings
- Check the frontend to see if the button is present as shown in Figure 15.2
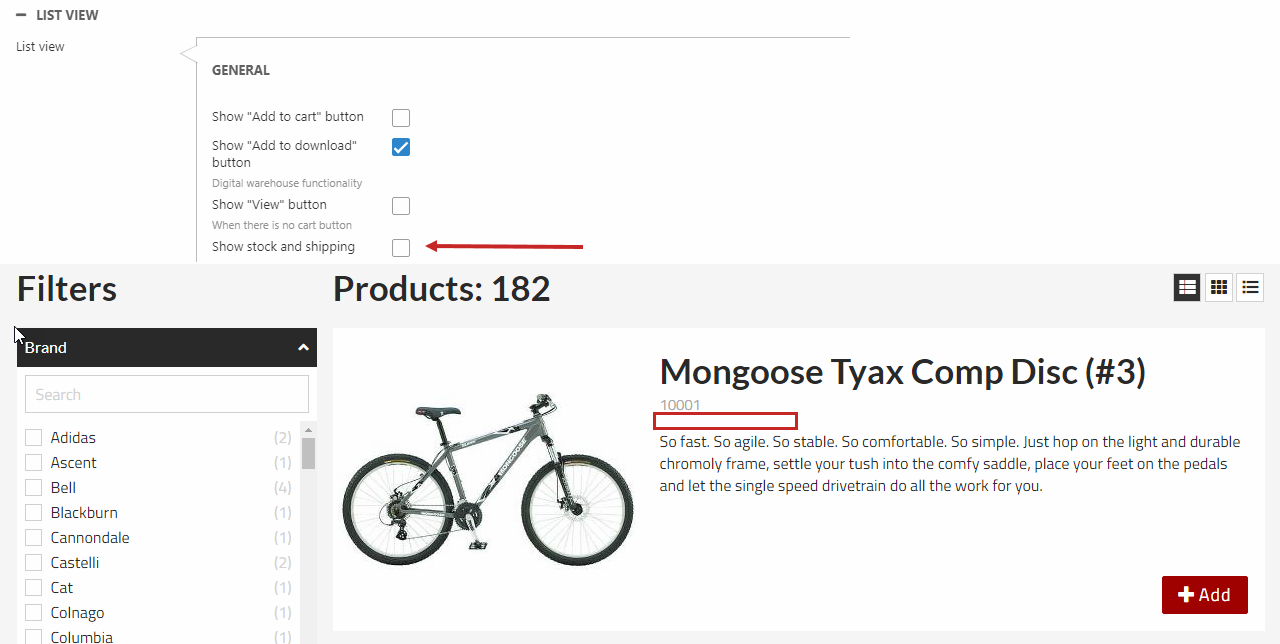
Shipping and stock information is redundant information that serves no purpose on your digital warehouse. Therefore, these fields should be hidden from the users. To do that:
- Also in the list view settings, make sure the Show stock and shipping checkbox is unchecked
- Save the settings
- The shipping and stock information should have disappeared from the frontend (Figure 15.3)
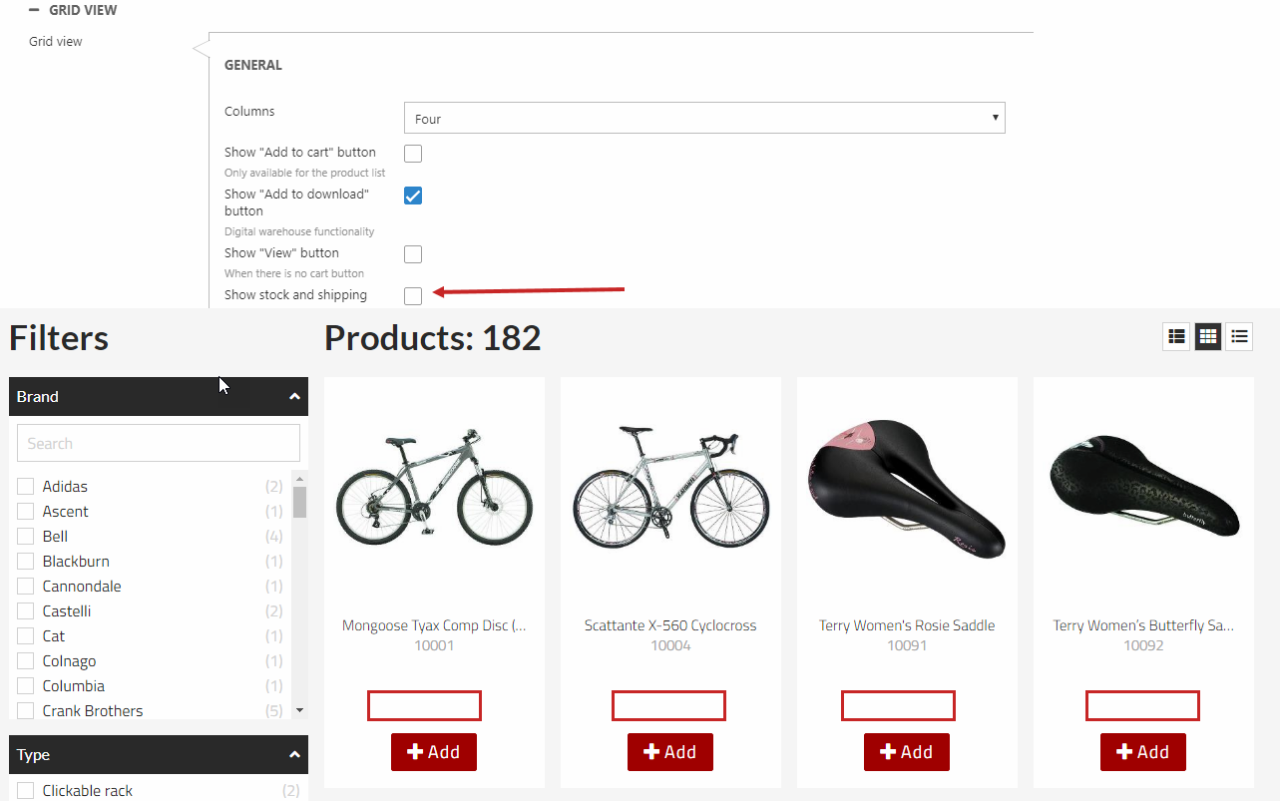
Grid view
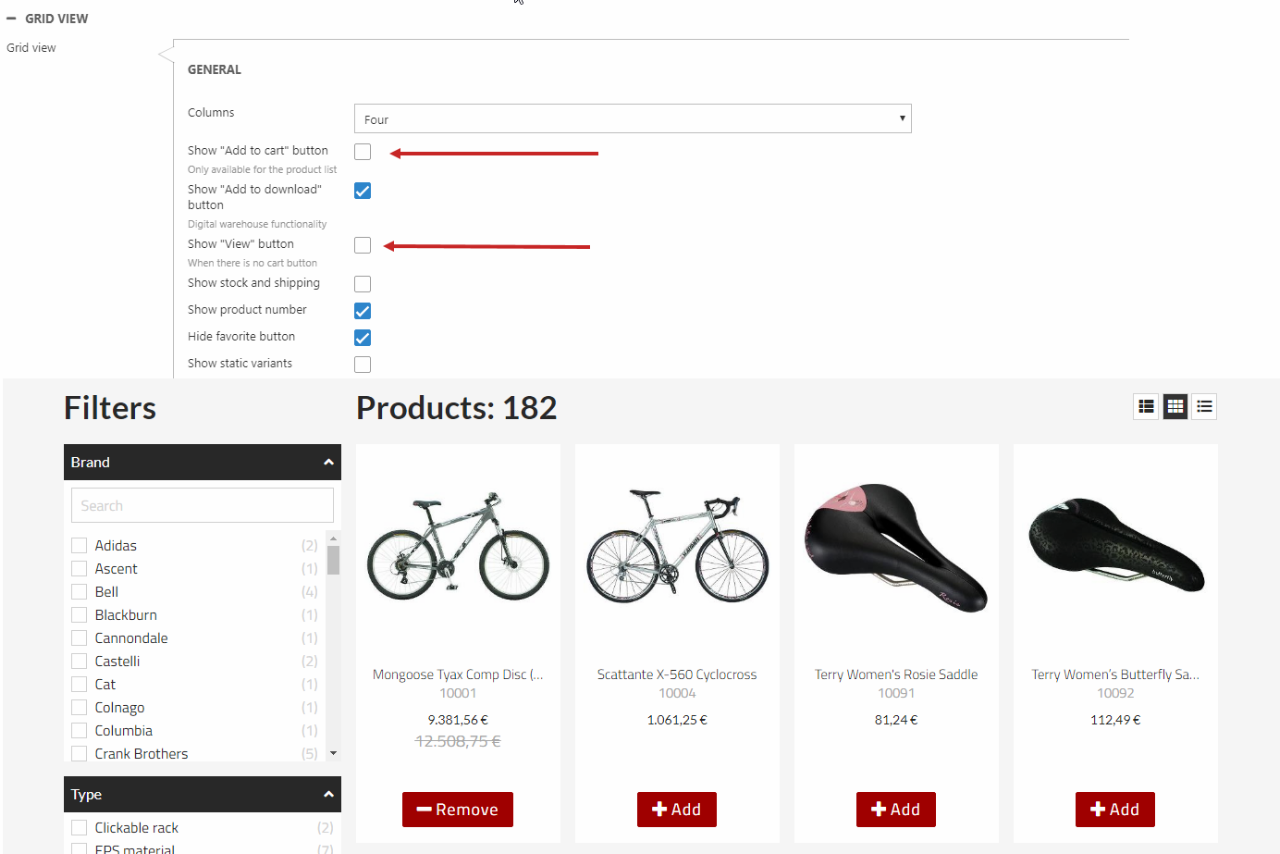
The settings for the grid view must be set correctly for the digital warehouse. Therefore, the Add to cart and View buttons should be hidden, since they serve no purpose here.
- Go to the website settings for grid view in the product list tab
- Make sure the checkboxes for Show "Add to cart" button and Show "View" button are unchecked
- Save the settings
- Check the frontend to see if the buttons have disappeared as shown in Figure 16.1
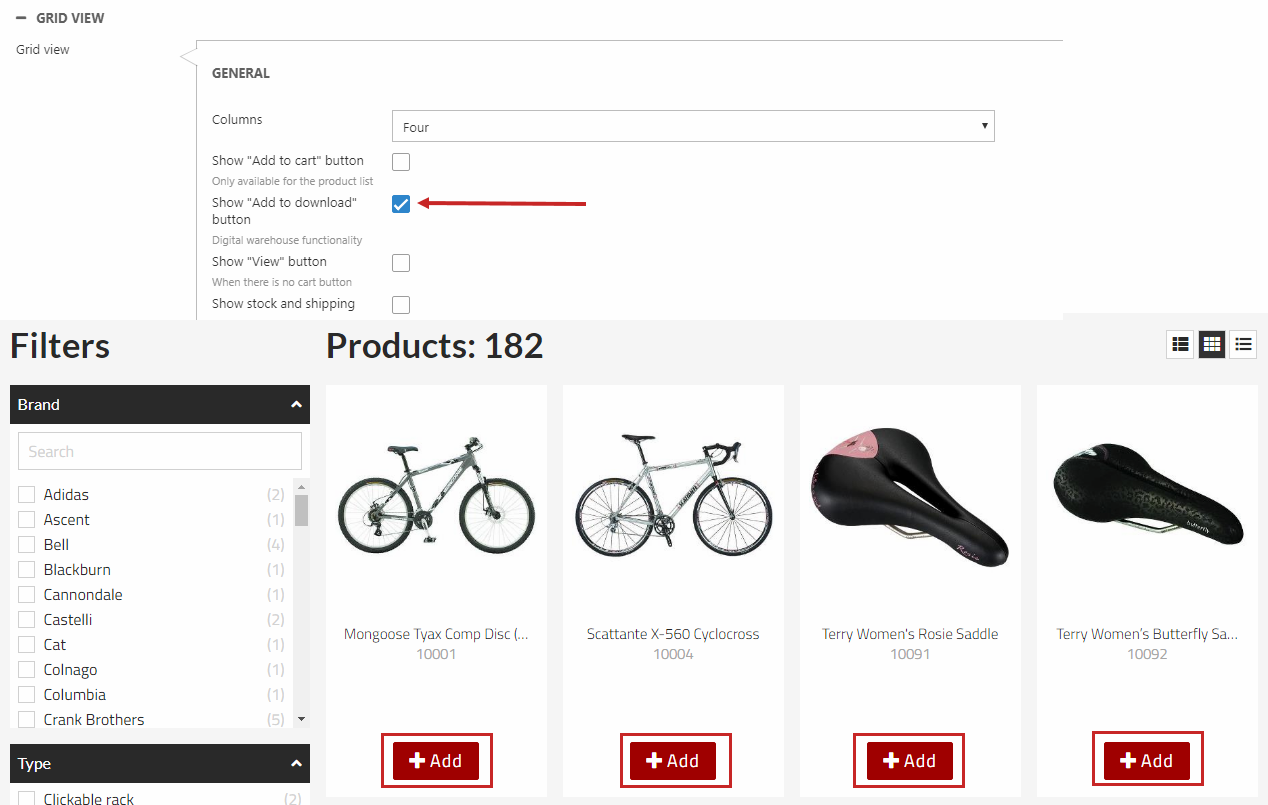
Now to add enable feature that actually makes your solution a digital warehouse. To add the needed functionality to your digital warehouse, an Add to download button is essential for your solution to work properly. This button enables the user to download multiple files in the format they want.
- Still in the grid view settings, tick the Show "Add to download" button checkbox so it is enabled
- Save the settings
- Check the frontend to see if the button is present as shown in Figure 16.2
Shipping and stock information is redundant information that serves no purpose on your digital warehouse. Therefore, these fields should be hidden from the users. To do that:
- Also in the grid view settings, make sure the Show stock and shipping checkbox is unchecked
- Save the settings
- The shipping and stock information should have disappeared from the frontend (Figure 16.3)
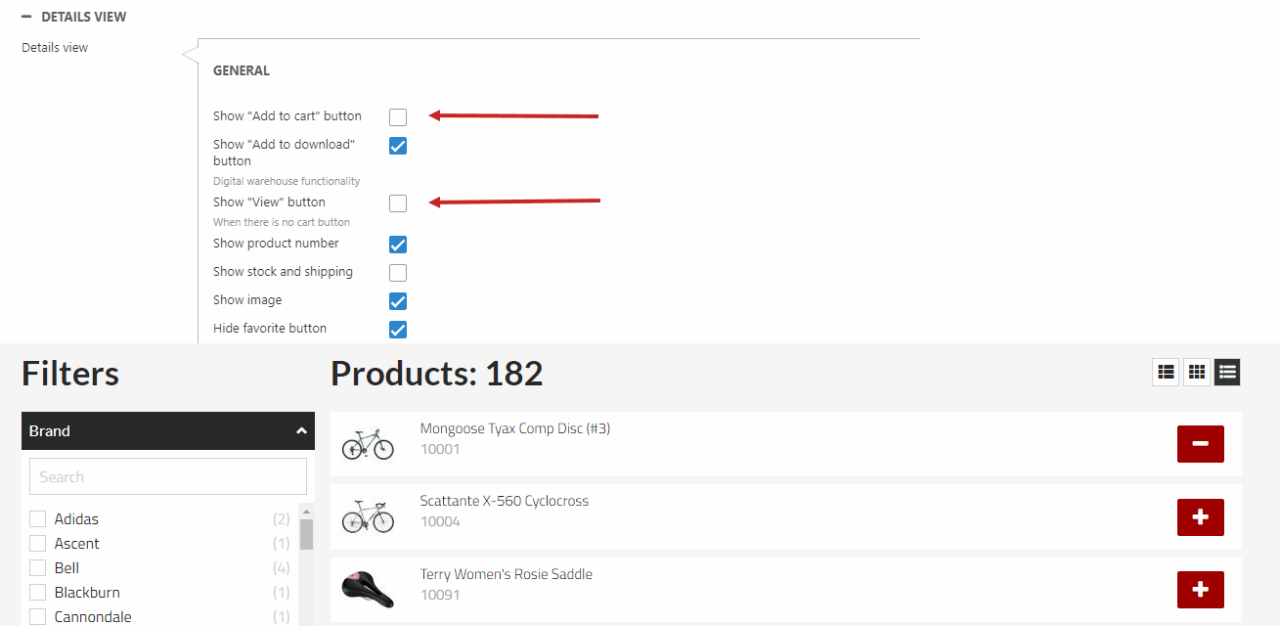
Details view
The settings for the list view must be set correctly for the digital warehouse. Therefore, the Add to cart and View buttons should be hidden, since they serve no purpose here.
- Go to the website settings for details view in the product list tab
- Make sure the checkboxes for Show "Add to cart" button and Show "View" button are unchecked
- Save the settings
- Check the frontend to see if the buttons have disappeared as shown in Figure 17.1
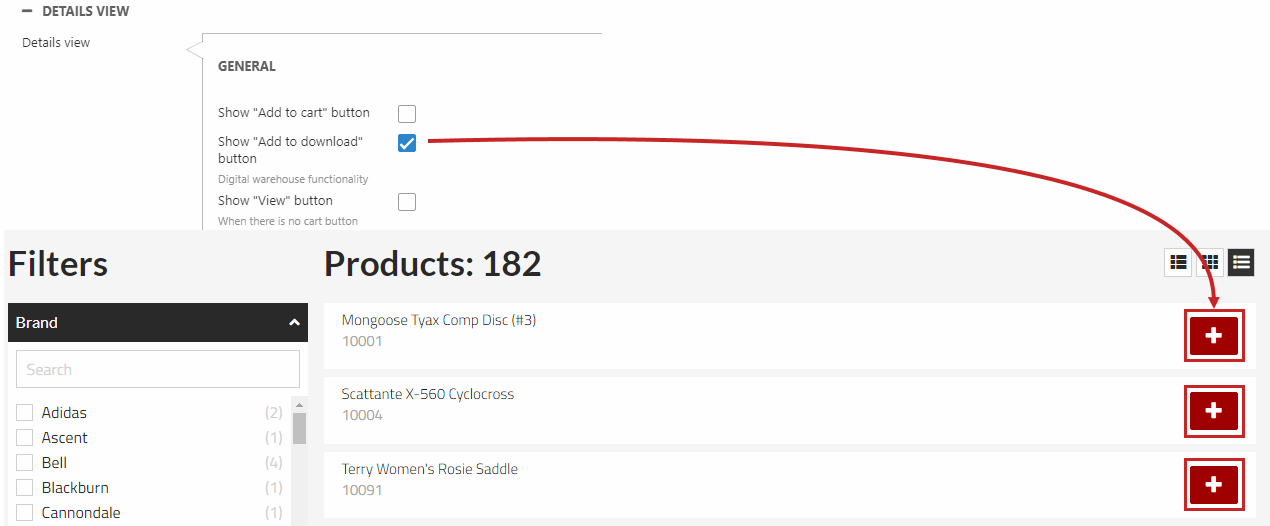
Now to add enable feature that actually makes your solution a digital warehouse. To add the needed functionality to your digital warehouse, an Add to download button is essential for your solution to work properly. This button enables the user to download multiple files in the format they want.
- Still in the details view settings, tick the Show "Add to download" button checkbox so it is enabled
- Save the settings
- Check the frontend to see if the button is present as shown in Figure 17.2
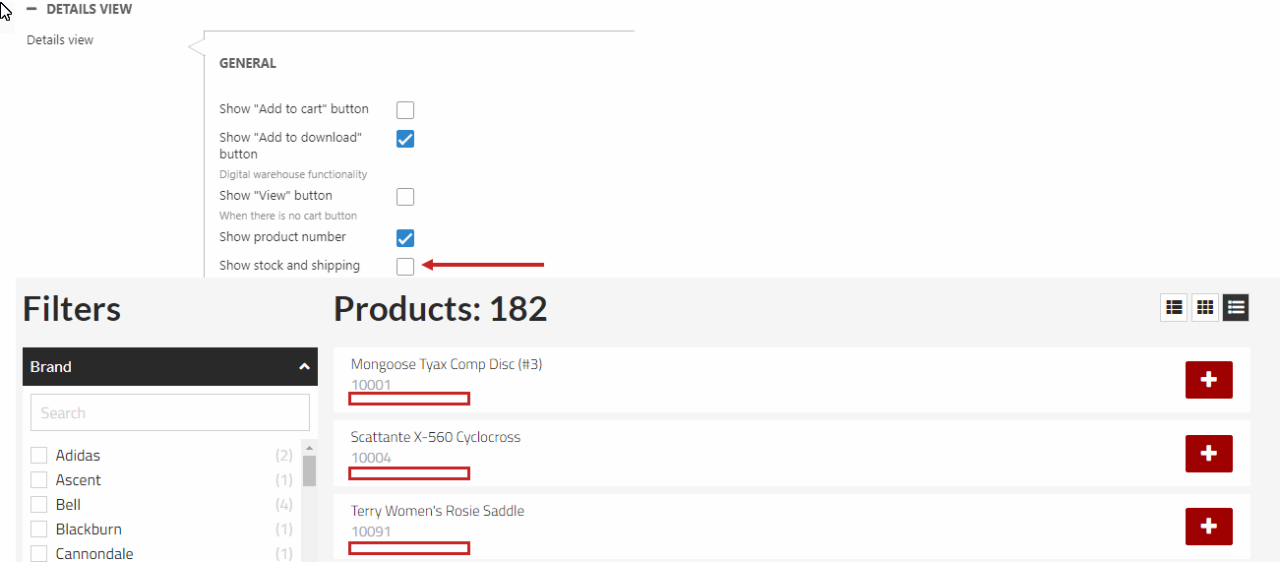
Shipping and stock information is redundant information that serves no purpose on your digital warehouse. Therefore, these fields should be hidden from the users. To do that:
- Also in the details view settings, make sure the Show stock and shipping checkbox is unchecked
- Save the settings
- The shipping and stock information should have disappeared from the frontend (Figure 17.3)
Compatibility with Printable Pages
The Digital warehouse uses the concept Printable Pages. This means that you easily, can create quality PDF files of your product, without investing a lot of time into it. You can create PDF’s from the Download cart PDF or Product Page PDF. To get started, locate your tools folder and unfold it as shown on Figure 19.1:
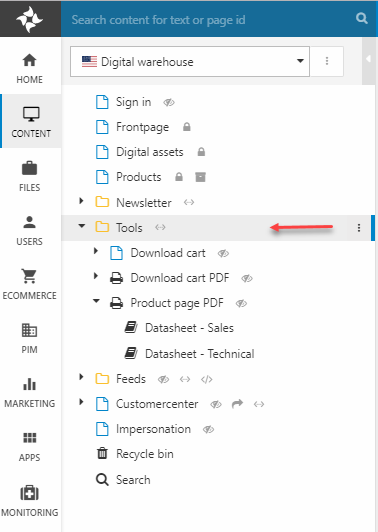
Download cart PDF
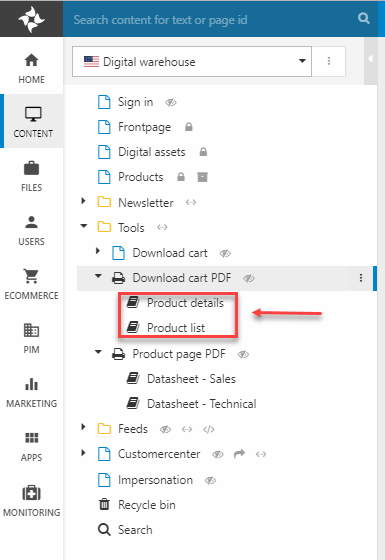
As you can see, the tools folder contain two different Printable Pages, there is the Download cart PDF and Product page PDF. Firstly, lets take a look at the Download cart PDF. The Download cart contains two pages, which are the Product details and Product list as shown on Figure 20.1.
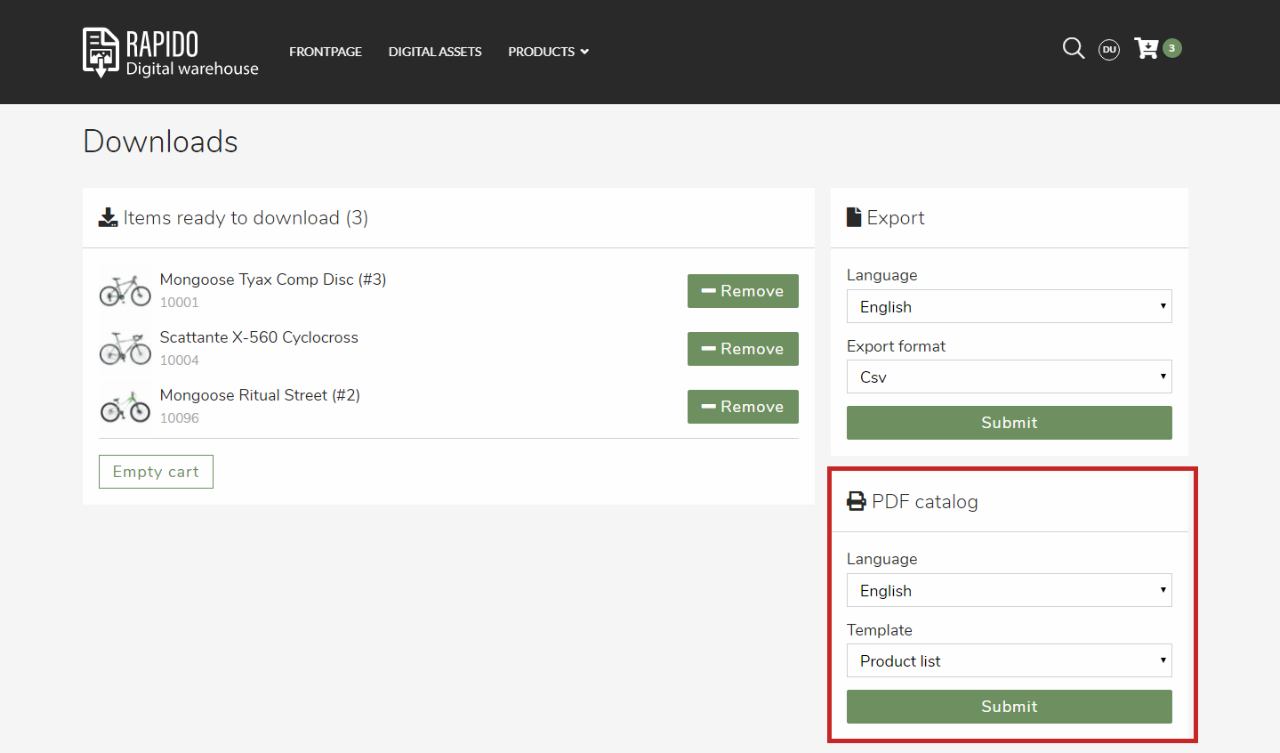
A frontend example on the download cart page is shown below illustrating the two different papers, which can be chosen from the PDF catalog section template dropdown.
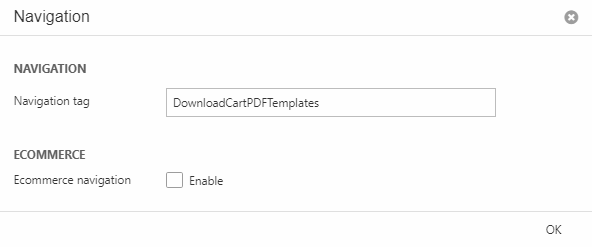
This feature only works if you have configured your navigation tag. To do that, follow these steps:
- Right-click on your ''Download cart PDF'' and click properties
- After entering the properties click on the Options tab from the ribbon
- Then click on Navigation and make sure your tag matches the one on Figure 20.3.
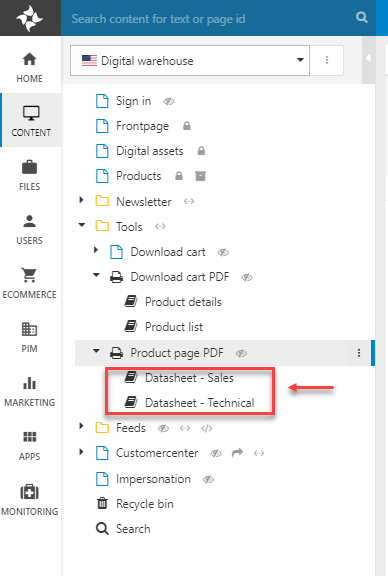
Product page PDF
In this section the focus will be on the Product page PDF. To see where it's located in the backend, look at Figure 21.1.
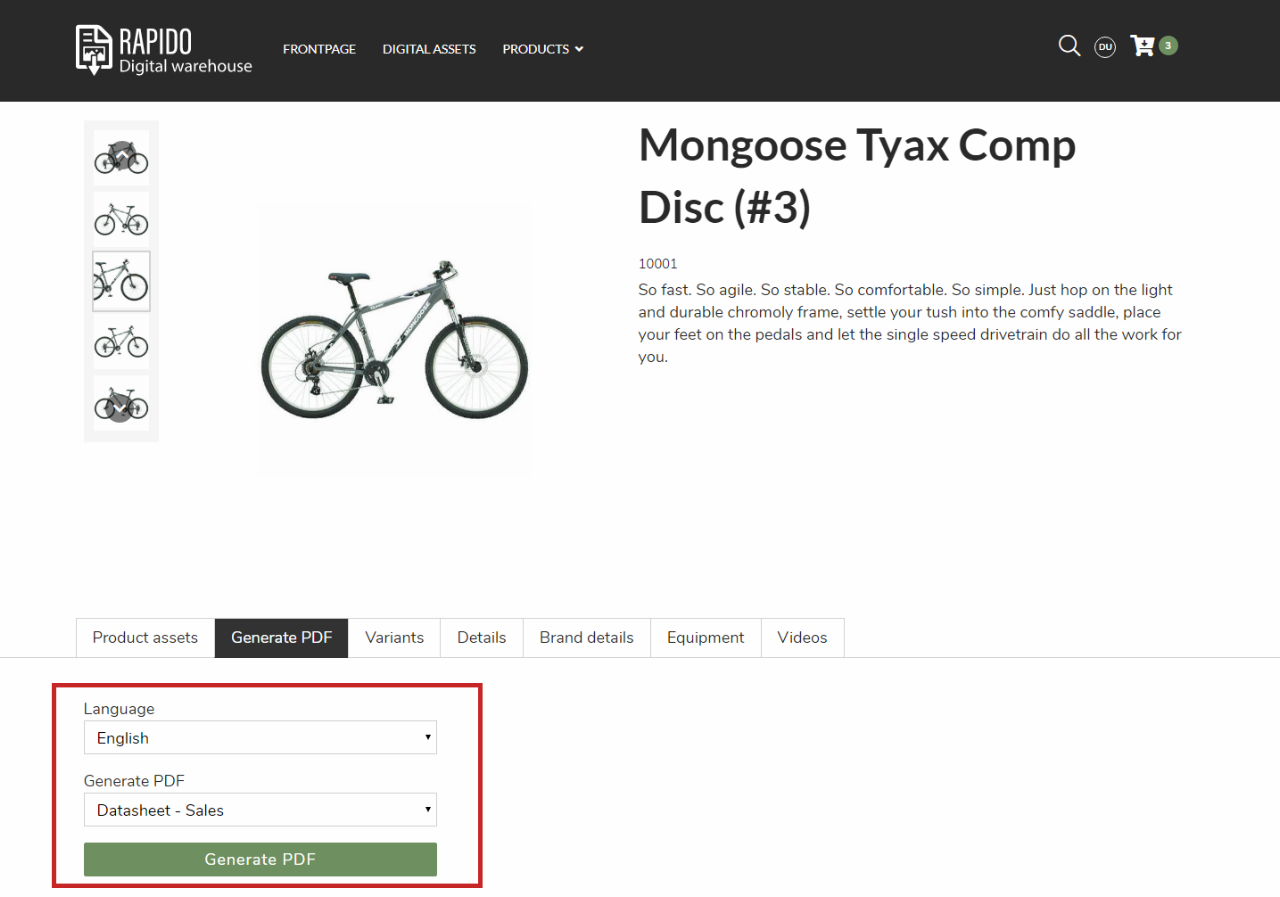
To see how it looks in frontend, go to your product list, and enter a product page. See Figure 21.2 for illustration of this feature. As seen on the image, under Generate PDF there is a dropdown where the PDF options can be selected, you can choose between:
- Datasheet - Sales
- Datasheet - Technical
In order to set this up correctly, remember to configure the Navigation tag. To do so, follow these steps:
- Right-click on your ''Product page PDF'' and click properties
- After entering the properties click on the Options tab from the ribbon
- Then click on Navigation and make sure your tag matches the one on Figure 19.3.
