
Get started with Dynamicweb
Dynamicweb is a CMS system with many useful tools. This guide will help you get the basics right and get you started.
A Dynamicweb solution consists of two things:
- The frontend is what everyone else outside can see – the outward look of your website that you want to look pretty.
- The backend is where all administrative work is done such as adding pages, paragraphs, or uploading files and images.
To work with all of the tools and options for creating and managing content on your website, you must login to the Dynamicweb administration backend (Figure 1.1).
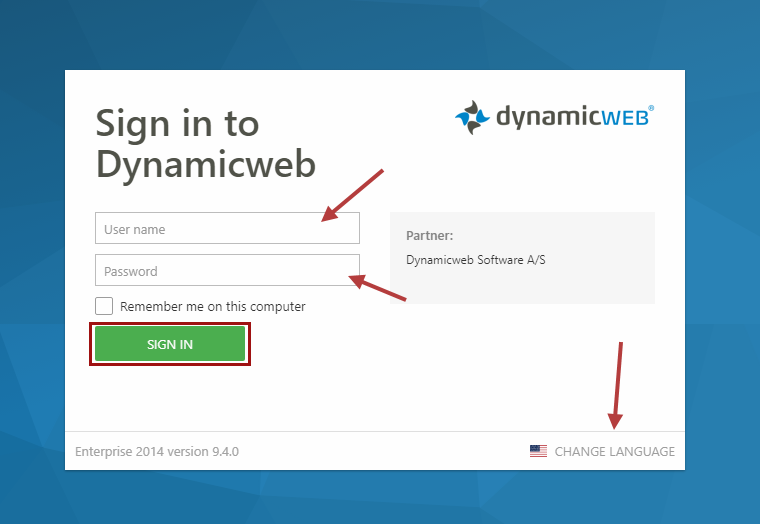
To access this login screen, you must write the address of your website in a browser (we recommend Chrome) followed by /admin - like this:
- www.yourwebsite.com/admin
Once you see the login screen, write your username and password and optionally change the backend language by clicking Change language.
Finally, click Sign in.
Administration Interface
Once you have logged in, you will see the Dynamicweb administration interface, also referred to as the backend (Figure 2.1).
The backend consists of an Area menu with different nodes (1) and a Content pane (2). The Content pane is where you will do work, such as create new paragraphs, change settings, etc.
In this screenshot, the content pane contains a dashboard with useful and customizable information displayed by widgets.
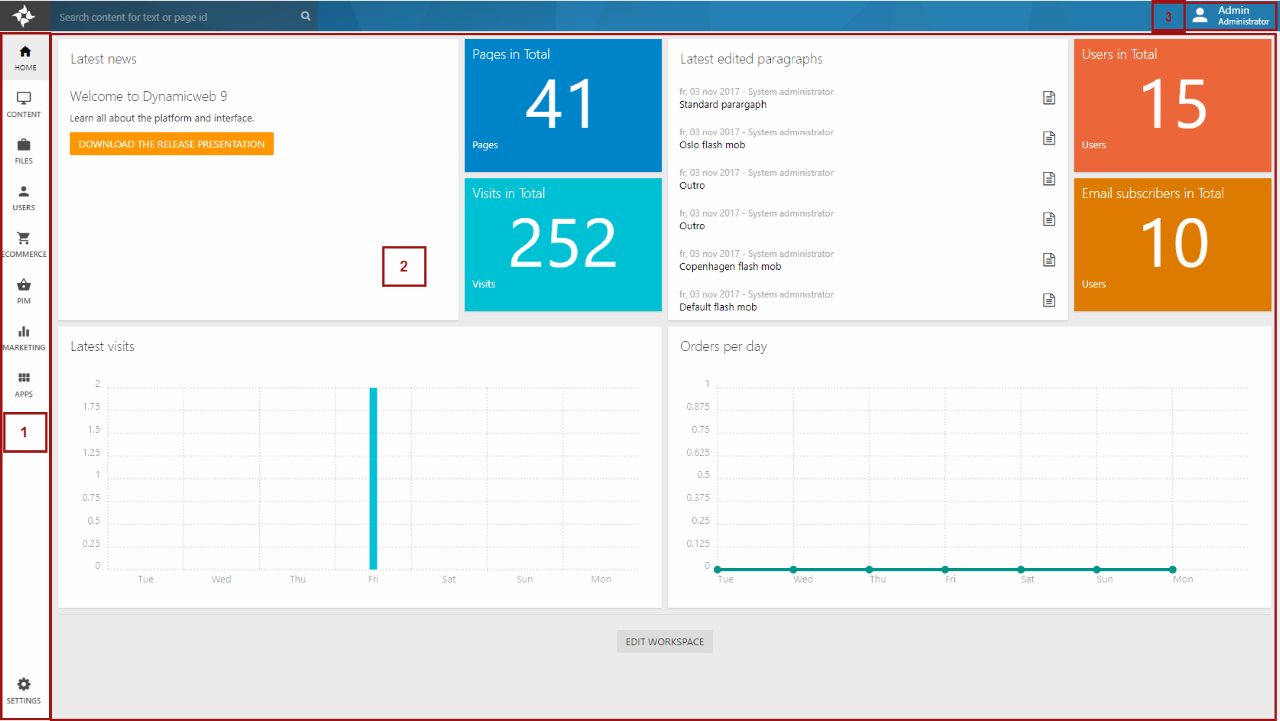
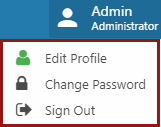
In the upper right corner (3), you can log out, edit your password, and change your user profile (Figure 2.2).
If you click one of the nodes in the Area menu, an Area tree will appear (Figure 2.3). In this screenshot, the Content tree has been opened – it contains information about the content of your website.
Pages and paragraphs
A page is a way to structure your content – for instance, you can have an ‘about’ page, a ‘my profile’ page, and a ‘shop’ page.
A page is usually shown in a menu or navigation in frontend, and is responsible for the title in frontend and its URL address.
The content on a page is added using paragraphs – you can add an infinite number of paragraphs to a page (resulting in a very long page in frontend). Paragraphs can contain text, images, and apps – e.g. a product catalog, a forum, and so on.
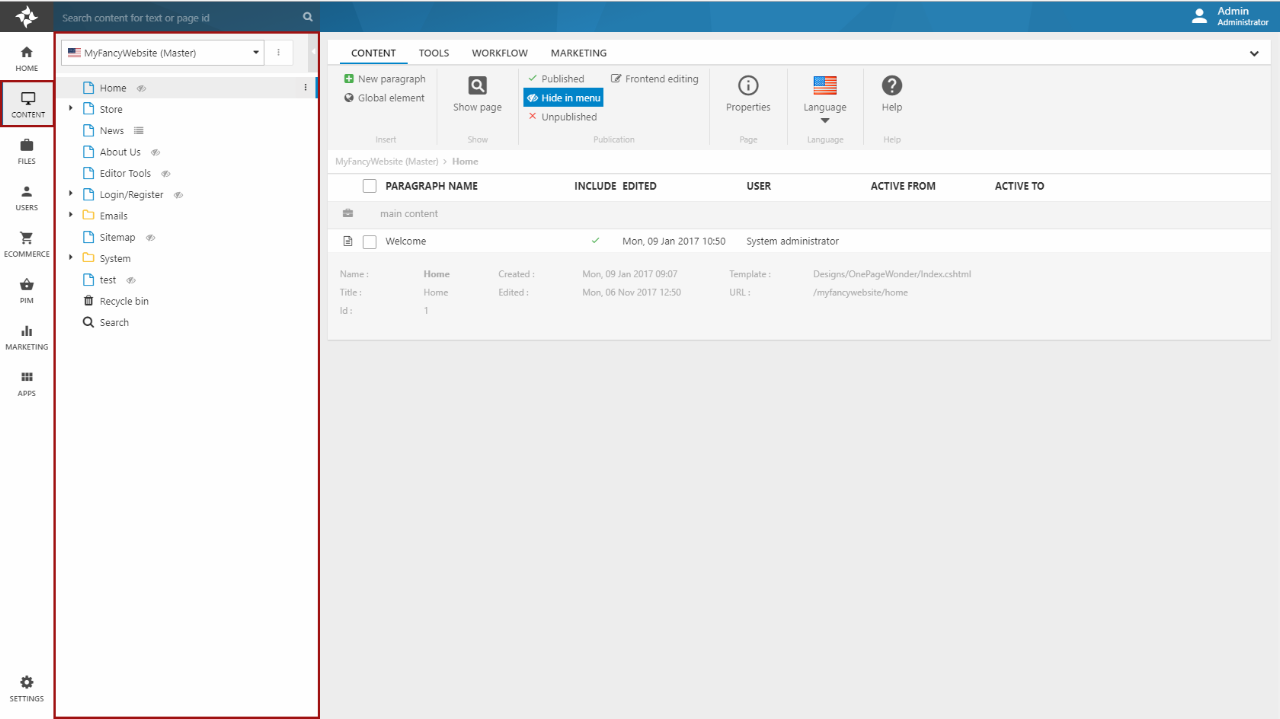
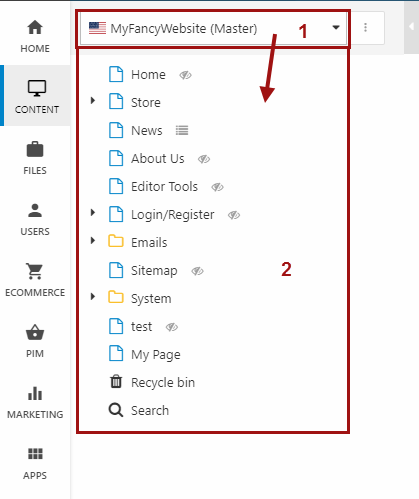
To work with pages and paragraphs click the Content area to open the Content tree (Figure 3.1):
- At the top of the Content tree is a dropdown menu with all of your websites (1). Select the website you want to create/edit pages and paragraphs for.
- When a website is selected, a list with the associated pages and folders is rendered below (2).
- At the bottom of the page list, you can find the Recycle bin and the search tool:
- The Recycle bin is a tool to find and restore deleted pages and paragraphs.
- The search tool is a tool to search for pages and paragraphs using either a Page ID, Paragraph ID or a text string.
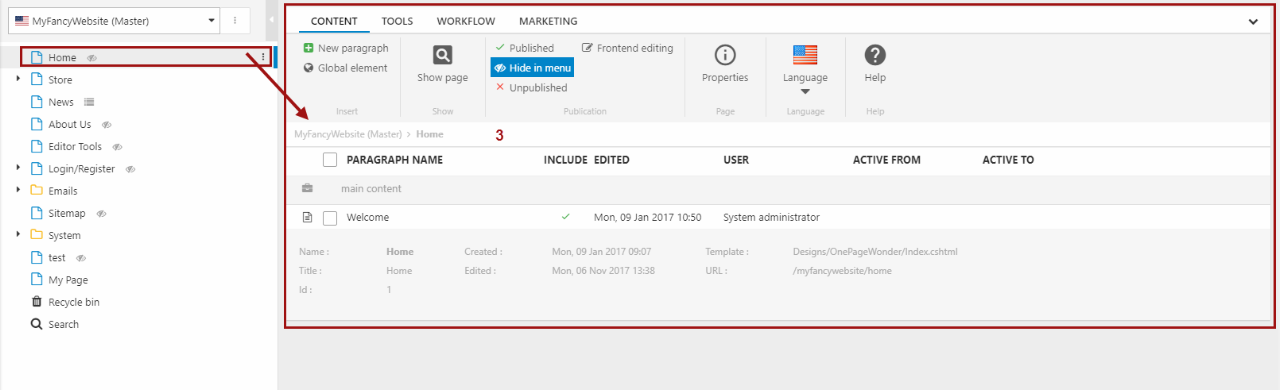
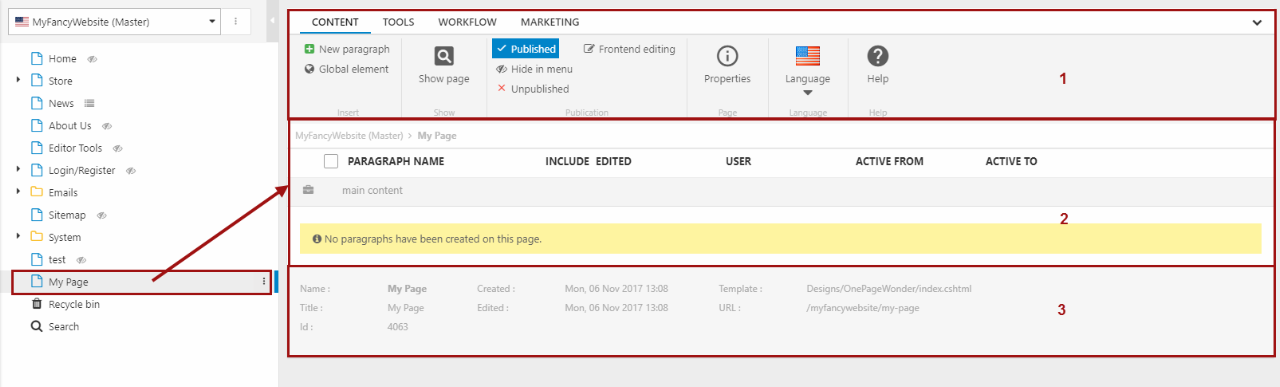
When you click one of the pages, details about the specific page and a list with its associated paragraphs is shown in the page view (3) (Figure 3.2).
As you can see, the website MyFancyWebsite contains a number of pages e.g. Home, Store and News. When the page Home is selected, its content is shown in the Content page. This page contains a single paragraph called Welcome.
Create a page
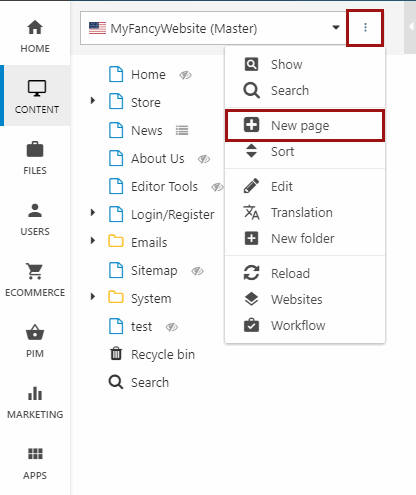
To create a new page, open the Content tree menu and click New Page (Figure 4.1).
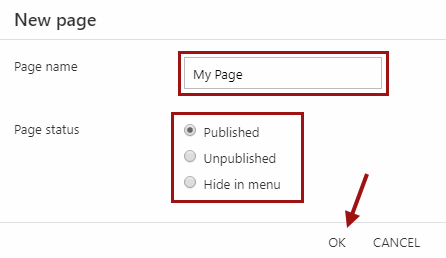
After clicking New Page:
- Select Blank Page as your page type
- Enter the title of the page and
- Choose whether you want your new page to be published, hidden in menu or unpublished (Figure 4.2)
- Click OK
Some solutions may have more than one page type, but that varies from solution to solution.
The content pane will now change to show the page view of the new page (Figure 4.3).
The page view consists of:
- A ribbon bar (1) with tools related to the page
- An empty paragraph list (2) – this is where you add and organize the paragraphs containing your content. Notice the Content-header – this is a content placeholder. Content placeholders are used to organize paragraphs.
- A page footer (3) which contains useful information about the page, such as the page ID and the template which is used to render the content in frontend.
Create a paragraph
Paragraphs are used to add content – text, images, and the like – to a page.
To add a new paragraph:
- Open the page
- Click New paragraph in the ribbon bar (Figure 5.1) - you may also need to select the Paragraph type.
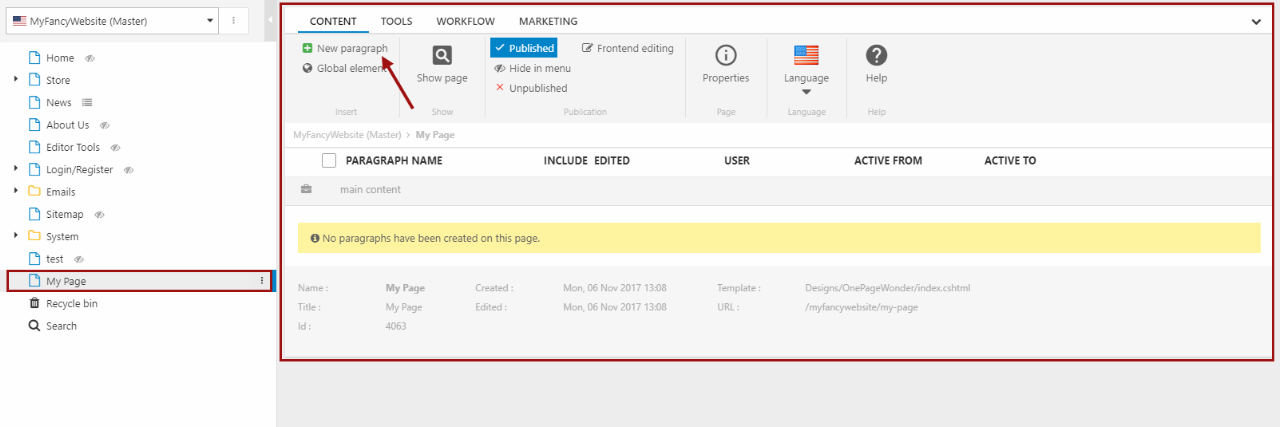
The Content pane now shows the paragraph view for the new paragraph (Figure 5.2).
The paragraph view consists of:
- A ribbon bar (1) with tools related to the paragraph
- An area (2) containing a headline field, a rich text editor, an image selector, and an image settings section – this is where you add content to the paragraph
- A footer (3) containing useful information about the paragraph – chiefly the paragraph ID and the template used to render content from this paragraph
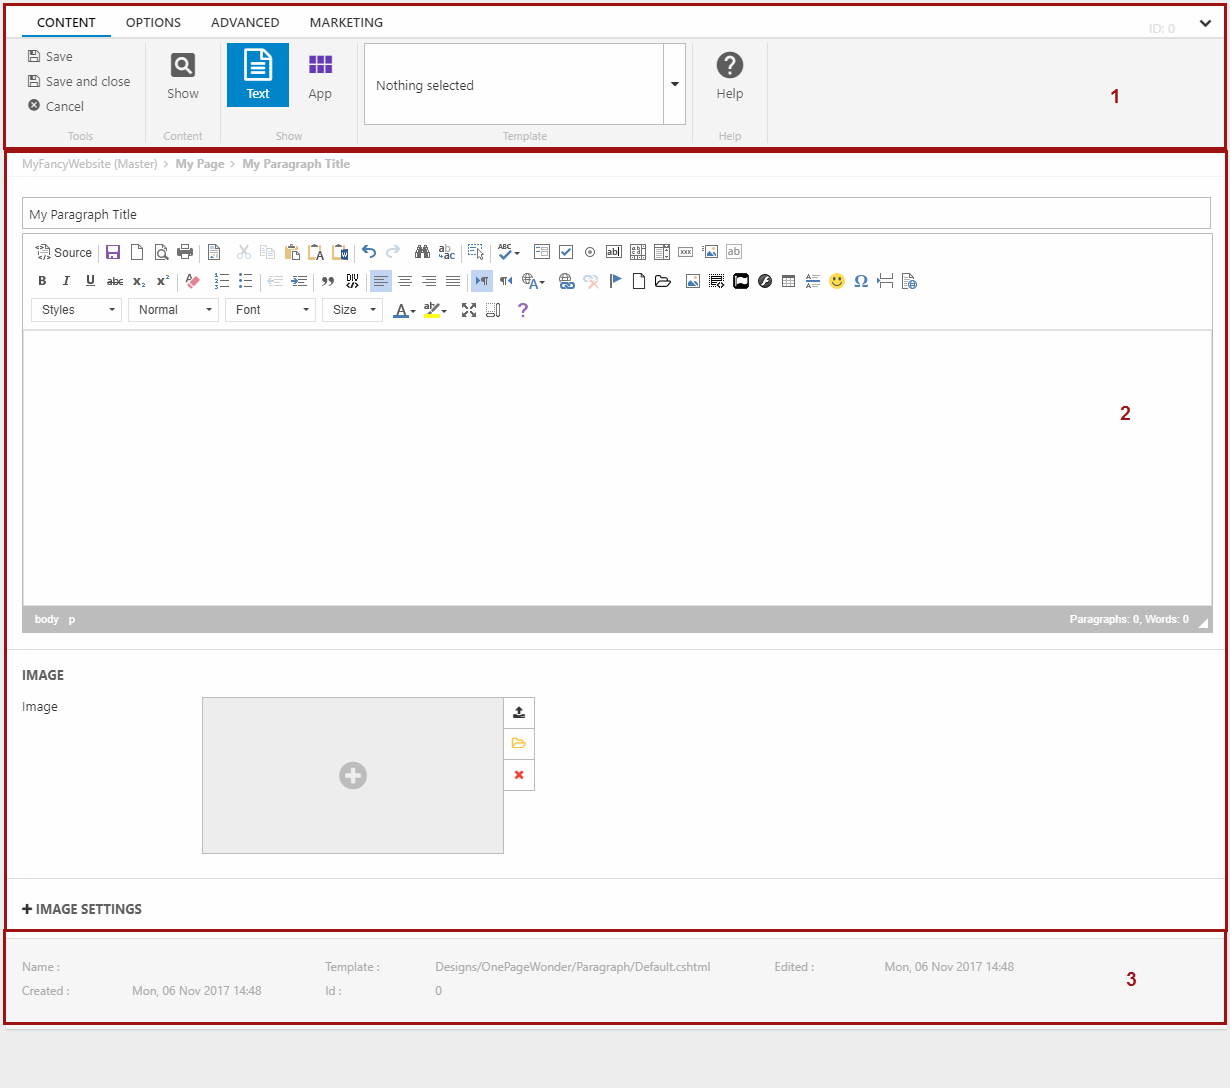
Here you can:
- Write a title
- Use the rich-text editor to add text
- Select or upload an image using the image selector
When you’re done, click Save or Save and close in the ribbon bar.
Publish states
You can set the publish state for a page. This is useful if you want to work on a page, put keep it hidden from frontend users. You can hide pages so they won’t be seen in the navigation pane in frontend but can still be accessed through a sitemap, or you can hide them completely.
Open the Content tree by clicking the Content node, and click on your page to open the page view (Figure 6.1).
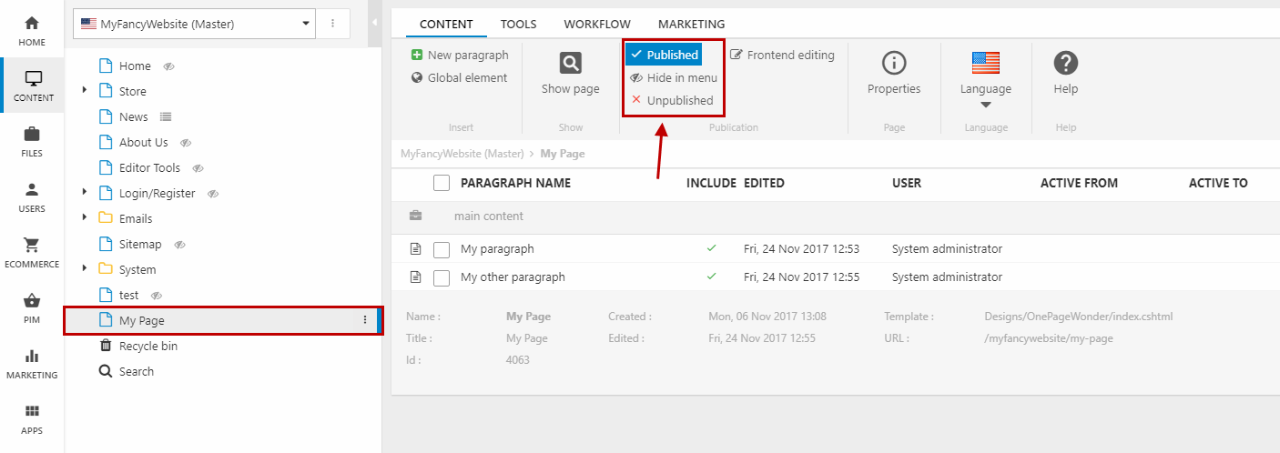
In Publication section in the ribbon bar, you can choose a publish state. By default, newly created pages are set as published on your website.
You can choose between the following publish states:
- Published – included in both the navigation and the sitemap
- Hide in menu – included in the sitemap and can be accessed using the direct URL
- Unpublished – not included i the navigation or the sitemap, and cannot be accessed using the direct URL
Recycle bin
In the Content tree, you can find the Recycle bin tool, where you can restore deleted pages, paragraphs and whole websites.
When clicking the Recycle bin tool, you are shown a list with all deleted items (Figure 7.1).
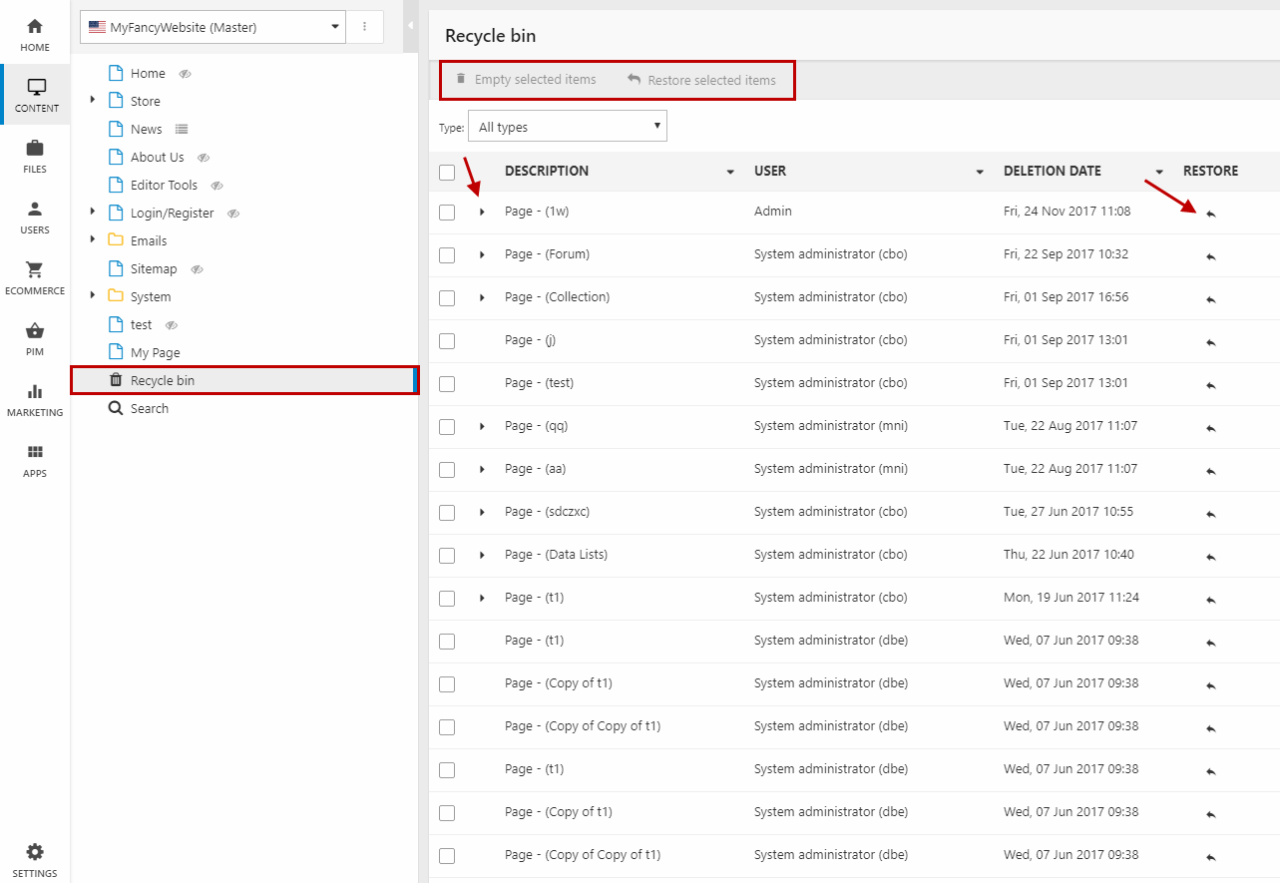
From here, you can:
- Restore items by clicking the arrow under Restore for separate items
- Select multiple items and either restore or delete them from the Recycle bin by clicking Restore/Empty selected items in the toolbar at the top
- If deleted pages have paragraphs, you can fold out the page to access its content.
You can also choose which types of content to show in the list by using the dropdown menu (Figure 7.2):
- Language/Area shows deleted websites
- Page shows deleted pages from all of your websites
- Paragraph shows all deleted paragraphs

Files
The File manager in Dynamicweb enables you to save and structure your images and other file types in an easy and intuitive manner.
To access the file manager, click the Files node in your Area menu – this will take you to the Files area (Figure 8.1).
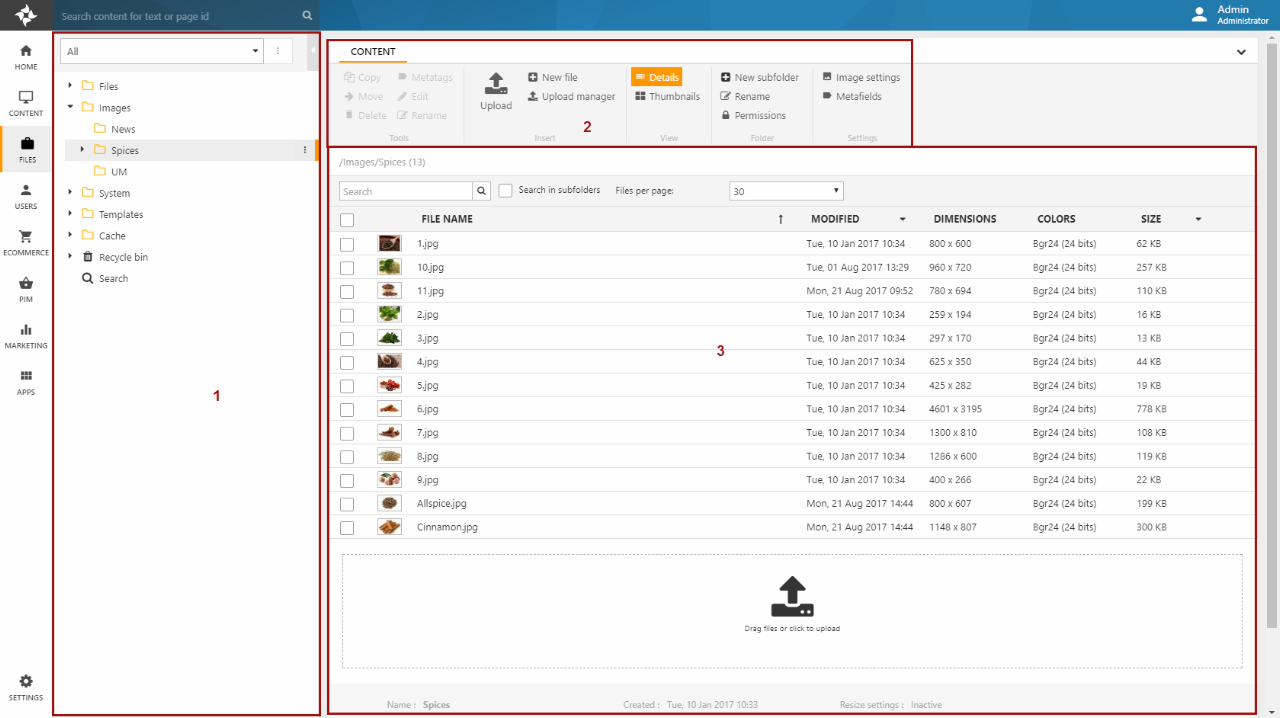
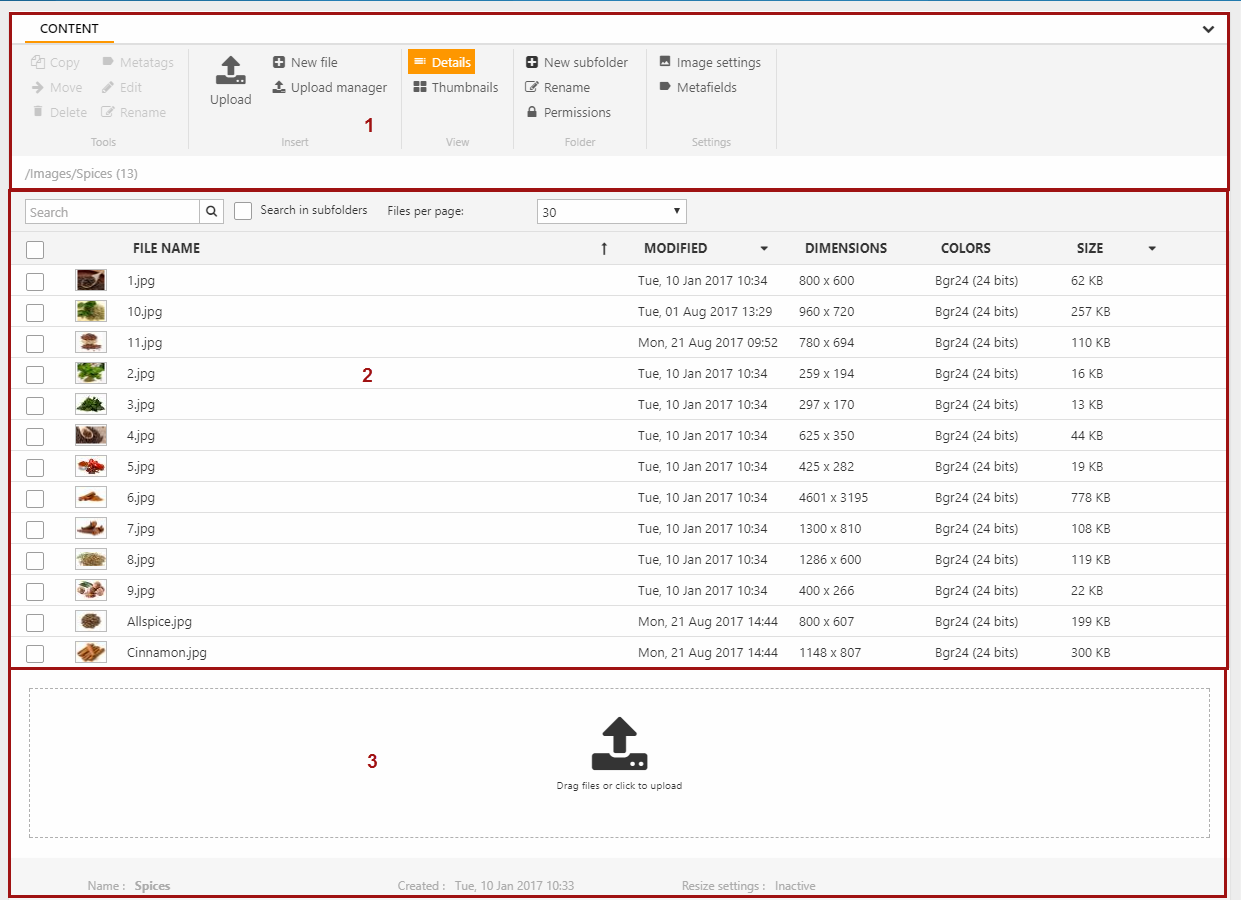
The files area consists of:
- The folder tree (1) from where you navigate to and from your folders and subfolders
- The file manager toolbar (2) which lets you perform various file or folder operations, e.g. upload files
- The content area (3) where the files within a particular folder are displayed and can be worked with
When you click on a folder in the folder tree, a list view of the folder content opens in the content pane (Figure 8.2). Broadly speaking, the content pane here consists of a file manager toolbar (1), a files list (2) with filtering at the top, and a file upload area (3).
Creating a folder
Your solution can only have the 5 default folders (Files, Images, System, Templates and Cache) as top folders. Other top folder must be created on the server.
To create a new folder from the backend, you must create a subfolder to one of the top folders.
To do so, click the menu button for the specific folder to open the folder menu. Click New subfolder.
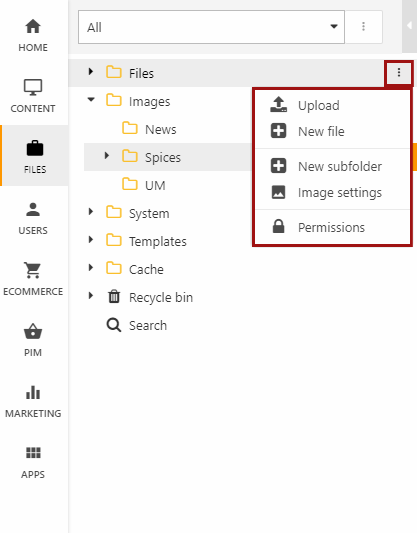
Name the folder and click OK. This opens the content area for the new folder (Figure 9.2).
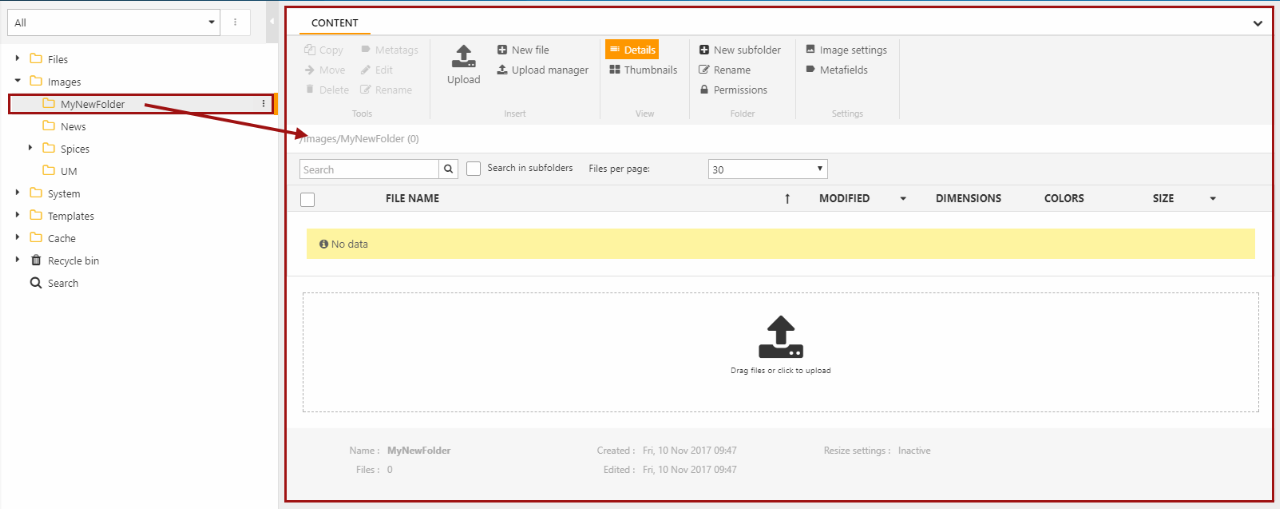
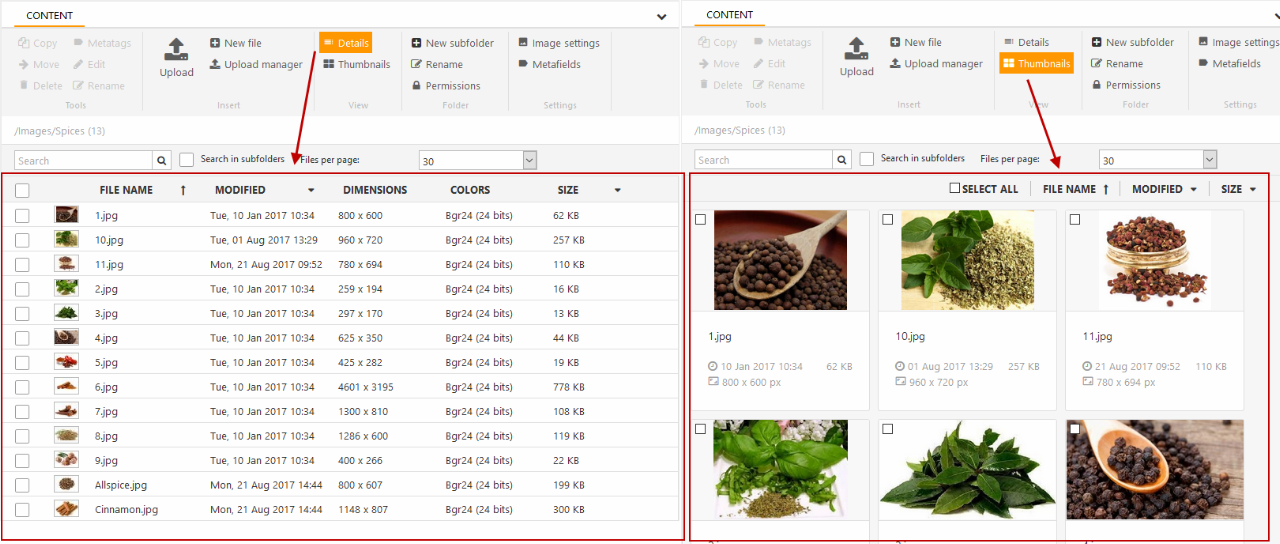
You can use the toolbar to switch between list view and thumbnails view (Figure 9.3) – for info on the more advanced features, please consult the manual.
Uploading files
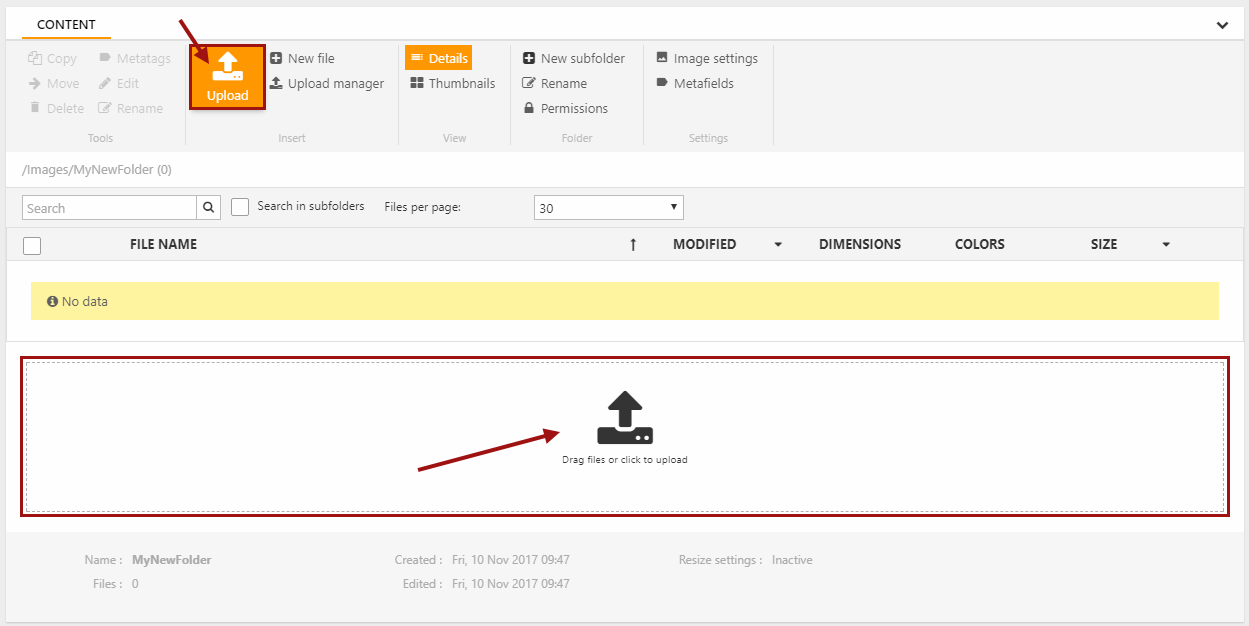
To upload a file, you can either click the Upload button in the file manager toolbar or drag and drop a number of files in the file upload area (Figure 10.1). Clicking any of the two buttons will open the usual file selector window on your computer.
After you have uploaded a file, you can right-click it to open the context menu for the specific file (Figure 10.2).
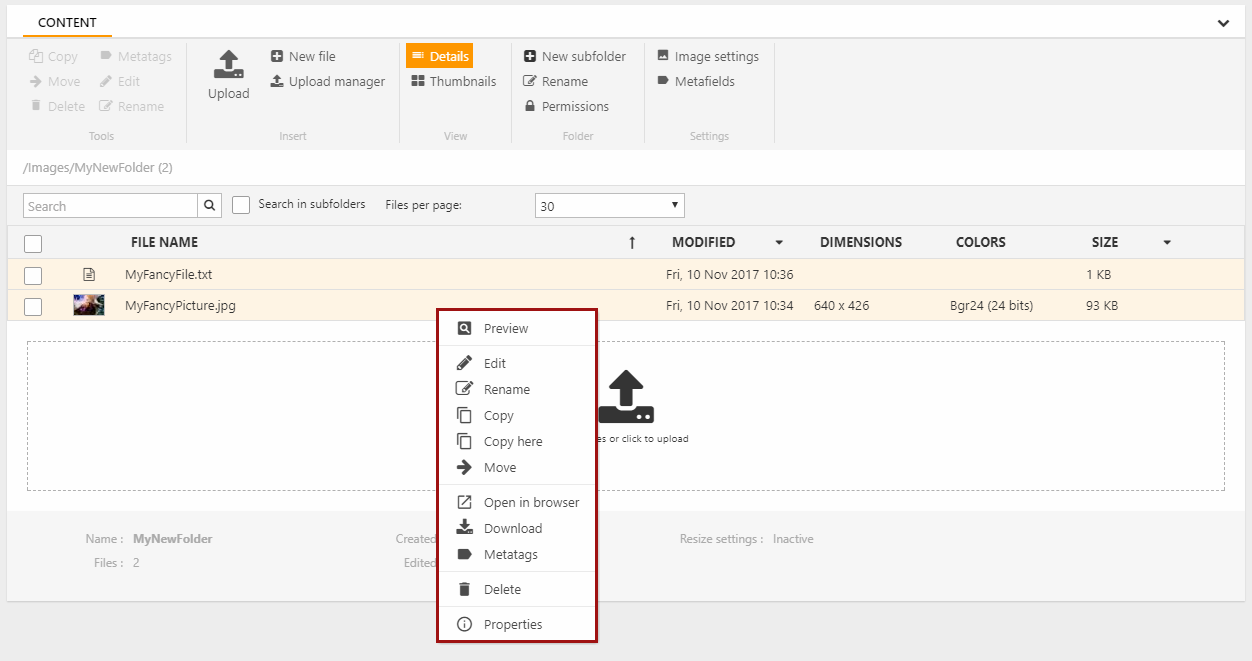
You can:
- Preview the file
- If the file is an image, a small pop-up window will open with a preview of the image
- If the file is a text file, the file will open in a new tab, displaying pure text (the same as when clicking Open in browser)
- Edit the file
- If the file is an image, the Image editing window opens where you can resize, crop, rotate, and flip the picture
- If the file is a text file, an Editor window opens where you can edit the file with syntax highlighting (or choose Simple editor to enable this), fix HTML automatically, or convert the file to XSLT or Razor
- Rename the file
- Move or copy the file to another destination or copy it to the same destination (Copy here)
You can also open the file in a browser, download the file, or delete it – for more advanced functionality, please see the manual.
The Upload Manager
If you need more advanced options when uploading files, click the Upload manager button in the toolbar to open the upload manager tool (Figure 11.1).
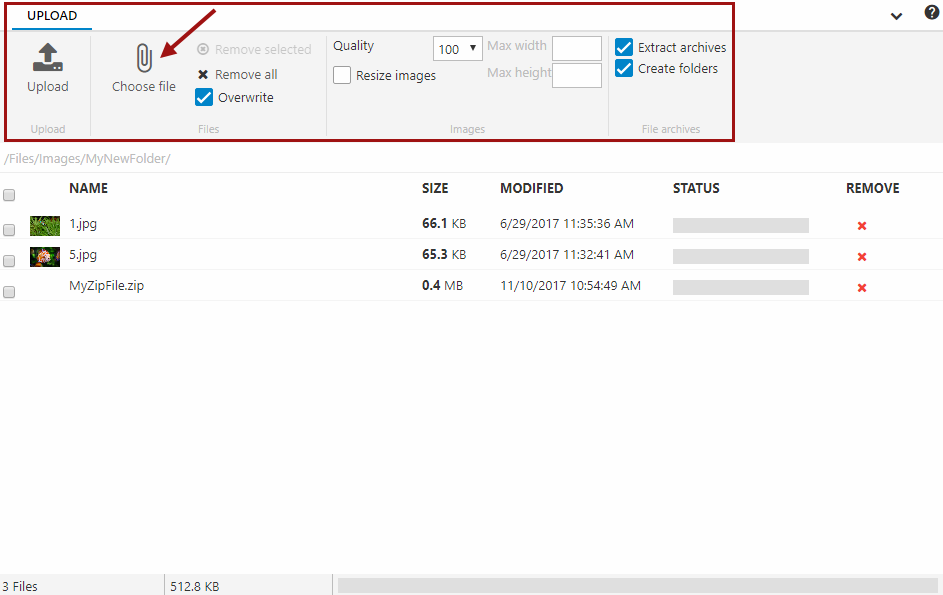
Click choose file in the toolbar and select your file(s) – they will appear in a list, so you have a chance to review them before uploading.
Use the settings in the toolbar to:
- Overwrite existing files with the same name as the uploaded files
- Set the quality and/or activate the image resize option, and define the max width/height
- If you’re uploading a zip file, you can choose to extract archives
- You can then choose to create to create the folder structure from the zip file in the folder tree and place all files in the original folders
When you’re done, click Upload.
Users
Dynamicweb contains tools for creating and managing users - both backend users (e.g. editors and admins) and frontend users (e.g. customers).
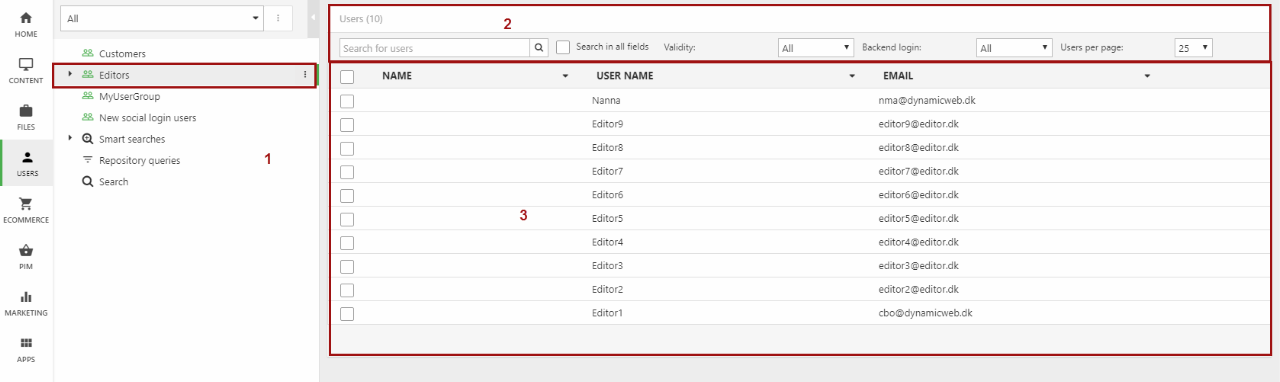
Click the Users area to display the Users tree (1) (Figure 12.1) – here you can see a list of user groups, as well as smart searches and repository queries. You also have access to a Search tool, which allows you to search through all users in the system.
If you click a user group, the appropriate users will be shown in a user list (3) in the content pane with a User toolbar at the top (2).
Creating a user group
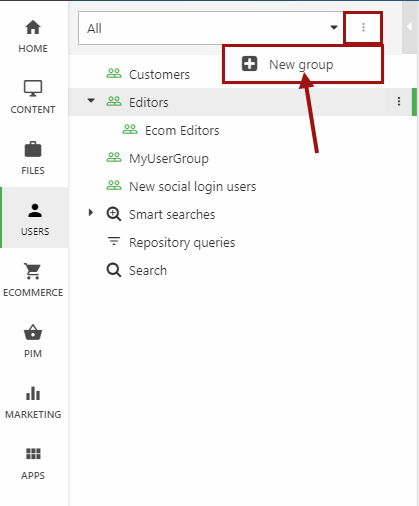
To create a new user group, open the User tree menu (Figure 13.1) and click New group.
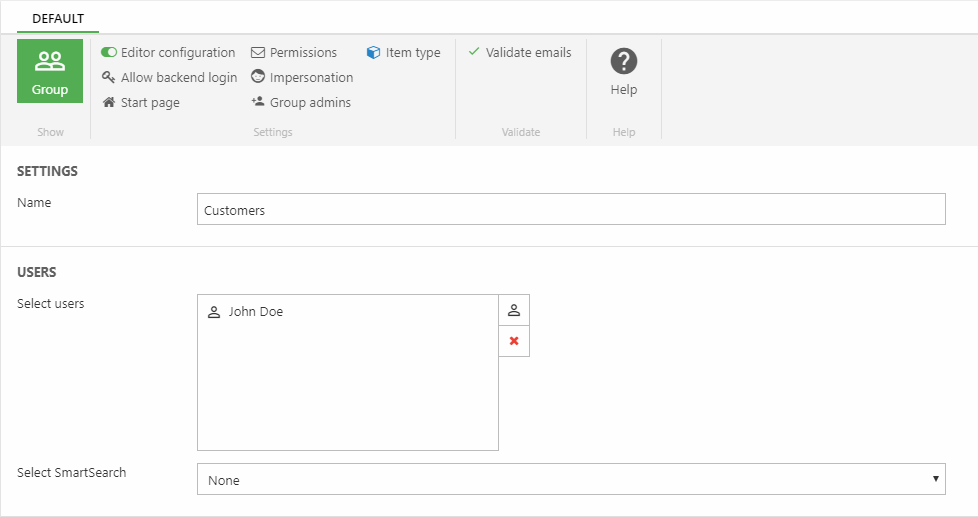
In the content pane, you can now edit your new user group (Figure 13.2).
- You must provide a name for the group
- You can also directly add users to your group using the user selector
- When you’re done click Save at the bottom
You can also add information on the group itself using the Information fields, but these are for the group only, and are not inherited by the users in the group.
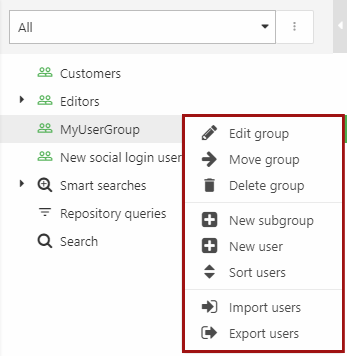
The new group is now available in the Users tree – and all user groups have their own context menu (Figure 13.3), so if you click the menu button, you can:
- Edit or delete the group
- Move the group to a different location (e.g. make it a subgroup)
- Create a new subgroup to the current user group
- Add a new user directly to the user group
- Sort users in the group
- Import and export users by using an input file like an xml document.
Creating a user
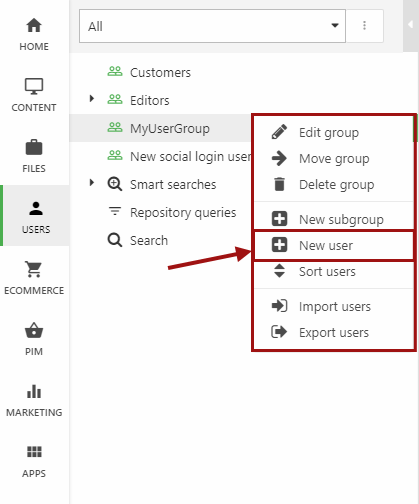
To create a user, click the menu button on a user group to open the context menu, when click New user (Figure 14.1).
The user view will then open in the content pane(Figure 14.2) – it shows the (many) options and properties on a user. The ones you must fill out are:
- User name – this is typically used when logging in
- Password – this can be encrypted by checking Encrypt
You don’t have to fill the following, but it’s typically a good idea:
- Name, first name, and last name
- Email – click the icon to the right of the email field to validate the email
- Email permission – when checked, you are allowed to send mails to this user
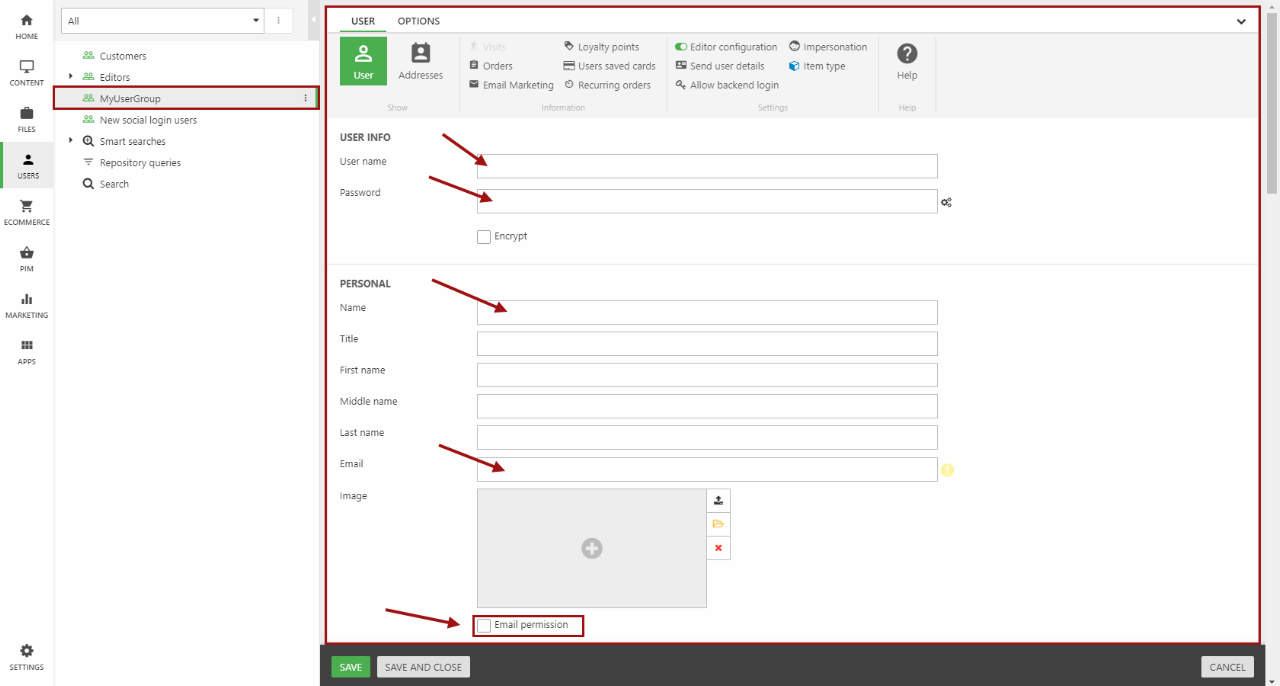
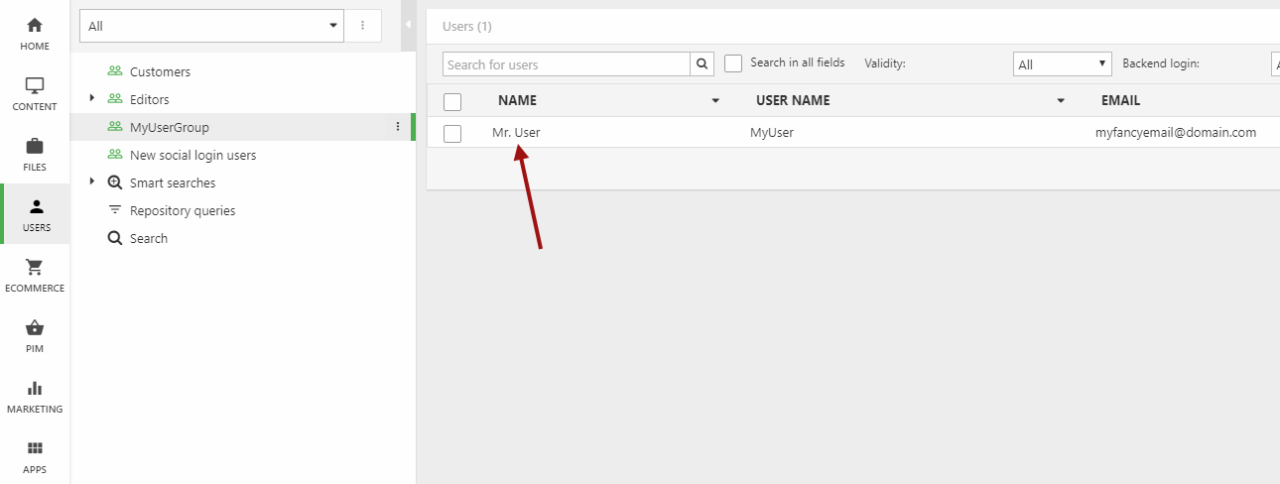
When you are done, click Save and close. You are redirected back to the user list of the user group, where you can now see the new user (Figure 14.3).
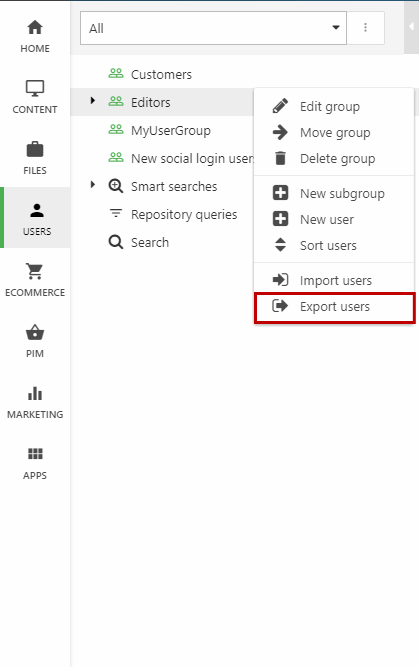
Exporting users to excel
If you like working in Excel, you can also export a set of users to Excel, edit them, and then import them to your solution again.
To export users to Excel:
- Click the menu button on a user group to open the menu (Figure 15.1)
- Click Export users
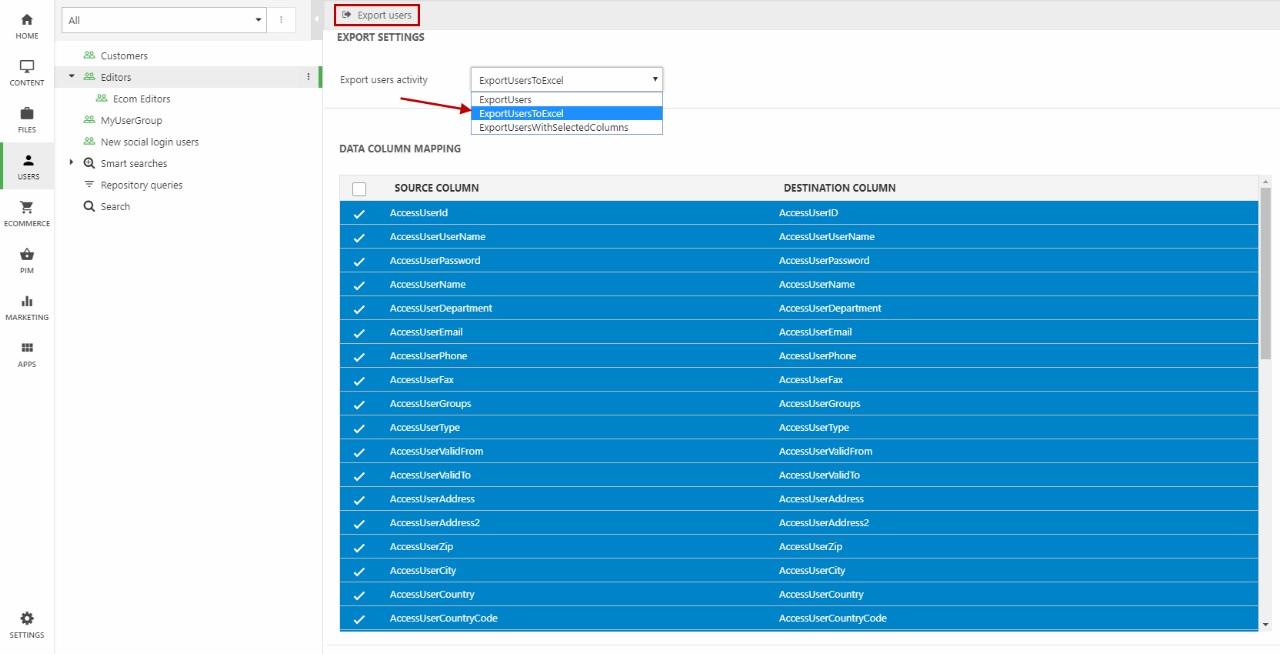
Now you will see the export users view (Figure 15.2).
Here, you must:
- Choose ExportUsersToExcel as export users activity to create an Excel Worksheet file with the users
- Select which data columns you want to export – everything is selected by default.
- Click Export users at the top.
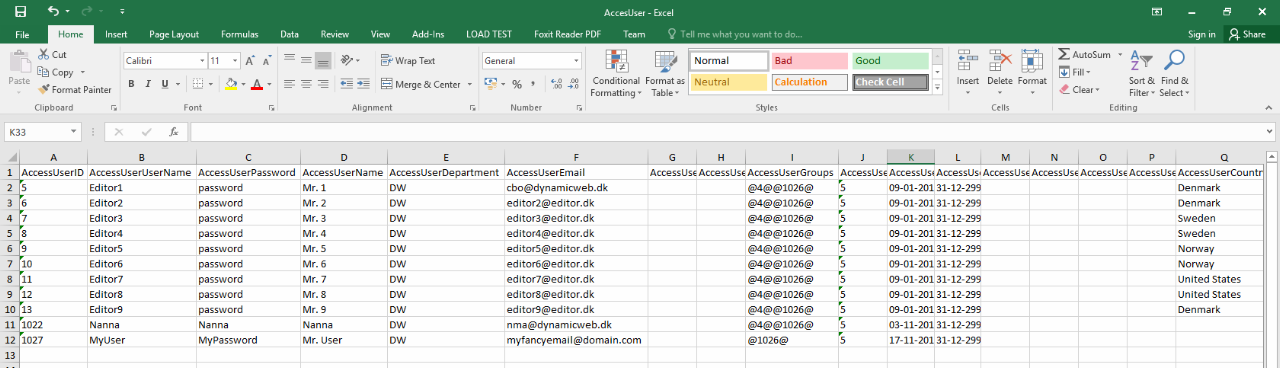
You now have an Excel file with your users (Figure 15.3).
When you’re editing the file, keep in mind that the excel provider has these limitations:
- Worksheets must not contain whitespace
- Do not use merged cells – they will be converted as null or an empty string.
- First row must contain headers
- The worksheet you are importing must have the file name “AccessUser”
Apart from that, you can edit the data as you’d like.
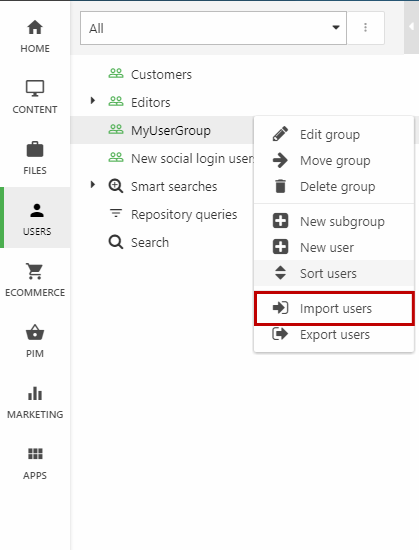
Importing users from Excel
To import users from an Excel Worksheet file, click the menu button for a user group and click Import users (Figure 16.1).
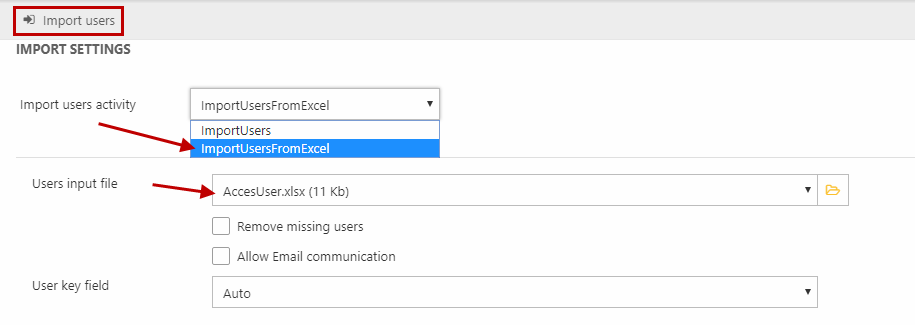
You will be directed to the import users view (Figure 16.2), where you must:
- Select ImportUsersFromExcel as your import users activity.
- Select your .xlsx file (this must be uploaded beforehand in Files)
- Click Import Users
Emails
Dynamicweb includes a full suite of marketing tools, but as an editor you will mainly work with the Email Marketing tool.
This tool basically takes a page from your content tree and sends it as an email to a list or group of users you select.
To really pin out the process:
- First, you create the email page – text, images, etc. – as a page in the content tree, usually within an emails folder
- Second you open the Email Marketing tool and create the email
Creating an email
Assuming you have already created a page to send as an email:
- Click Marketing in the Area menu
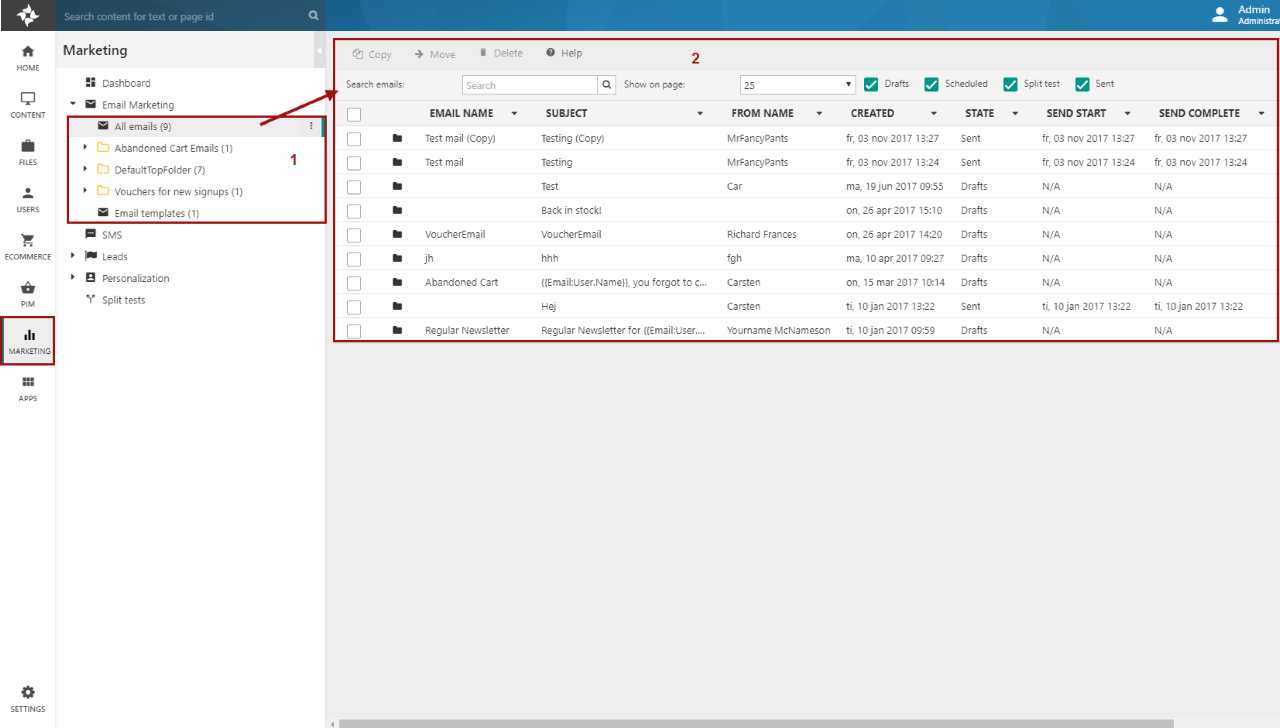
- In the Marketing tree, fold out the Email Marketing area (1) (Figure 18.1).
- Click any of the email folders, e.g. All emails - this opens the email list (2) with useful short information about your emails.
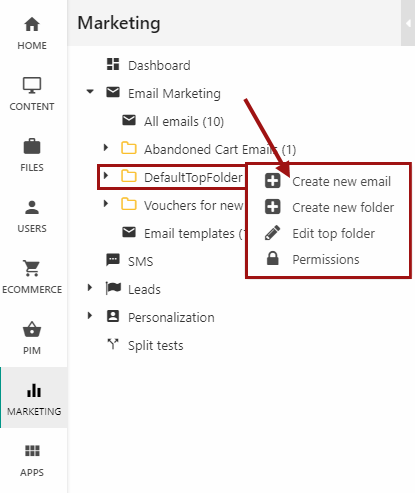
- Click the menu button on a top folder in the list
- Click Create new email (Figure 18.2).
- Select Blank email as email type and write a subject for your email.
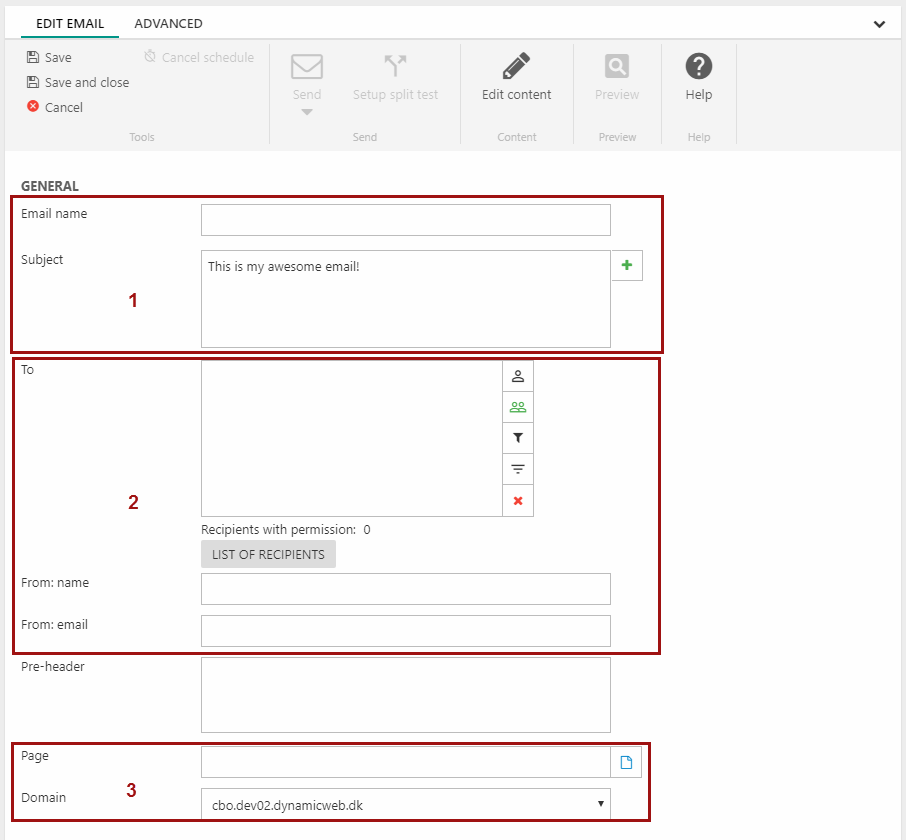
In the content pane, you can now set up your email (Figure 18.3):
- Give the email a name (internal name) and subject (what people will see in their mailbox) (1)
- Choose recipients of the email and specify the sender’s name and email (2)
- Select the page you created with the emails content and select a domain – the website you are sending this from) (3)
- When you’re done, click Save
Sending an email
Before you can send an email, everything except the pre-header must be specified.
Once everything is ready to go, click Send in the toolbar (Figure 19.1).
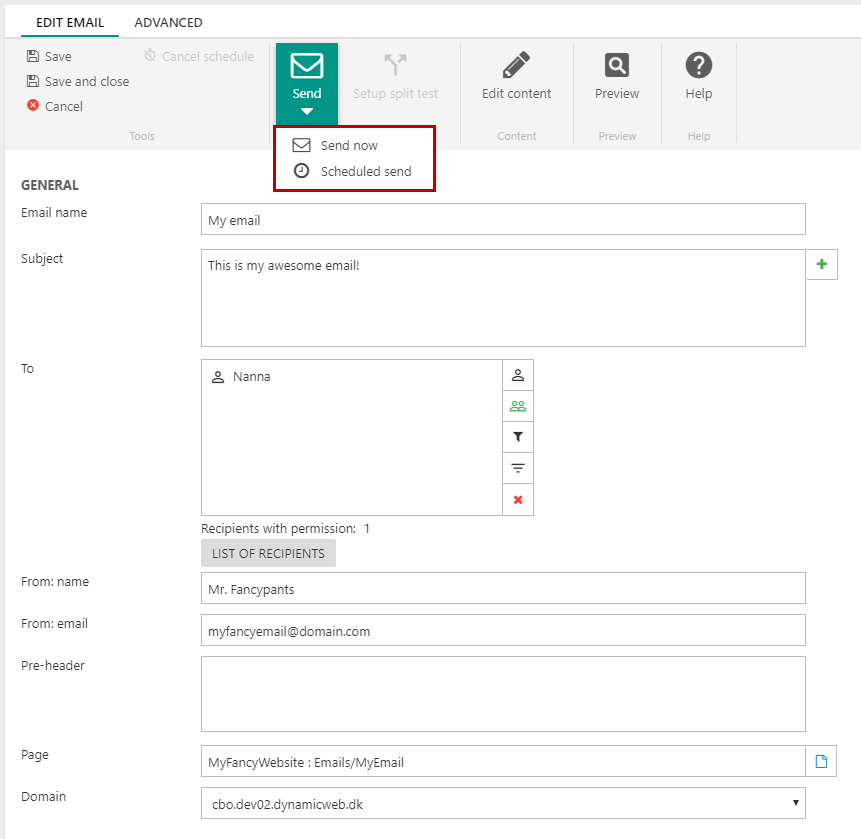
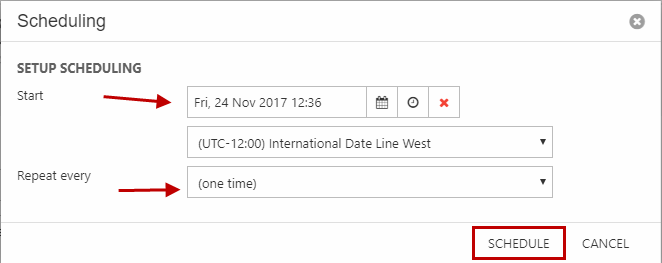
You can then send the email instantly by clicking Send now. If you want to schedule when to send the email, click Scheduled send and a Scheduling window will appear (Figure 19.2).
Here you can choose the time and date to send the email and choose if the email should be sent repeatedly e.g. every month. When you’re done, click Schedule.
When the email is sent, it is moved from the Drafts folder to the Sent folder under the folder you’re working in.
Redirects
Sometimes you delete old pages from your website, or you move a page from one place in the content tree to another. If a visitor then clicks on an URL to the old location, they will see a 404-error that the page doesn’t exist. This can be very frustrating for your visitors.
To make sure that doesn’t happen, you can set up a redirect – a shortcut which redirects visitors from the old URL to the new URL:
- Click the Settings node in the Area menu
- Fold out the Web and HTTP section in the Settings tree (Figure 20.1)
- Click the Redirects node
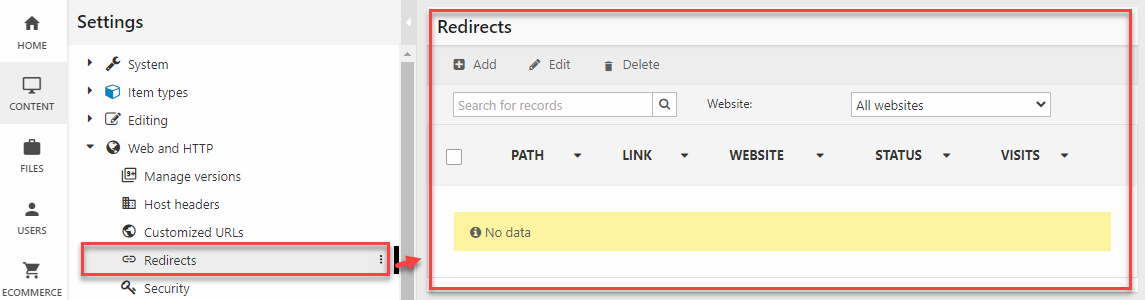
Click Add and you’ll see the Edit window (Figure 20.2).
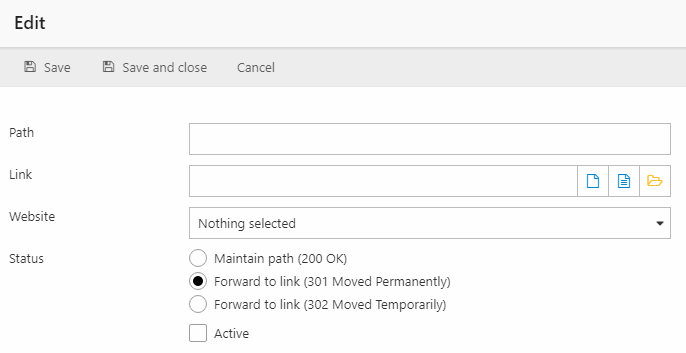
To create the redirect:
- In Path write the old address – without the website URL – like this /api-docs/Dynamicweb.Analytics
- In Link select the page you want people to be redirected to
- Select the type of redirect:
- Maintain path keeps the URL as the user typed it, but loads the new page
- Forward to link forwards the visitor to the new URL, and tells search engines whether this is a permanent or temporary redirect
- Check Active
- Click Save
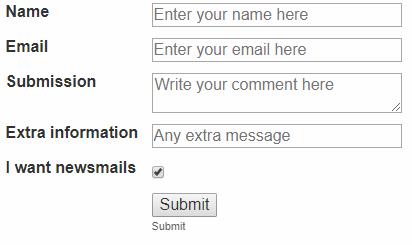
Forms for Editors
Forms for Editors is an app which makes it easy for you, as an editor, to create forms on a page – feedback forms, signup forms, etc. – and collect data from your visitors in a structured manner.
A simple form could look like Figure 21.1.
Forms are created in the backend and then published in frontend using a Forms for Editors app.
You can read more about the Forms for Editors app here.