
Integration Framework v1
Lke IFv2, the Integration Framework v1 is a collection of components for transferring data and maintaining data consistency between a Dynamicweb solution and a remote system – typically a Dynamics NAV or Dynamics AX solution, a CRM system, or a Product Information Management (PIM) system.
You can still use IF v1 components but with the following in mind:
- IF V1 is no longer maintained
- Documentation for V1 is no longer maintained and will – eventually – be archived
- Any bugs or issues with IF v1 must be handled by the partner or implementation team responsible for operating your solution
In more concrete terms, you will – in contrast to IF v2 which is maintained and updated by us – have access to the full source code, with all the freedom and responsibility this entails.
Of course, we recommend using Integration Framework v2 in all cases – but if the remote system is not supported natively by Ifv2 this requires you to re-engineer the plugin units to account for the new feautures and practices implemented in Ifv2.
IF1 articles

ERP - New Projects
ERP - Extending an existing integration
ERP - Developing a custom integration
FAQ
NAV 2009 R2
AX 2009
Batch Integration
A batch integration uses scheduled tasks to transfer data and maintain data consistency between a Dynamicweb solution and a remote system.
It consists of periodic updates, where data is retrieved from a remote system, saved to an XML file, then imported into the Dynamicweb database – or exported from Dynamicweb and imported into a remote system.
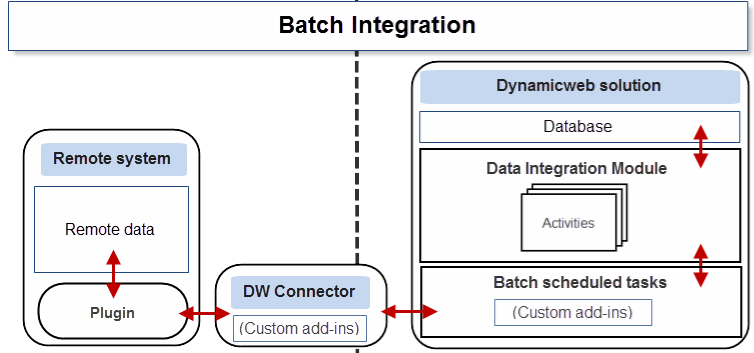
To outline the dataflow:
- During an import, a call to a web service exposed by a DynamicwebConnectorService installed in the remote environment retrieves the data to be imported and saves the file in XML format on disk – the content is then imported into the Dynamicweb database using the Data Integration module.
- During an export, the Data Integration module is used to pull data from the database and save it in XML format in the file archive. The saved data is then sent via the DynamicwebConnectorService to the remote system. When the remote system has received the data (e.g. new orders or users), it sends an acknowledgement back to Dynamicweb containing a list of IDs that the data items were saved with in the remote system. The remote system IDs are then added to the records in the Dynamicweb database, so you know what’s been exported and what hasn’t.
Remote system setup
The very first step of an integration is to ready the remote system – the NAV or AX solution, the CRM, or the PIM solution – for an integration with Dynamicweb.
This is done by:
- Installing and configuring an ERP-specific plugin on the remote system
- Installing and configuring the DynamicwebConnectorService web service on the DMZ/Perimeter server
- Using the Dynamicweb Test Service app to verify that everything is set up correctly
The process is system-dependent, and is a job for a specialist – please refer them to an appropriate article:
Populating the database
Once you receive word from the ERP side that the remote system is ready, you can start working on the Dynamicweb side of things.
First, you create an initial bulk import of data from the remote system based on a set of default integration activity templates:
- The ErpDataImport template imports Products & Product Groups, Ecom Languages, Currencies, Manufacturers and Product units
- The ErpUserImport template imports Users – but not User Groups
To create an activity based on one of these templates:
- Go to Settings > Data Integration
- Click New activity from template
- Create an activity based on the ErpDataImport and/or the ErpUserImport template as appropriate
The templates are set to use automatic mapping between input and output data, which means that as long as the tables and columns in the input XML data is named identically to the tables and columns in the database, everything will work out of the box.
When you’ve created the appropriate integration activities, you must create and run a batch integration task:
- Go to Settings > Integration > Integration Framework Batch
- Click Add in the toolbar to create a new batch integration task (Figure 5.1)
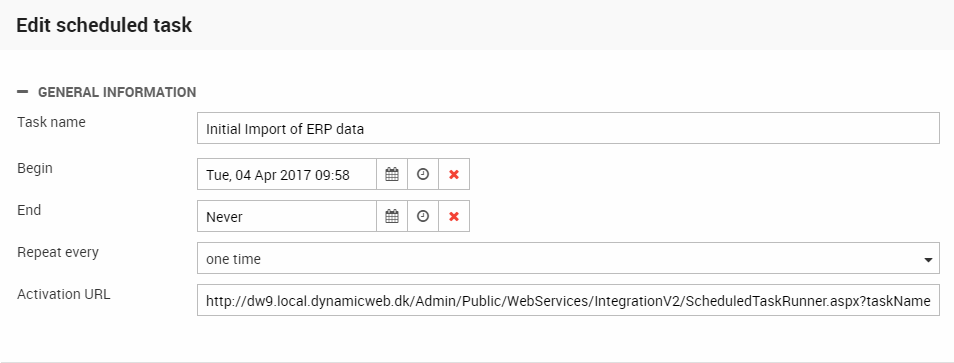
Set up the batch integration task:
- Name the task
- Specify a start and end date (and time)
- Specify at which interval you want the task to be run (once, every hour, every week, etc.) – for this task, you want to run it manually, so select ‘one time’
Using the type dropdown, select the import data add-in (Figure 5.2) and configure it.
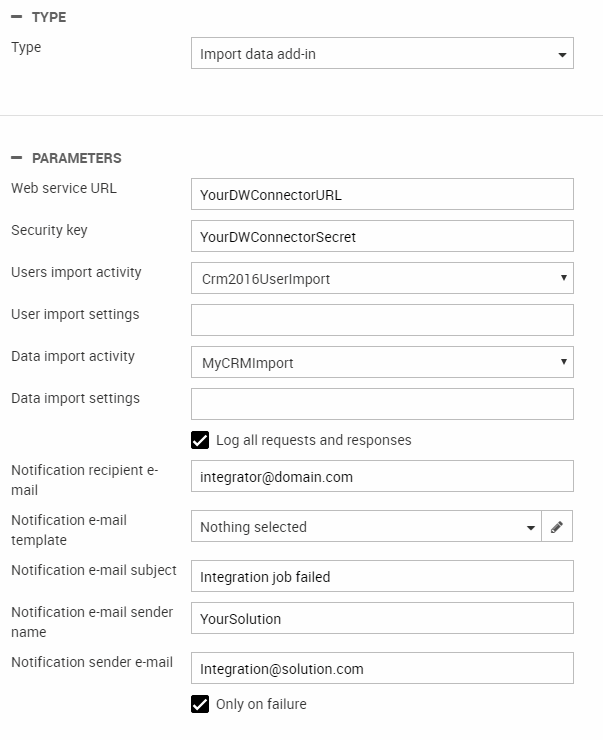
To configure the import add-in you must:
- Enter the DynamicwebConnectorService URL
- Enter the security key which is the secret key from the DynamicwebConnectorService configuration file
- Select a user import activity and/or a data import activity to use (the ones you just created)
The ERP side of the integration can provide you with both the DynamicwebConnectorService URL and the security key (secret).
You can use the user import settings and data import settings to send data to the root node of the request XML. Make sure it is formatted as valid XML attributes, e.g. ShopId=”Shop1”, which will be sent as <GetEcomData ShopId=”Shop1><tables>…</tables></GetEcomData>. In the integration activity settings field you should also correspondingly enter shopID=”SHOP1”.
In the initial phase you should enable logging – whereas email notifications are more useful for production scenarios. Log files can take up a lot of space, so disable logging as soon as you have a stable setup.
It is important that you run the Data Integration activities via the batch integration task, or you will not properly connect to the DynamicwebConnectorService, and your import will not behave as intended (old data, no updates, may fail silently).
Customizing the integration
After the initial import, you probably need to do a fair bit of customization. The extent of this task depends almost entirely on the needs and preferences of the customer, however.
A typical integration often covers:
- Importing products
- Importing users
- Exporting users
- Exporting orders
The Data Integration module contains standard templates for each of these activities - you used two templates for the initial import – and as long as the data you receive from the remote system is named identically to the data in the database, these template activities will automatically map table to table and column to column.
In those cases, extending the integration with e.g. extra product data is trivial, and happens on the ERP side of the integration.
However:
- If the data you receive from the remote system does not fit into one of the standard fields in Dynamicweb, you will have to create custom fields to store the data in. Make sure to create a custom field with the right data type.
- If you need to apply a constant to a field during import – e.g. if you want to import data to a particular shop or a particular language – you must create data integration jobs with manual mapping, and use the built-in scripting options.
- If the ERP side is unable to deliver data consistently, in an appropriate format, or properly named. To handle that on your side of the integration, you can create custom integration activities with manual mapping or using different integration providers. However, it is usually more appropriate to handle that on the ERP side.
- If you want to retrieve less data than a standard integration does
- Etc.
This phase of an integration can be time consuming, and it’s important to establish effective communication channels with the ERP side of the integration to reduce downtime.
You can read much more about creating integration activities manually in the Data Integration Module article – or go straight to the Integration Providers section to check out the providers at your disposal.
Live Integration
A live integration consists of real-time requests from a Dynamicweb frontend to a remote system. The responses are then used to update e.g. product, cart or order information before displaying them in the frontend.
Currently, a standard live integration implementation allows for live requests for prices and stock, live calculations of shopping carts, and live creation of orders in the remote system.
The data flow differs slightly depending on the type of live integration implemented:
- When a page containing products is being rendered, a list of product IDs or product numbers is sent to the remote system alongside the ID of the current user. The remote system then returns the prices and stock state for that user, and the products in memory are then rendered with the prices appropriate to that user. No data is saved in the Dynamicweb database.
- Likewise, when a shopping cart or an order is being created, the cart information (products, quantities, user information) is sent to the remote system. The remote system then returns an updated cart or order with customer specific prices and discounts – and the information is saved in the Dynamicweb database before being shown to the user. If an order is created in the remote system, the ID is returned to Dynamicweb and saved in the Dynamicweb database so that the link between the order in the remote system and in the Dynamicweb database is maintained.
A live integration presupposes a solution with a working batch integration in place. The reason is pretty straight-forward: you can’t request real-time information from nothing, so you need e.g. a ProductID and a UserID to request a customer-specific price. And we can’t render, index and filter products before they exist in the database.
To get started with a live integration:
- Download the live integration dll for your Dynamicweb version (8 vs 9)
- Place it in this bin folder of the solution – like all bin-folder modifications, this causes an IIS reset.
- Log in again
You can now access the Live Integration add-in by going to Settings > Integration > Integration Framework Live and clicking the add-in.
The Live Integration add-In
The live integration dll provided by us ships with the interface in Figure 8.1.

To configure the add-in, point it to the web service URL exposed by the Dynamicweb Connector service installed on the remote environment. You can have multiple endpoints, e.g. for multiple accountings – each endpoint requiring a unique URL (with a matching connector service – 2 endpoints = 2 connectors).
The URL syntax is [URL];[Field];[Value]
The Field property can get data from either of these:
- User.Company (AccessUserCompany column of table AccessUser)
- User.Department (AccessUserDepartment column of table AccessUser)
- User.[Any custom field] (System name(!) of any custom field column of table AccessUser).
- Order.[Any custom field] (Any custom field column of table EcomOrder)
- Session.Shop (ShopID of the shop in current http context)
Additionally, you can:
- Provide the security key (secret) provided to you by the ERP side of the integration (from the DynamicwebConnectorService .config file)
- Customize the tag for checking the state of the live integration connection (and e.g. warn users that customer specific prices are not available, or hide the product catalog behind an error message, etc.)
- Allow live integration for anonymous users. This is not implemented in the remote system plugins by default, but is available for anyone who wishes to implement the functionality
- Use country codes to select which number format to use when parsing numbers from the external system
- Set caching levels, depending on how critical it is to you that the information being rendered is up to date
- Set order states after successful or failed imports
- Provide a text for discount order lines (imported discounts do not, by default, include a descriptive text to display in carts and on orders)
You can also set up email notifications to notify key people of problems with the connection, and set various logging levels for development and production use.
Finally, you can include various custom fields in the XML when requesting price and order calculations from the ERP side. Custom fields are not handled by the ERP plugins by default.
Once the add-in is installed and configured, Dynamicweb will automatically check for live data every time a product or product list is rendered in frontend.
Should the out-of-the-box features included not match your needs, you can create a custom live integration add-in using the Live Integration project – read more below.
Extensibility Points
In some cases, you want to modify the data flowing between Dynamicweb and your remote system.
Perhaps you want to import or export data which is not covered by our standard functionality, or you need to send a non-standard set of parameters to your remote system. Or maybe you are creating an integration with a remote system which is not included in the framework by default.
Here is an overview of your options for extending both a batch integration and a live integration:
- Custom batch integration task add-ins
There are several standard add-ins available for batch integration tasks, but if they are inadequate you can create custom add-ins, which can handle and modify the data being sent to and received from the Dynamicweb Connector. - Data Integration tasks & custom data integration providers
Imported and exported data is handled by the Data Integration module, so you can set up custom data integration activities and use e.g. the built-in scripting options – or by creating a custom Data Integration provider. - Live Integration project
The Live Integration add-in is an implementation of notification subscribers, a price provider and a configurable add-in. It is designed to be easily customizable, and you can customize both the requests sent to the Dynamicweb Connector and the way you handle the data which is returned.
Additionally, you can create custom DynamicwebConnector add-ins – but this is usually only relevant if you are integrating with a remote system for which we do not provide plugin, or if the remote system is heavily customized.
Custom batch integration task add-ins
If you need to implement functionality which is not possible using our standard batch integration task add-ins – e.g. retrieve product images from an external system – you can create custom batch integration task add-ins.
A template for creating custom batch integration task add-ins is included in the Visual Studio templates for extending Dynamicweb. The template contains the full source code for one of the standard scheduled task add-ins that come with Dynamicweb – it should be fairly straight forward to adjust as needed.
You will be using the ErpServiceCaller helper class to communicate with the DynamicwebConnectorService.
Data Integration tasks & provider
Batch Integration tasks execute a standard Data Integration module activity, which means that you can modify data in all the regular ways:
- Use the built-in mapping tools, such as conditionals, scripting and XSLT transformations
- Use a different Data Integration provider, e.g. the Ecom provider, which can auto-generate product information from incomplete data
- Create a custom data integration provider
The Live Integration project
The Live Integration add-in is basically an implementation of notification subscribers, a PriceProvider and a configurable add-in. The default add-in handles live integration of prices and stock, shopping carts and orders.
It can be downloaded and used as an advanced starting point for developing custom live integrations.
The overall structure is as follows:
- The LiveIntegrationAddin class is for adding GUI functionality. This class is a configurable add-in, which means that the properties (if decorated correctly) show up in the Live Integration Framework add-in screen. Use this class to add settings which should be configurable by the administrator
- The PrepareProductInfoProvider class handles retrieving/caching data when showing product lists, and updating the product lists with the retrieved information. Custom data sent to your remote system must be added manually using the BuildProductRequest method, and return data must be updated manually using the ProcessResponse method
- The Orderhandler class handles retrieving/caching data when showing carts or completing orders, and updating the cart/order with the retrieved information. It also caches discounts received from the remote system, to be used by the DiscountProvider. Custom data sent with a request must be added manually to the BuildOrderRequest method, and return custom data must be updated manually using the ProcessResponse method
- The connector class handles the actual communication using the ErpServiceCaller helper class
- The DiscountProvider class is used for displaying discounts correctly in cart/order. It retrieved discounts cached by the OrderHandler and adds them to the order or cart
Logging is used throughout the Live Integration and is implemented in the Logger file. The log can be accessed from the Live Integration Framework node in the Dynamicweb backend.
The ConfigurationFileReader is used for loading/saving settings in the LiveIntegrationAddin class – it should be extended if you add settings to your add-in.
The tag which checks if a live integration connection is implemented in the PageOnGlobalTagsObserver class.