
Dynamicweb Connector Service
The DynamicwebConnectorService is a web service, which functions as the bridge between the Dynamicweb solution and a remote system. It handles data encryption and decryption, and must be installed on the DMZ/Perimeter network so it can be reached by both the DW solution and the remote system. It also functions as an extensibility point if you are developing a custom integration with a system for which we don’t deliver a standard plugin.
The install process will require a user that has permission to install the service. If you are on a domain, the user should include the domain. If you are using a user on the local machine, the username should be prefixed with a period and a slash: “./Username”.
To install the Dynamicweb Connector service:
- Download the DynamicwebConnectorService files from our downloads area – you must be logged in to access the files
- Right click on theZIP file, then select properties > unblock
- Extract the DynamicwebConnectorService files to an appropriate location – e.g. C:\Program Files\DynamicwebConnectorService
- Locate the installUtil.exe file – it is usually found in the c:\Windows\Microsoft.NET\Framework\vX.X.XXXXX folder, where vX.X.XXXX is the latest version of .NET you have installed. This should be .NET 4.6.2 or greater
- Install the service from the command prompt using installUtil.exe, with the following command:
- Go to Control Panel > Administrative tools > Services and start the service called DynamicwebService
This exposes the web service to the Dynamicweb solution.
The ConnectorService and the TestTool
The Dynamicweb Connector Service is strongly linked to the Dynamicweb Connector TestTool, which is a tool used to test requests and responses from the web services exposed by the remote system plugins or by the Connector Service itself.
Most importantly, the configuration file used by the test tool is identical to the one used by the Connector Service, which makes it easy to test out different config section setups and deploy them from test tool to the connector service directly.
Configuration
To use the connector service you must open and edit the DynamicwebConnectorService.exe.config file, which contains the settings necessary to connect to remote systems. It can be found in the DynamicwebConnectorService folder and contains:
- A <configSections> element which specifies configuration sections and handler declarations
- A number of Connector sections – e.g. <D365Connector> – which contain setting for a particular remote system
- An <appSettings> section which contains configuration settings for the service itself
The appSettings are:
|
Name |
Required |
Default Value |
Note |
|
ServiceName |
|
DynamicwebService |
A valid name for a windows service, e.g. “DynamicwebService”. Use this to provide a unique name for the service, in case that you have multiple services running on the same machine. |
|
TestMode |
|
False |
True | False Enables test mode when set to “True” |
|
TestOutputFile |
|
|
Full path to a file, e.g. “C:\TestFolder\TestFile.xml” This file will be returned as response when test mode is enabled. |
|
TestOutputFolder |
|
|
Full path to a directory, e.g. “C:\TestFolder\” Files in this folder will be returned as responses when test mode is enabled. |
|
Secret |
X |
|
A secret key which is used for encrypting and decrypting responses from the service. |
|
DebugInfo |
|
False |
True | False Includes exception details in responses from the service when set to “True” |
|
WebserviceURI |
X |
|
A valid URL, e.g. “http://localhost:8090/DynamicwebService” |
|
ConnectorType |
X |
|
Full name of a connector type. Please refer to the table below for the list of connector type names. |
ConnectorType full names:
| ConnectorType | Full name |
| AX | Dynamicweb.Ecommerce.Integration.Connectors.Ax.AxConnector |
| D365 BC and NAV | Dynamicweb.Ecommerce.Integration.Connectors. Nav.NavConnector |
| D365 F&O | Dynamicweb.Ecommerce.Integration.Connectors.D365.D365Connector |
| CRM | Dynamicweb.Ecommerce.Integration.Connectors.Crm.CrmConnector |
| Perfion | Dynamicweb.Ecommerce.Integration.Connectors.Perfion.PerfionConnector |
In addition to any settings, you must edit the Connector section for the remote system you want to connect to. Each Connector section is described in detail below.
Connectors
Connectors are add-ins which connect to the plugin installed on a particular remote system – e.g. AX2012 or D365. They are used by both the Dynamicweb Connector Service and the Dynamicweb Connector TestTool, as outlined above.
Each Connector contains a number of settings, which are used to e.g. authenticate the request for data or trigger a particular behavior from the remote plugin.
See more under each Connector below.
AxConnector
The Connector settings for the AxConnector are:
|
Name |
Required |
Default Value |
Note |
|
AxVersion |
|
2009 |
2009 | 2012 (Version of AX). |
|
AxEndpoint |
x |
|
URL to the AX webservice |
|
BindingType |
|
WSHttpBinding |
BasicHttpBinding | WSHttpBinding |
|
CompanyName |
|
|
A company (data area id) registered in AX, e.g. “DAT”. If nothing is specified then AX will use the default area id associated with the authenticated user. |
|
UserName |
x |
|
Username used for Active Directory authentication |
|
Password |
x |
|
Password used for Active Directory authentication |
|
Domain |
x |
|
Domain used for Active Directory authentication |
A configured AxConnector could look like this:
D365Connector (F&O)
The D365Connector is used to connect to a D365 F&O installation - the settings are:
|
Name |
Required |
Default Value |
Note |
|
D365Url |
x |
|
URL to an installation of Dynamics 365 for Finance and Operations |
|
ActiveDirectoryResource |
x |
|
A resource identifier used for Azure Active Directory authentication |
|
ActiveDirectoryTenant |
x |
|
A tenant (company) identifier used for Active Directory authentication |
|
ActiveDirectoryClientAppId |
x |
|
An application identifier used for Active Directory authentication |
|
ActiveDirectoryClientAppSecret |
x |
|
An application secret used for Active Directory authentication |
|
CompanyName |
|
|
A company (data area id) registered in Dynamics 365, e.g. “DAT”. If nothing is specified then Dynamics 365 will use the default area id associated with the authenticated user. |
| ActiveDirectoryValidateTenant | x | true | If Cloud Deployment set to true - if On-premise set to false |
A configured D365Connector could look like this:
NavConnector (Business Central)
The NavConnector is used to connect to older Dynamics Nav versions, as well as more recent D365 Business Central installations – the settings are:
|
Name |
Required |
Default value |
Notes |
|
NavEndpoint |
X |
|
URL for Business Central or NAV endpoint . For example: https://api.businesscentral.dynamics.com/v2.0/tenantID/instanceName/WS/CRONUS UK Ltd./Codeunit/DWWebService |
| ClientCredentialType | X | Valid options are: S2S, OAuth, Default, Ntlm, Windows, Basic | |
|
IgnoreCertificateWarnings |
|
false |
Set to true for https endpoints using self-signed or untrusted certificates. Useful for testing, but should be avoided in production. |
| UserName | X - (only for basic, ntlm, windows, default) | ||
| Password | X - (only for basic, ntlm, windows, default) | ||
| Domain | X - (only for basic, ntlm, windows, default) | ||
| TenantID | X - (only for S2S and OAuth) | ||
| ClientID | X - (only for S2S and OAuth) | ||
| ClientSecret | X - (only for S2S and OAuth) | ||
| EnableOAuthLog | false | Set to true if you wish to generate a log-file containing information on the OAuth access token request. | |
| Port | Optional | Port number from azure App registration Authenticaion Redirect URI with a value like: http://localhost:Port |
A configured NavConnector section could look like this:
OAuth 2.0 for NavConnector
With version 2.1.0 of the DynamicwebConnectorService it is possible to authorize access to the plug-in unit of a cloud hosted Business Central instance via the OAuth 2.0 protocol.
To set up OAuth 2.0 in the ConnectorService you must go through the following steps:
- Downloading version 2.1.0 or a newer version of the DynamicwebConnectorService
- Downloading version 2.4.0 or a newer version of the DynamicwebConnectorTestTool
- Installing the TestTool and using it to obtain an access token
- Installing the ConnectorService and inserting the TenantID, CientID og ClientSecret from your Microsoft Azure Portal
- Copying the obtained access token from the TestTool to the ConnectorService directory
Using the TestTool to obtain an access token
OAuth 2.0 access tokens are encrypted to be client and server specific, which means that a working access token can only be shared across multiple applications on the same server with the same client. This means that if your ConnectorService and Dynamicweb solution is hosted on the same server, you can use the endpoint management tool in Dynamicweb to obtain an access token also usable in the ConnectorService, but as this is not necessartily the case, it is also possible to use the DynamicwebConnectorTestTool for the purpose.
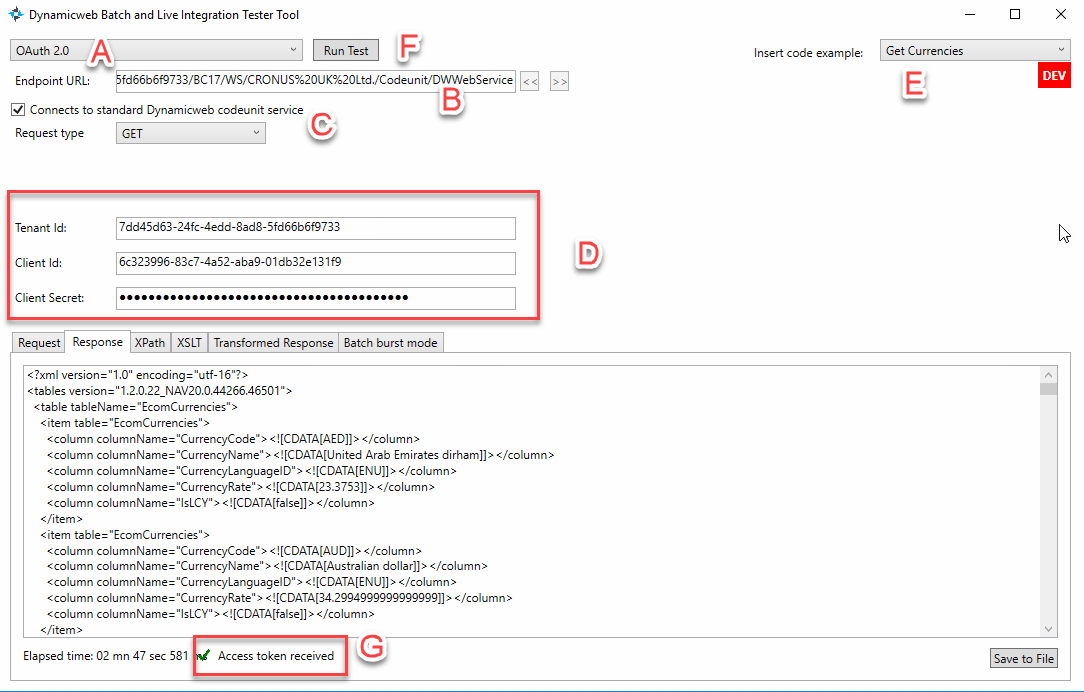
To obtain an access token through the TestTool, run the application and follow these steps:
- Choose connection type OAuth 2.0 (A)
- Paste the URL of the plug in unit web service (B)
- Check the "Connects to standard Dynamicweb codeunit service" box (C)
- Enter the TenantId, ClientID and Client Secret from your Microsoft Azure portal (D). Our guide to setting up OAuth 2.0 for Business Central might be helpful, if you are not yet familiar with that process
- Make sure you have http://localhost configured as a redicret URI in your Azure portal app registration
- Enter a request - you can choose a simple request from the code examples in the dropdown in the top left corner (E)
- Run test (F)
- Use your credentials to log in to the prompted Microsoft log in pop-up. Please beware that your browser may block the pop-up initially
- Upon succesful log in, a message in the TestTool should appear, stating that the Access Token was recieved.
Using the access token in the ConnectorService
After an access token has been successfully recieved, open the .exe config file of you ConnectorService application and set the ClientCredentialType property to "OAuth" as shown in the example below. Then enter the same values from Azure portal as was used in the TestTool in the corresponding properties.
To copy the access token from the TestTool to the ConnectorService, locate the folder entitled EndpointManagement in the directory of your TestTool and copy the entire folder to the ConnectorService directory. If your access token was successfully recieved earlier on, it should be located as a BIN3 file in this exact folder.
Afterwards, you might need to stop and start the Connector service application for it to use the OAuth 2.0 token.
TestMode
When TestMode is set to true in the configuration XML, the connector service can be used to mock responses from the remote system. This is very useful when you have a pretty good idea about the data you will eventually receive, but the connection between the Dynamicweb solution and the remote system is not yet open.
When TestMode is true, you can specify which testfile you want to return for a request in the request XML:
The structure and contents of the testfile should be as close to the structure and contents you eventually expect to receive from the remote system, whether it has been mocked or consists of actual sample data.
HTTPS/SSL
If you need SSL/HTTP on the ConnectorService:
- Please follow the steps in this guide until you reach the section called ‘The WCF Service’
- Download these batch files for creating SSL certificates – but you should check if the paths to the commands are correct, and use your own GUID for your created SSL certificate
- The zip also includes the httpcfg.exe utility for SSL setup which can sometimes be missing from a machine
After installing the SSL certificate you must open the DynamicwebService configuration file (DynamicwebConnectorService.exe.config) and fix the key="WebserviceURI" value to use SSL(it must start with "https") for example value="https://localhost:8090/DynamicwebService". Then restart the DynamicwebService windows service from Computer -> Management -> Services.
If you want to stop using SSL you need to change the "https" to "http" for "WebserviceURI" and restart the DynamicwebService windows service.