
QuickPay Payment Window
QuickPay is a payment service provider.
The QuickPay Payment Window checkout handler is designed to work with QuickPay v10 – released in 2015 – which supports Danske Bank's Mobile Pay Online and embedded payment windows.
Some things to note:
- This provider can only be tested on a public URL
- While QuickPay can handle transaction fees & returns, these features are handled natively in Dynamicweb and are not a part of the integration
- The QuickPay v10 platform does not have a dedicated test mode – so all tests happen with your regular account and a number of test cards. You may also find this list of error codes useful.
If you don’t have a QuickPay account you can sign up for a free test account – this comes with standard system users called Payment Window, API User, and the Owner account. The Owner has all permissions set, but for production you should create a dedicated user or use the Payment Window system user.
To configure the QuickPay Payment Window checkout handler in Dynamicweb you need the following 4 keys:
- Merchant ID
- API Key (Payment window)
- Agreement ID (Payment window)
- Private Key
At the time of writing this (Oct ’19) these can be found under Settings > Integration in the QuickPay Manager interface. The Merchant ID and Private key are tied to the account, whereas the Agreement ID and API key are tied to a user.
When you have the four keys you can configure the checkout handler:
- Go to Settings > Ecommerce > Orders > Payments and create a new payment method
- Select the QuickPay Payment Window checkout handler
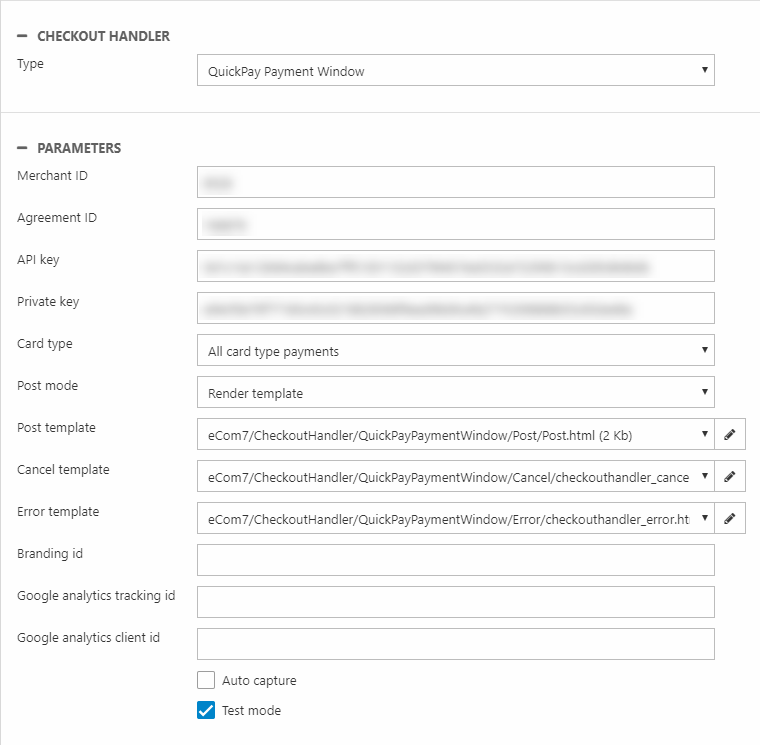
- Fill in the parameters section (Figure 1.1)
For a basic configuration:
- Supply the Merchant ID, Agreement ID, API Key and Private key from QuickPay
- Select a Card type – you can select All cards, only 3D Secure cards, or individual cards – and so on.
- Select a post mode
- Auto post (do not use the template)
- Render inline form
- Render template - this allows you to customize the information sent to QuickPay via the post template
- Select or create templates:
- The Post template is used to post data to QuickPay when the render mode is Render template or Render inline form
- The Cancel template is shown if the user cancels payment at some point during the checkout process
- The Error template is shown if an error occurs
You can also supply a branding ID, a tracking ID and a Client id from a Google Analytics account, and check Auto capture to capture orders as soon as they have been authorized. Please note that in many countries it is illegal to capture an order before the items have been shipped.
Since QuickPay is a Payment Service Provider (PSP) – and not an Acquirer like Nets, Teller or PayPal – you must also supply them with details about the acquirers you have an agreement with:
- Login to https://manage.quickpay.net
- Go to Settings > Acquirers
- Open each relevant acquirer and supply the required information
- Save
Once you’re done you can start testing – and QuickPay supplies a list of test cards for your convenience. Please remember that QuickPay can only be tested on a public URL. You should also note that not all acquirers allow you to complete test orders or have special requirements – MobilePay Online requires a real phone number to be used, and ViaBill requires a valid social security number to complete an order.
Please note that it may take a while before an acquirer is registered on your account - in the meantime you will be served an error code from QuickPay when trying to test the setup.
No special steps are required to go live – just ensure that you have a paid solution set up, and that the checkout handler is configured to use the QuickPay user you want to use (and not, for instance, a test user).