
AuthorizeNet & AuthorizeNet AIM
The AuthorizeNet and AuthorizeNet AIM checkout handlers only support payment in U.S. dollars.
Authorize.Net is a very popular payment provider available to businesses with a merchant account from an MSP (Merchant Service Provider) located in North America, Europe, or Australia.
Authorize.Net has two types of transactions:
- SIM (now called Payment Form)
- AIM (now called Payment Transactions)
Basically, SIM lets Authorize.Net handle most of the data collection and storage, whereas AIM gives you more control over the payment process, but requires you to have a valid SSL Certificate and for your site to be capable of initiating both client- and server-side SSL connections. You can read more about the differences in the Authorize.Net API documentation. Both providers support TLS 1.2.
In this document, we will show you the basic setup for either type.
This covers:
- Creating a test account for Authorize.Net
- Configuring the Authorize.Net administration
- Configuring the checkout handler parameters – for either AuthorizeNet or AuthorizeNet AIM
- Testing your setup
- Going live
For a more extensive guide on how to set up Auhtorize.Net transactions, please refer to http://developer.authorize.net/hello_world/.
Authorize.Net Test Account
The first thing you need to do is create a test account with Authorize.Net.
To do so:
- Go to https://developer.authorize.net/hello_world/sandbox/, fill in the form, and save your test account information
- Login to the Authorize.Net test environment using these credentials: https://sandbox.authorize.net/
You should now have an API login ID, a Transaction Key, and a Secret Key. You will use these to configure the Dynamicweb AuthorizeNet checkout handler later.
Once logged in to your test account, you can see the administration interface.
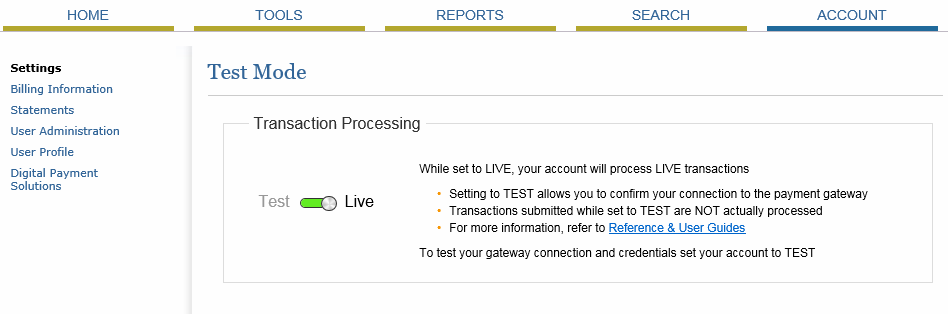
Make sure that you test in Live mode – since test mode uses ‘0’ as the trans_id value, you won’t be able to test capturing authorized orders from Dynamicweb manually, unless your checkout handler is set to Authorize and capture.
From the Authorize.Net administration area, you can find your API login ID, Transaction Key and Secret Key again, if needed.
Previous versions of Autorize.Net required you to generate and use an MD5 hash value for authentication purposes when using Authorize.Net for SIM transactions.
As of early 2019 this has been replaced by a Signature Key - you can read more about the move from MD5 to the SHA-512-based signature keys here: https://support.authorize.net/s/article/MD5-Hash-End-of-Life-Signature-Key-Replacement.
Payment with Authorize.Net SIM requires the user to fill out a payment form (Figure 4.1), which is then submitted by Dynamicweb.
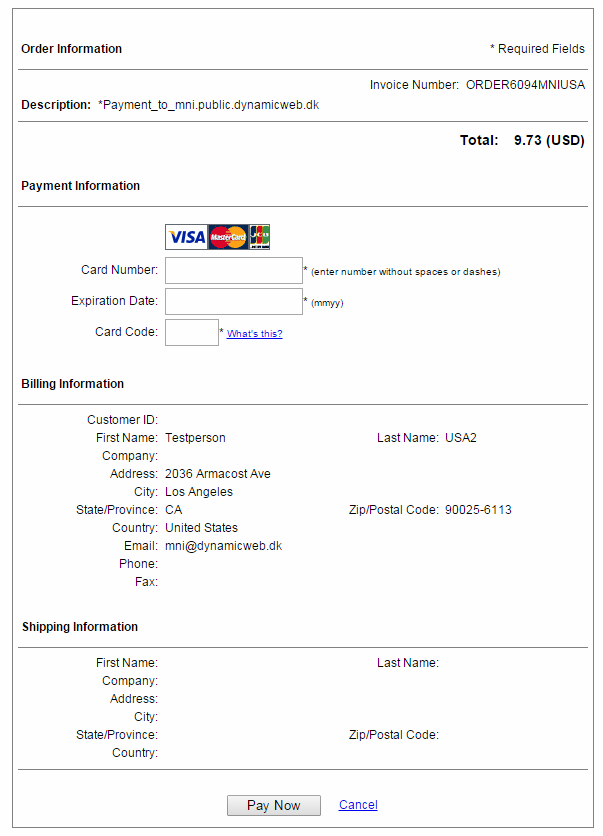
You can customize which fields are displayed, required, and so forth by going to Account > Settings > Transaction Submission setting > Payment forms > Form fields and editing the form field settings there.
Authorize.Net supports displaying and editing customer details – e.g. name, email, etc. – but since these are already maintained by Dynamicweb they should be read-only.
Fields which should be editable are:
- Credit Card Number (implicit; is always editable)
- Expiration date (implicit; is always editable)
- Card Code (explicit, optionally editable)
Checkout handlers
There are two separate checkout handlers associated with Authorize.Net – AuthorizeNet (for SIM/Payment form) and AuthorizeNet AIM (For AIM/Payment Transaction).
Obviously, you only need to configure the one you are going to use :)
AuthorizeNet
Once you have obtained your test credentials, you can configure the Dynamicweb checkout handler for Authorize.Net.
To do so:
- Create or edit a payment method in the Settings > Ecommerce > Orders > Payment following the regular procedure
- Select the AuthorizeNet checkout handler from the dropdown
- Fill in the relevant parameters (Figure 6.1)
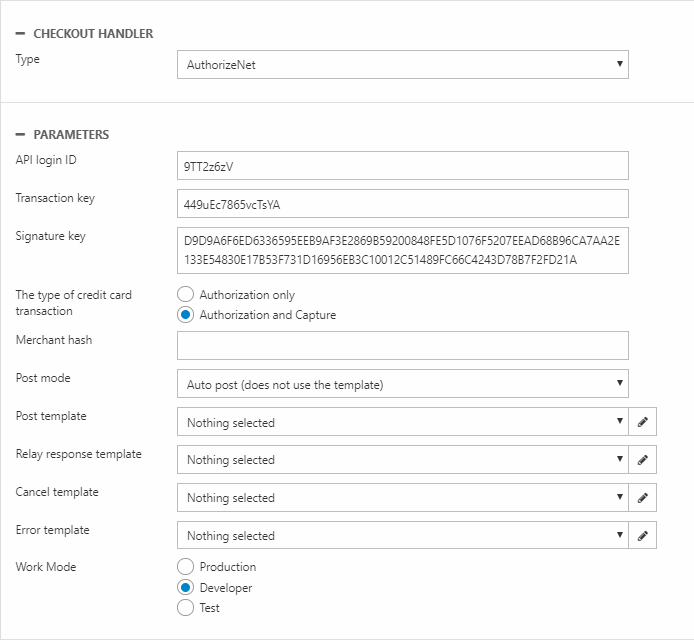
You must:
- Enter the API login ID and the Transaction Key – using the wrong ID or key will give you an error.
- Select between the Authorize and Capture and Authorize type of transaction. The Authorize and Capture setting automatically captures authorized amounts, whereas the Authorize setting allows you to use delayed capture – i.e. capture payment from the order list in Ecommerce.
- Supply the SHA-512 based signature key you generated in Authorize.Net
- Select a post mode – Auto post submits the minimum number of fields needed for authorization, and Render template allows you to submit additional fields, should you need to.
In addition you must customize any templates you want to use:
- The Post template is used when your post mode is set to Render template
- The Relay response template is used to render a receipt with transaction results returned by Authorize.Net
- The Cancel and Error templates render cancellation and error messages
Finally, select a work mode:
- Production for live transactions
- Developer for testing your setup. This mode allows "live" transaction processing and makes it possible to test the manual capturing of orders created with Authorize Only. However, if you have it configured for Authorize and Capture then it will make an autocapture of the order when authorized.
- Test likewise allows you to test your setup, but does not allow “Live” transactions. Can be used with Authorize and Capture, though.
The HTML template files are located in your File Manager in the folder /Templates/eCom7/CheckoutHandler/AuthorizeNet
AuthorizeNet AIM checkout
Once you have obtained your test credentials, you can configure the Dynamicweb checkout handler for Authorize.Net AIM.
To do so:
- Create or edit a payment method in the Settings > Ecommerce > Orders > Payment following the regular procedure
- Select the AuthorizeNetAIM checkout handler from the dropdown
- Fill in the associated parameters (Figure 7.1)
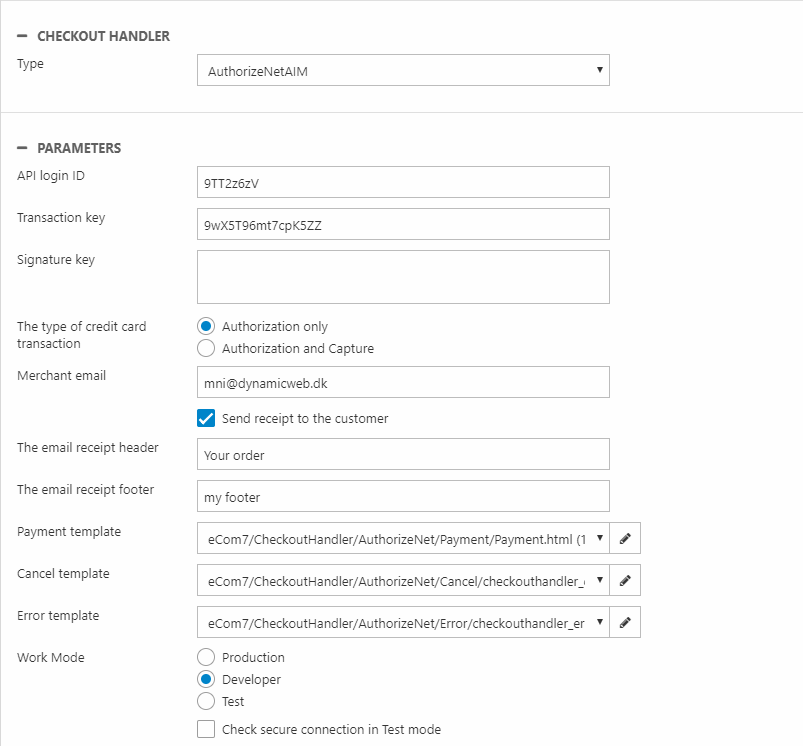
You must:
- Enter the API login ID and the Transaction Key – using the wrong ID or key will give you an error.
- Choose between the Authorize and Capture and Authorize type of transaction. The Authorize and Capture setting automatically captures authorized amounts, whereas the Authorize setting allows you to use delayed capture – i.e. capture payment from the order list in Ecommerce.
- (Optional) Supply an SHA-512 based signature key generated by Authorize.Net
- (Optional) Specify a merchant email if you want to send a receipt to the merchant once a transaction is successfully received by Authorize.Net. You can also check the send receipt to the customer checkbox to alert the customer in the same manner. If either option is used, you can enter a text for the email header/footer in the input fields
In addition you must customize any templates you want to use:
- The Post template is used when your post mode is set to Render template
- The Relay response template is used to render a receipt with transaction results returned by Authorize.Net
- The Cancel and Error templates render cancellation and error messages
Then select a work mode:
- Production for live transactions
- Developer for testing your setup. This mode allows "live" transaction processing and makes it possible to test the manual capturing of orders created with Authorize Only. However, if you have it configured for Authorize and Capture then it will make an autocapture of the order when authorized.
- Test likewise allows you to test your setup, but does not allow “Live” transactions. Can be used with Authorize and Capture, though.
Finally, you should check secure connection in Test mode to ensure that your connection really is secure.
The HTML template files are located in your File Manager in the folder /Templates/eCom7/CheckoutHandler/AuthorizeNet
Template tags
The following template tags are available to you when working with the AuthorizeNet templates:
Post template – used when Post Mode is set to Render template:
- All standard order tags
- Authorizenet.x_action – url of Transaction Processing Server
- Authorizenet.x_fp_hash
- Authorizenet.x_fp_sequence
- Authorizenet.x_fp_timestamp
- Authorizenet.x_show_form
- Authorizenet.x_method
- Authorizenet.x_version
- Authorizenet.x_login
- Authorizenet.x_amount
- Authorizenet.x_test_request
- Authorizenet.x_invoice_num
- Authorizenet.x_description
- Authorizenet.x_first_name
- Authorizenet.x_last_name
- Authorizenet.x_company
- Authorizenet.x_address
- Authorizenet.x_city
- Authorizenet.x_state
- Authorizenet.x_zip
- Authorizenet.x_country
- Authorizenet.x_email
- Authorizenet.x_cancel_url
- Authorizenet.x_delim_data
- Authorizenet.x_relay_response
- Authorizenet.x_relay_URL
- Authorizenet.x_type
Relay response template
- Authorizenet.x_test – sign of test mode
- Authorizenet.x_amount
- Authorizenet.x_trans_id
- Authorizenet.x_response_code
- Authorizenet.x_response_reason_code
- Authorizenet.x_response_reason_text
- Authorizenet.x_return_URL
Cancel template
- All standard order tags
Error template
- All standard order tags
- CheckoutHandler:ErrorMessage
For more information on these tags, please see the Server Integration Method Developer Guide.
Testing
Before going live, test your setup thoroughly.
You can use the following test credit card numbers when testing your checkout handler:
|
Test Card Brand |
Number |
|
American Express |
370000000000002 |
|
Discover |
6011000000000012 |
|
JCB |
3088000000000017 |
|
Diners Club/ Carte Blanch |
38000000000006 |
|
Visa |
4007000000027 |
|
|
4012888818888 |
|
|
4111111111111111 |
|
MasterCard |
5424000000000015 |
The expiration date must be set to the present date or late – you can read more in the Testing guide from Authorize.Net.
You may also need to familiarize yourself with the response codes (error codes) you may get back from Authorize.Net.
Going live
Once you’ve tested your setup thoroughly, simply exchange your test account credentials with the live credentials (API login ID and Transaction Key) belonging to your real Authorize.Net account and switch the checkout handler parameter work mode to Production.
If you’ve been working with a transaction processing setting other than live in the Authorize.Net administration, switch to live.
Your setup should now be complete!