Click and collect

The click and collect feature enables the customer to select a store to pick up their product from instead of getting it delivered. The solution can either be configured with the stock location on each order line or on the whole order. This way, the solution can be tailed to the specific needs.

There are two scenarios:

  1. On the product page, you can choose to either ship the product or collect it yourself. This is done using two separate buttons e.g.: Add to cart and Collect in store as shown in Figure 1.1.
  2. In the cart, you can choose to collect the products instead of getting them shipped by selecting the Click & Collect shipping provider.

For both of the mentioned scenarios you will want a way to separate your click and collect stock locations from your ordinary stock locations that aren’t available for click and collect. This is done by creating a new stock location category and then you can render all the stock locations in this category as pickup points.

So:

  • Navigate to Settings > Ecommerce > Product catalog > Stock location categories and create a new category for Click and collect
  • Create/edit your existing stock locations you want available for click and collect and put them in this Click and collect category
  • Assign a dedicated "Pickup point" user to the stock location, where the user address, country, and phone number represent the pickup point's

Now you’re ready to complete the setup - you only need to decide which scenario you want for your shop.

In the first scenario, you have both options on the product page:

  • Add the product to cart and get it shipped
  • Select a store to collect it from yourself

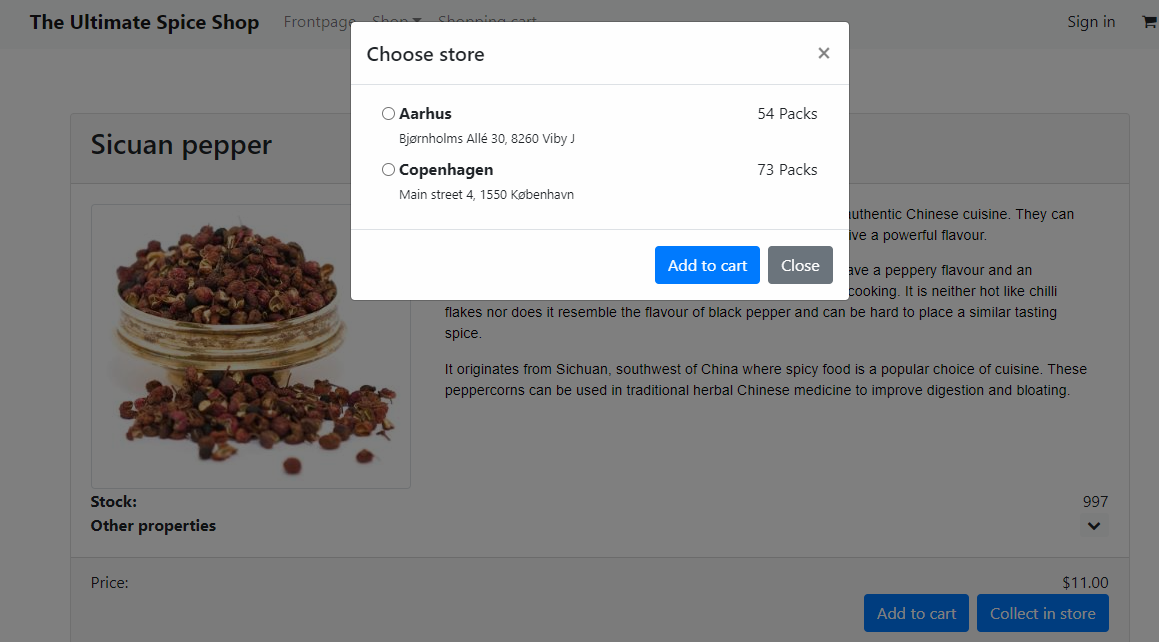
For the Collect in store option, you render all the stock locations in your Click and collect category (Figure 3.1). The selected stock location is then added to the order line of the product.

Figure 3.1 The Stock locations modal

This must be implemented in your product details template in the Product Catalog app and could be done using the following code example. First off, the definitions and script section at the top of the template:

RAZOR
@using Dynamicweb.Rendering @using Dynamicweb.Ecommerce.ProductCatalog @using Dynamicweb.Security.UserManagement @inherits ViewModelTemplate<ProductViewModel> @{ string groupIdQueryParameter = string.IsNullOrEmpty(Dynamicweb.Context.Current.Request["GroupID"]) ? string.Empty : "&GroupID=" + Dynamicweb.Context.Current.Request["GroupID"]; string productLink = "/Default.aspx?ID=" + Pageview.Page.ID + "&ProductID=" + Model.Id + groupIdQueryParameter; var stockUnits = Dynamicweb.Ecommerce.Services.StockService.GetStockUnits(Model.Id, Model.VariantId); } <script> function chooseStore() { let queryString = "/Default.aspx?ID=@Pageview.Page.ID&cartcmd=add&redirect=false"; const body = {}; var store = $("input[name='stockLocation']:checked").val(); if (!store) { return; } queryString += "&" + store; body["ProductID"] = "@Model.Id"; body["VariantId"] = "@Model.VariantId"; var variantId = $("#VariantId").val(); if (variantId) { body["VariantId"] = variantId; } requestFetch( queryString, body, function () { location.reload(true); }, null ); } function requestFetch(url, data, successCallback, errorCallback) { this.xhr = new XMLHttpRequest(); this.xhr.open("POST", url, true); this.xhr.onreadystatechange = function () { const self = this; function error(message) { console.warn(message); if (typeof errorCallback == "function") { errorCallback(this.response); } } if (this.readyState == XMLHttpRequest.DONE && this.status == 200) { var data = this.response.trim(); //console.info("%cData: ", consoleStyles.success, data); if (typeof successCallback == "function") { successCallback(data); } } else if (this.readyState == XMLHttpRequest.DONE && this.status != 200) { error.call(self, url + ": XMLHttpRequest failed"); } }; this.xhr.setRequestHeader('cache-control', 'no-cache, must-revalidate, post-check=0, pre-check=0'); this.xhr.setRequestHeader('cache-control', 'max-age=0'); this.xhr.setRequestHeader('expires', '0'); this.xhr.setRequestHeader('expires', 'Tue, 01 Jan 1980 1:00:00 GMT'); this.xhr.setRequestHeader('pragma', 'no-cache'); if (data) { if (data instanceof FormData) { this.xhr.send(data); } else { let formData = new FormData(); for (let key in data) { formData.append(key, data[key]); } this.xhr.send(formData); } } else { this.xhr.send(); } }; </script>

Then you must add the Collect in store button that is shown if any stock units have been configured in the Stock Matrix for the product. The button needs to have a data-toggle and data-target defined, like so:

RAZOR
@if (stockUnits.Any()) { <button class="btn btn-info pull-right" type="button" style="margin: 5px;" data-toggle="modal" data-target="#stockLocationsModal">Collect in store</button> }

And most importantly, insert the code for the actual stock location modal somewhere in your template. In this example, STOCKLOCCAT1 is the stock location category ID of our Click & Collect category.

RAZOR
<!-- Stock locations modal --> <div class="modal fade" id="stockLocationsModal" tabindex="-1" role="dialog" aria-labelledby="stockLocationsModalLabel" aria-hidden="true"> <div class="modal-dialog" role="document"> <div class="modal-content"> <div class="modal-header"> <h5 class="modal-title" id="stockLocationsModalLabel">Choose store</h5> <button type="button" class="close" data-dismiss="modal" aria-label="Close"> <span aria-hidden="true">×</span> </button> </div> <div class="modal-body"> @foreach (var su in stockUnits.OrderBy(s => s.StockLocationId)) { var stockLocation = Dynamicweb.Ecommerce.Services.StockService.GetStockLocation(su.StockLocationId, Model.LanguageId); if (stockLocation != null) { if (stockLocation.CategoryId == "STOCKLOCCAT1") { <div class="container-fluid"> <div class="row"> <div class="col-md-8"> <div class="radio"> <input type="radio" name="stockLocation" id="stockLocation_@su.AutoId" value="stockLocationId=@su.StockLocationId&UnitId=@su.UnitId" style="margin-top: 6px;vertical-align: top;"> <label for="stockLocation_@su.AutoId"> <b>@stockLocation.Name</b> @{ var user = User.GetUserByID(stockLocation.UserId); if (user != null) { <div><small>@user.Address @user.HouseNumber, @user.Zip @user.City</small></div> } } </label> </div> </div> <div class="col-md-4"> <div class="pull-right"> @{ var unit = Dynamicweb.Ecommerce.Services.VariantOptions.GetVariantOption(su.UnitId, Model.LanguageId); } @su.StockQuantity @unit.Name </div> </div> </div> </div> } } } </div> <div class="modal-footer"> <button type="button" class="btn btn-primary" onclick="chooseStore();">Add to cart</button> <button type="button" class="btn btn-secondary" data-dismiss="modal">Close</button> </div> </div> </div> </div>

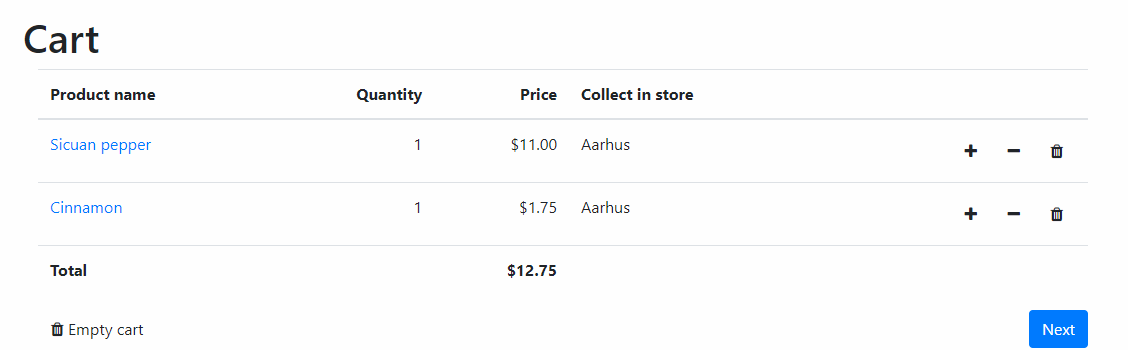
In the cart, each product has the pickup point saved in the order line and it can be rendered like shown in Figure 4.2.

This must be implemented in the template for the Show Cart step in the Shopping Cart app, where the Stock location can be rendered inside the OrderLines loop using the tag: Ecom:Order:OrderLine.StockLocation.Name

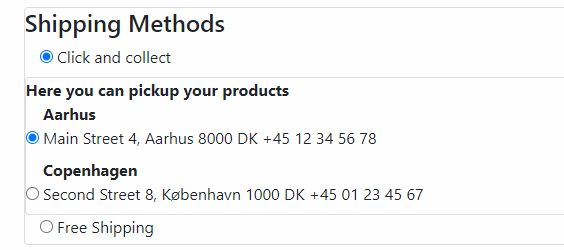
In the second scenario, products are added to the cart with the usual Add to cart button and then in the checkout, you can choose a Click and collect shipping method (Figure 5.1) which transforms the whole order into a Click and collect order.

Figure 5.1 You can select the Click and collect shipping method in the checkout

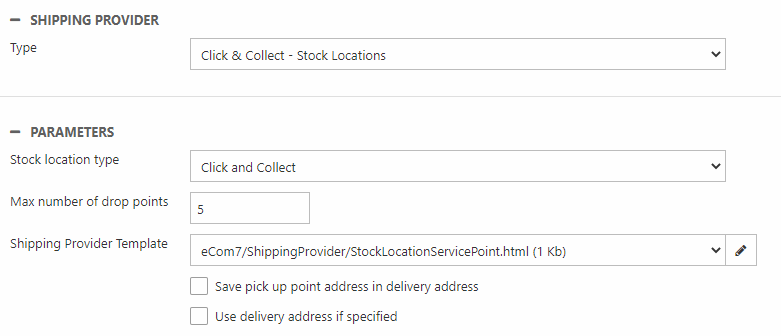
So, create a new shipping method with the Click & collect - Stock Locations shipping provider (Figure 5.2).

Set the parameters to the following:

  • Stock location type: Select your click and collect stock location category
  • Shipping Provider Template: Select the StockLocationServicePoint.html template

This enables the provider to render some content in the checkout: a list of the stock locations in your chosen stock location category, as shown in the image above.

Figure 5.2 The parameters for the Click & collect - Stock Locations shipping provider

The last step is to implement this in the template for the Information step in the Shopping Cart app. You will need:

  • A new function in the script section
  • Incorporating the function in the payment and shipping section

So, open your Information step template and add this updateCart function in the script section:

RAZOR
updateCart = function (gotoStep) { gotoStep = gotoStep || 'CartV2.GotoStep1'; var form = document.getElementById('ordersubmit'); var field = document.createElement('input'); field.type = 'hidden'; field.name = gotoStep; field.id = gotoStep; //field.value = 'Update'; form.appendChild(field); form.submit(); }

Then scroll down to the fieldset section for Payment and delivery and add the onchange=’updateCart()’ or onclick=”updateCart()” parameter to the radio buttons for both payment and shipping, as shown in this code - or simply replace your Payment and delivery fieldset section with this code:

RAZOR
<fieldset> <div class="panel panel-default"> <div class="panel-body"> <legend><h4>@Translate("Payment_and_delivery", "Payment and Delivery")</h4></legend> @if (Loops.Contains("Paymethods")) { <h4>@Translate("Payment_methods", "Payment methods")</h4> <div> @foreach (var i in GetLoop("Paymethods")) { <div class="radio"> <label class="col-sm-10"> <input type="radio" name="EcomCartPaymethodID" id='EcomCartPaymethodID_@i.GetValue("Ecom:Cart.Paymethod.ID")' value='@i.GetValue("Ecom:Cart.Paymethod.ID")' checked='@i.GetBoolean("Ecom:Cart.Paymethod.IsSelected")' onchange='updateCart()' /> @i.GetValue("Ecom:Cart.Paymethod.Name") </label> </div> } </div> <div> @GetString("Ecom:Cart.PaymentInlineForm") </div> } @if (Loops.Contains("Shippingmethods")) { <h4>@Translate("Delivery_methods", "Delivery methods")</h4> <div> @foreach (var i in GetLoop("Shippingmethods")) { <div class="radio"> <label class="col-sm-10"> @if (i.GetBoolean("Ecom:Cart.Shippingmethod.IsSelected")) { <input type="radio" name="EcomCartShippingmethodId" onclick="updateCart()" id='EcomCartShippingID_@i.GetValue("Ecom:Cart.Shippingmethod.ID")' value='@i.GetValue("Ecom:Cart.Shippingmethod.ID")' checked="checked" /> @i.GetValue("Ecom:Cart.Shippingmethod.Name") } else { <input type="radio" name="EcomCartShippingmethodId" onclick="updateCart()" id='EcomCartShippingID_@i.GetValue("Ecom:Cart.Shippingmethod.ID")' value='@i.GetValue("Ecom:Cart.Shippingmethod.ID")' /> @i.GetValue("Ecom:Cart.Shippingmethod.Name") } </label> <br/> <div style="padding-left:40px;"> @i.GetString("Ecom:ShippingProvider.Content") </div> </div> } </div> } </div> </div> </fieldset>