
Translations
A common issue when working with multi-language websites is how to manage translations of static text in e.g. product list templates or text the shopping cart checkout process.
In Dynamicweb, this is handled by using a translate tag in your templates rather than static text, and then translating the keys from the backend, using the Dynamicweb translation interface.
A translate tag contains:
- A translation key
- Optionally, a default value
In one of the following formats, depending on your template setup:
- HTML: <!--@Translate(TEXTKEY, “Default value”)-->
- Razor: @Translate(“TEXTKEY”, "Default value")
Once the first translation key is created on your solution, a translations.xml file is created in the Templates/Designs/YourDesign folder.
Translations.xml files may be moved freely from one design to another, if necessary, or to Templates/Designs for shared (global) translations.

Basic Concepts
In this section, you will learn about:
- Using the translate tag in your templates
- How to translate keys – and how get an overview of current translations
- Shared translations, and how they are used
- Adding translation keys manually
Using the translate tag
If you want to translate key terminology in your templates across languages, you must first define a translation key from within your templates.
You do so by using the translation tag, in either HTML or Razor format, depending on whether or not your templates are .html or .cshtml.
- HTML: <!--@Translate(TEXTKEY, “Default value”)-->
- Razor: @Translate(“TEXTKEY”, "Default value")
For example, you have some static text on one of your templates:
To make that text dynamic (translatable), use the translate tag, as below. In both cases, the key – if not already present – will be created in the translations.xml file located at Templates/Designs/YourDesign folder.
Please note: If you want to translate input field labels, you need to nest the translation tag within apostrophes, not double quotation marks, e.g. placeholder=’@Translate("Search")’. If any other format is used, the parser will choke.
Translating keys
Translating keys can be done in two ways:
- From each language layer
- From the Management Center > Translations interface
The first way is well suited to solutions where language layer translations are maintained by a dedicated translator, whereas the second way is well suited for getting an overview of the translation status on the entire solution.
Translating keys for one language layer
If you work with dedicated translators, it is much easier for them to work with one language layer only when translating, rather than go through the management center (which they may not have access to either).
To translate keys for only one language layer:
- Switch to the language layer using the website selector
- Right-click the website selector and click translations (Figure 5.1)
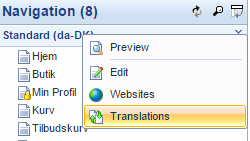
This opens the translation interface for that language layer (Figure 5.2).
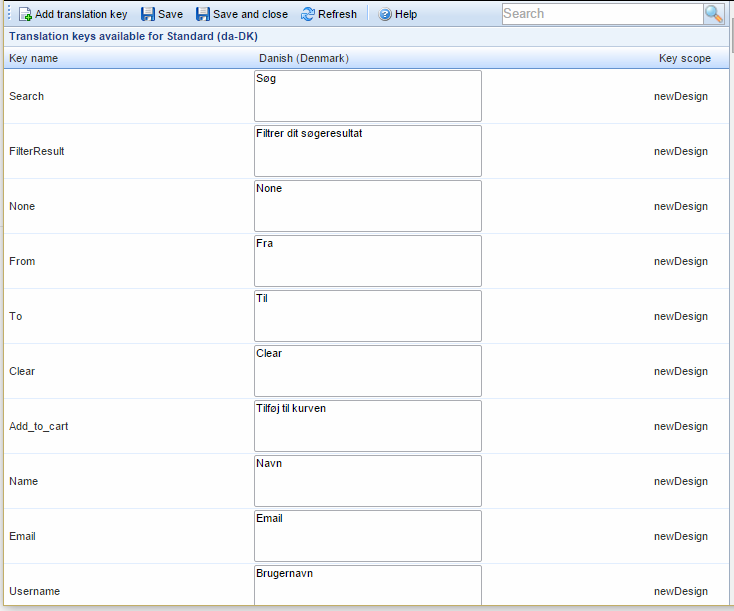
From the translation interface, you can:
- View the translation key in the left column
- View and modify the translation (if any) in the middle column
- See the scope of the translation key in the right column (here the scope is the design called newDesign).
The translations overview
From the Settings area, you can get an overview of all the keys and translations on your solution.
To open the translations overview:
- Go to Management Center > Translations
- Click on either Shared or one of your designs to open the relevant translations overview (Figure 6.1)
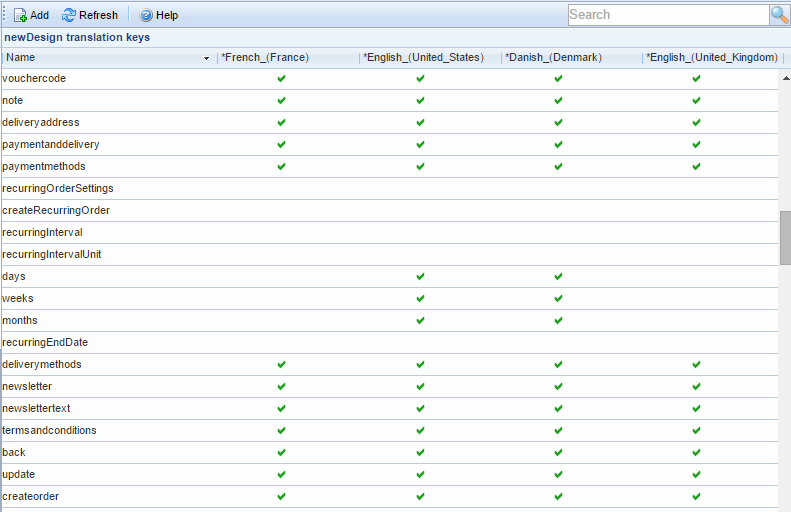
From the translations interface, you can view all keys and the translation status for each regional setting (language) on the solution (here French, US English, Danish & UK English). You can also search for translation keys using the search field in the toolbar.
A green checkmark on the grid means that the key is translated into that language – but not, of course, that it is correct.
Clicking any key will open the translation key edit view (Figure 6.2)
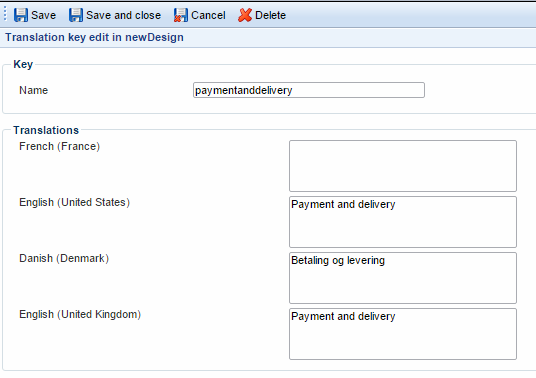
From the translation key view, you can:
- Rename the key
- View, delete or enter a translation of the key for each website language on the solution
Shared translations
By clicking the Shared node under Management Center > Translations you can create and manage translations and keys created in the Templates/Designs/Translations.xml file.
Shared translations are created and managed in exactly the same way as design-specific translations, but are available from all designs, provided that the same key is not also present in the design-specific translations.xml file.
In other words:
- All translations in the translation.xml in the /Templates/Designs/DesignName/translation.xml file AND /Templates/Designs/translation.xml are available
- If the same key exists in both places, the key in /Templates/Designs/DesignName/translation.xml will be used
Adding translation keys manually
You can add translation keys (and translations) manually from both the language layer translation interface and the translations overview for the entire solution.
To add a translation key manually, click the Add translation key button to open an empty translation key edit view (Figure 8.1).
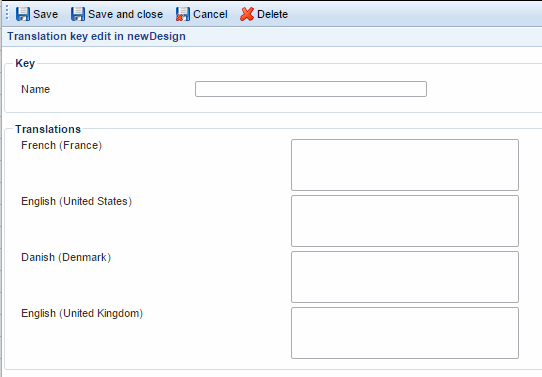
From the translation key edit view, you must:
- Name the key
- Provide one or more translation values for the key
Once created, the translation key can be used in all templates employed by the current design.


