Products
The Heart and Soul of any Ecommerce Solution
What’s a shop without products? What’s a product group?
Without products, your eCommerce solution is pretty dull and useless.
In Dynamicweb, products are very rich objects, with loads of properties, settings, options and abilities – and things can get pretty complicated.
In this article, you will learn more about products in Dynamicweb, starting with the basics – how to create and manage products – and all the way down to more advanced topics, like context sensitive pricing (the price matrix) or units and unit categories.
Basic Concepts
In this section you will learn about:
- Creating and editing products – and other basic actions you can take, like moving, activating or copying products
- The product fields available to you when creating a new product – you probably won’t need to worry about them all, though.
- The product description area, and how to add media (e.g. pictures, pdfs or links) to a product
- Discounts, custom VAT groups and Language and delocalization settings
- How to set up related groups and related products on a product
As a regular user, you may also need to work with relatively advanced subject such as the price matrix, product units and stock.
To keep everything about them in once place, these can all be found under the implementing section – but feel free to ignore the parts dealing with one-time setup and focus on what really matters; working with them every day.
Creating and editing products
To create a (single) new product, you can either:
- Right-click a product group and click New product in the menu
- Click New product from a product list (product group view) (Figure 3.1)
Creating a single product will take you to the details view – where you can fill out the details of the product before you save or save and close it to create it. To edit a product, simply click on it in the product list – you will have access to the same settings as when creating a product, i.e. the product details.

If you click Create multiple products from a product list, you will be presented with a grid view like Figure 3.2, where you can fill out the basic details of the products.

To edit multiple products select a number of products in a product list and click Edit products (Figure 3.3).
You will see the same list as above – only with values already present. Change any values needed and click save to save your changes.
To customize which fields you can fill out, right click one of the column names in the product list and activate the columns you need to use – the fields shown are identical to the fields you can fill out when creating multiple products. Read more here.
If you want to include variants in buld edit mode, go to Management Center > Ecommerce > Advanced configuration > General and check the Include variants in bulk edit checkbox under the additional fields section.

Deleting, moving or copying products – etc.
Once products have been created, you can do things with them.
When viewing the product details of a single product, you have access to the tools-section (Figure 4.1) from the product details ribbon bar.
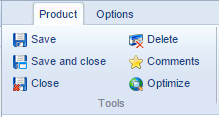
From the tools section you can:
- Save, save and close or simply close the product without saving your changes
- Delete the product
- Access and moderate product comments
- Click Optimize to run the search engine optimization tool for the product (this will help you fill out the meta-information fields described below).
Additionally, from a product list (the All products list, or when viewing a product group) you can right-click a product to access a number of actions (Figure 4.2).
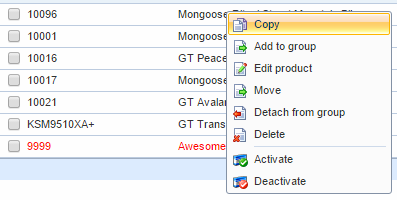
With the right-click menu, you can:
- Copy, edit, move or delete a product
- Add a product to or detach a product from a product group
- Activate or deactivate a product
You can select and work with multiple products at the same time by using the checkboxes to the left of the product list, and clicking Edit products in the ribbon bar.
On actions and primary/related groups
When you create a product it is attached to the group it is created in – this is the primary group – but it can be featured in any number of related groups.
Deleting a product from a product group – related or primary – deletes it from ALL groups – a warning pops up and tells you that all language versions are deleted from all groups – even when it’s deleted from a related group.
When adding a product to a group, keep in mind that if the product already belongs to a group, the new group will be added as a related group on the product. In similar vein, a product which is detached from a group is not detached from all groups, but only the current group.
Products which are not attached to any groups have a red background in the all products list. Read more about the all products list here.
Activating or deactivating a product causes it to be active or inactive across all product groups and language versions it is attached to.
Note: detach and move are not available from the All products list, but only from group product lists
Standard product fields
When creating or editing a product, you will have immediate access to the details view - the product fields and the ribbon bar tabs.
Use the fields to specify or edit fundamental product properties, e.g. a name, a VAT group, the product type, and so forth.
Below is an overview of the product fields normally available to you.
Basic Product settings
The first thing on a product are the basic product settings (Figure 7.1).
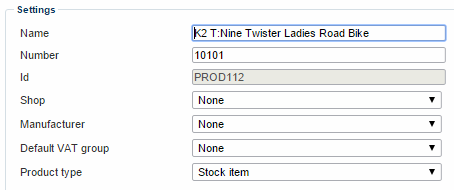
With the basic product settings, you can:
- Provide a name and number for the product. The product name will be used in the frontend product catalog, and the product number may be relevant for your particular setup, or simply used as an identifier if you have two products with the same frontend name (e.g. in separate shops).
- Select a shop for the product
- Select a manufacturer (of the manufacturers created under Management center > eCommerce settings > Product catalog > Manufacturers)
- Select a default VAT group for the products, of the VAT groups created under Management center > eCommerce > Internationalization > VAT Groups. Read more about VAT in Dynamicweb.
- Select a product type for the product.
You cannot edit the Id field. This is a unique identifier given to all products, groups and shops and it is used, for instance, when integrating Dynamicweb eCommerce with third party solutions.
Product types
Dynamicweb operates with four types of product:
- A stock item is usually a physical product (which you can, in theory, run out of, i.e. it has a limited stock)
- A service is usually a non-physical product, like support or billable hours – if selected, stock level and stock status are unavailable in the default information panel
- A parts list consists of several products and/or product groups, e.g. a computer with defined/selectable parts – read more about parts lists here
- A gift card allows the gift card holder to purchase other goods or services using a gift card code – read more about gift cards here.
Activate product settings
Below the basic product settings, you will see the active product settings (Figure 8.1).

With the Activate product settings, you can:
- Set a product to be active or inactive
- Select a publication period (campaign) that the product should be part of – read more about Publication periods (campaigns) below.
On inactive products
Why would I want inactive products in my shop, you ask? Well, you may want to have products which are not for general sale, but which can be awarded as a discount, for instance, when a customer purchases for a fixed amount, or buys 5 products at one time, etc. Read about order discounts here. Or you may want to deactivate a product in one country, but keep it for sale in another country. Read more about localization here.
In Management Center > Ecommerce > Advanced configuration > General you can choose between showing and hiding inactive products in the frontend.
Default information settings
Next up are the stock, price, weight and volume settings – called the default information settings (Figure 9.1).

With the default information settings, you can:
- Provide a price for the product (excluding VAT)
- Specify a stock level and a stock status (of the stock statuses created under Management center > eCommerce settings > Orders > Stock state)
- Provide a weight and volume for the product. You can define the weight and volume unit used under Management Center > Ecommerce > Advanced Configuration > General
If the Stock level field in Details is read-only in the default language, it’s because it is set to sum up all variant stocks for a product with variants. If you are trying to create a variant, but the stock level is still greyed out, try saving the variant first – the stock level field should now be editable. Read more about variants here.
Prices and VAT
We strongly recommend that you use prices excluding VAT in the backend. Dynamicweb is capable of handling VAT across countries, and VAT groups for countries with differentiated VAT-rates, but things become messy if we have to first subtract VAT, then add a different kind of VAT, then remove it for business customers, and so forth.
If you need to use prices including VAT anyway, you must go to Management Center > Ecommerce > Advanced Configuration > Prices and check the Prices in database include VAT checkbox.
Loyalty points settings
If your solution has the loyalty points functionality implemented, you will have access to the loyalty points settings (Figure 10.1).
The loyalty point field allows you to enter a loyalty point value for the product - and your customers to use their points to purchase the product. Read more about Loyalty points here.

Meta information fields
The meta-information fields (Figure 11.1) are used by search engines to index searches, and can have an effect on how your website is ranked in search results.
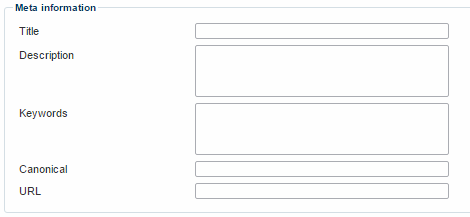
You can provide:
- A title and description
- One or more keywords
- A canonical URL, for search engine indexing purposes. The page-URL displaying the product will then be regarded as an instance of the canonical URL.
- A user friendly URL for the product (if empty, the system will use the product name)
If you do not define any meta-information for your products, no information will be added to the frontend source output. This means that empty values in the keyword or description fields will not affect the performance of your site.
Search Engine Optimization
If you need help filling out the meta-information fields, you can use the optimize button in the tools-section of your ribbon bar. It can help you fill out the fields in a way which will improve your search-ranking.
Custom field types
Depending on your setup, you may have access to one or more types of custom fields on the product:
- Product fields are custom fields which occur on all products on a solution
- Product category fields are fields tied to a product category, which is then attached to one or more product groups. Products located in the group will then inherit the fields (and optionally field values) to their product details.
If available, both types of fields can be used like regular fields.
If the product category fields are inherited (Figure 12.1), you can restore the value inherited from the group by clicking the icon to the right of the field, or fill in your own values – whichever is appropriate.

Read more about creating and using product fields in the implementing section below.
Read more about product categories and product category inheritance in the product groups documentation.
Back Catalog-fields
If your solution operates with more than 250.000 products, e.g. if you have a large back catalog, you may experience a dip in performance.
To combat that, you can enable the back catalog fields on your product details (Figure 12.3).
With the back catalog fields, you can:
- Exclude a product from being indexed
- Exclude a product from being accessible through a customized URLs
- Exclude the product from the all products list
To enable the back catalog fields, go to Management Center > Ecommerce > Advanced configuration > General and check the Show back catalog fields on products checkbox under the additional fields section.

The product description
From the ribbon bar, you have access to the Description button (Figure 13.1).

Click it to access the description view (Figure 13.2).
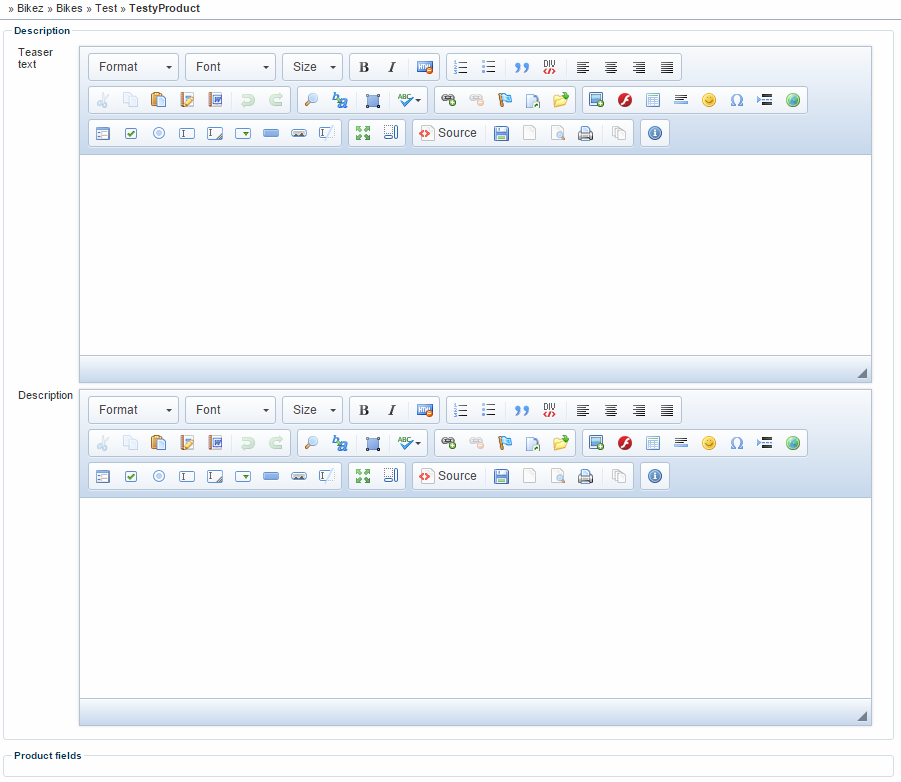
The description view is pretty simple:
- There’s an editor for a teaser text and an editor for a description.
- If you have created product fields of the editor type, they will appear below those two fields, in the product fields section
Product media settings
From the ribbon bar, you have access to the media-button (Figure 14.1).

If you click it, you will see the media settings view (Figure 14.2).

With the media settings, you can:
- Attach a small, medium or large image to the product – or link to a file from your File Manager. Preview the images selected by clicking the spyglass icon.
- Use a link or alternative link to link your product to other media types, like a pdf-file, a data-sheet, etc.
- Use the details views to create additional links to media or internal sites, and to provide an additional description in text
Default product images
You can set up default images for your products by going to Management center > Ecommerce >Advanced configurations > Images, and locating the Product default images area (Figure 15.1).

Using image patterns to add product pictures to a product
Instead of providing a picture for each product manually, you can use an image pattern. An image pattern looks in a specified folder and assigns a product picture to the product based in a pattern you provide – e.g. based on product number, name or another combination. Image patterns are configured on the product catalog you use to publish your products in the frontend – read more here.
Related groups, products & searches
In the ribbon bar, you have access to the related groups, related products and related searches buttons (Figure 16.1).

They are a convenient way for you to access information about how the product interacts with other parts of Dynamicweb eCommerce. Specifically, you can see (and create) group membership and product relations – to both product relation groups and other individual products.
You can create and configure default related groups, products, product relation groups and searches on a group level, read about product groups here.
Related groups
With the related groups button, you can see which groups a product are a member of (Figure 17.1).

From the related groups view, you can add or remove a product from a group, and you can specify which group is the primary group (which is used primarily when creating canonical URLs, read more here).
Related products & product relation groups
In Dynamicweb, you can create product relation groups (like ‘Same manufacturer’ or ‘Related products’), and use them to associate products with each other.
You can then take these related products and display them to front end users visiting the product, e.g. show them a list of ties matching a particular shirt, or an extra charger for the phone you’re selling, etc.
To create and use product relation groups, click the down-arrow in the Related products button (Figure 18.1).
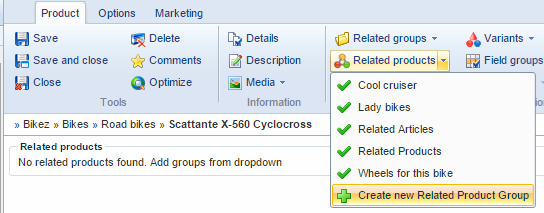
Select an existing product relation group or create a new one.
You will be presented with a product catalog tree, where you can select the product you want to relate to the current product. After selection, you will be able to see (and delete/edit) the related products from the related products view (Figure 18.2).
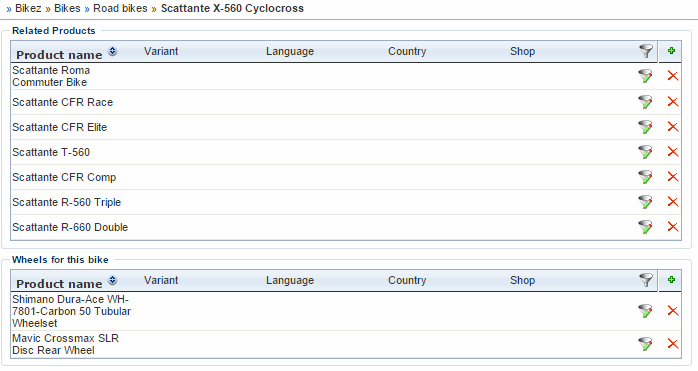
Related products across languages, countries and shops
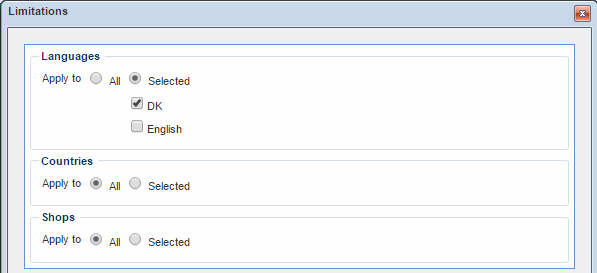
You can customize which product relations should apply in which languages, countries and shops. To do so, click the funnel icon (don’t ask) next to the red X.
This opens the limitations window (Figure 19.1).
From there, you can specify if the product relation should be active across all or only the selected languages, countries and shops.
Product relation groups can be managed by going to Management Center > Ecommerce > product catalog > Relation groups. From there, you can create, delete or sort the product relation groups for all your languages.
Related searches
Rather than manually selecting related product, and having to maintain those relations when adding new products, you can use smart searches to populate the list of related products for the product.
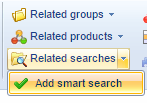
To do so, Add smart search from the Related searches dropdown (Figure 20.1) and select a smart search.
The products conforming to the criteria in the smart search will then function as the related products (Figure 20.2).

Default related searches in frontend
To display the related searches in frontend, go to the paragraph settings of the Product Catalog.
In the Template section, select the product template called ProductSmartSearhRelations.html which will use the related searches you have created to display a list of related products on the corresponding product pages.
You can, of course, adapt the product template to meet the specific needs of your eCommerce solution.
If you want all or most products in a group to have the same related products, you can create and apply default related searches on a product group level. Read more here.
Assigning discounts
If any of your order discounts are set to be assignable from product catalog, you can use the discounts-button (Figure 21.1) to assign a product to a discount directly from the product page.

To do so:
- Click the little arrow-icon on the discount button and select either Manage including discounts or Manage excluding discounts. This opens a window showing the discounts you have made assignable from the frontend.
- Select the discounts you want to include the product in
- Click save and close
- The discount will be added to the discount overview for the product (Figure 21.2)

Remember to Save and close the discount overview.
Read more about discounts in the discounts documentation.
The VAT Group matrix
The VAT group matrix allows you to assign a product to two or more different VAT groups, depending on the country. Read more about VAT and VAT groups in Dynamicweb here.
To get started, click the VAT groups button (Figure 22.1).

This opens the VAT groups overview (Figure 22.2), from where you can add new VAT groups to the product.

To add a new VAT group to your product:
- Click Click here to add a new row
- Select the VAT group and the relevant country and click OK
- Click Save or Save and close
To edit a VAT group on the product, click it and make your changes – to delete a VAT group, click the red X in the delete column.
Language and localization options
From the product ribbon (Figure 23.1), you have access to the Language and localization settings for the product.

The Language dropdown shows the current working language. When you create a product it is created in both the default language and in the working language, but only localized to the working language. To localize it to another language, switch to the language and translate e.g. the name, then save the product.
With the Delocalize button you can remove the language-specific versions of a group, i.e. non-default languages.
To do so, click the dropdown and change the language to the localized instance of the product and click delocalize. Note that you cannot delocalize default language versions of a product – they must be deleted instead. You can delocalize multiple products in one go from the product list of a product group.
Read more about working with languages under Internationalization.
The Options & Marketing tabs
In addition to the default product tab, you have access to the Options tab (Figure 24.1).

With the options tab, you can specify an activation and deactivation date for the product.
The product will not be visible in the frontend until it reaches the activation date, and will be automatically deactivated when it reaches the deactivation date. (The default deactivation date is set to never for new products).
You also have access to the Marketing tab (Figure 24.2).

The Marketing tab allows you to interact with the Personalization and Social media publishing parts of Dynamicweb – read more about Marketing in Dynamicweb.
Implementing
As stated in the introduction, products in Dynamicweb are very rich objects, with loads of properties, settings, options and abilities – and things can get pretty complicated.
In this section, you can read about some of the more advanced native properties of products – like related groups, products and searches – but also about how to implement ratings and compare functionality, and other non-core functionalities.
You will learn about:
- How to create and work with related groups and related products
- The parts list product type
- Creating and using custom product fields
- Implementing comments & ratings on a product
- Creating and using unit categories a
- The stock matrix and the price matrix
Parts lists
Parts list are occasionally also known also as BOM – Bill of Materials. A BOM is a list of materials and parts required to manufacture an end product. In our template tags, BOM is used instead of parts list.
A parts list is a special product type, which enables you to create products consisting of a list of other products or product groups already present in your product catalog. A parts list can have its own description, price, associated media, etc. – and can be added to the Shopping Cart as either an independent product, or as a number of sub-products.
A parts list is displayed in the shopping cart as a main item containing the head product, and sub-items containing the component/sub products.
To create a parts list product, follow the normal procedure for creating products, but select the product type parts list under settings (Figure 26.2).
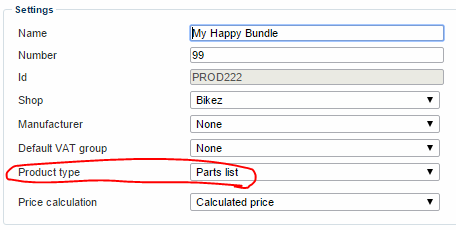
This will give you access to two things particular to parts lists:
- The price calculation dropdown menu
- The parts list button in the ribbon bar and the associated parts list overview
The price calculation settings
When you select and save a parts list product, you will get access to the price calculation dropdown (Figure 27.1).

The following options are available in the drop-down menu:
- Calculated price sums up the individual prices of all products added to the parts list.
- Fixed price uses only the default price, which you enter in the Default information section below, and it ignores any individual pricing on products added to the parts list.
- Fixed price plus changes combines the default price with the individual prices of all products added to the parts list.
The parts list overview
On the parts list button in the ribbon bar (Figure 28.1), click the down-arrow to add products or product groups to the parts list product.

The selected products and product groups are then added to the parts list overview (Figure 28.2.
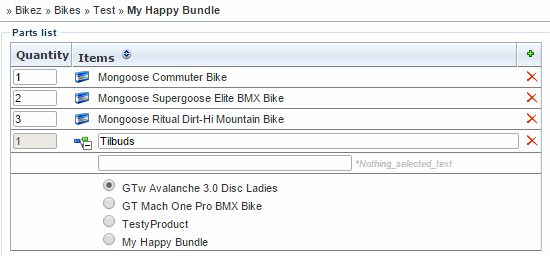
In the overview, you can:
- Specify a quantity for each product in the parts list
- If product groups are added - Open each product group and specify a selection text – e.g. ‘Select your bike here’ – and select the product that you want to use as a default selected product in the group
- Delete the product or product group from the parts list by clicking the red X-icon – or add additional products or product groups by clicking the green plus-sign
Click the sort icon to sort the parts in the parts list. Product groups follow the sort order of the original group (which you can also customize).
Parts list loops and tags
To render parts lists on the frontend, use the BOMProducts loop (all product tags and loops are available from inside this loop).
Parts list groups and products are rendered with the BOMConfiguration and ConfiguratorProducts loops (all product tags and loops are available from inside the ConfiguratorProducts loop).
Read more about the tags and loops available to you in the TemplateTag documentation.
Gift Cards
Gift cards provide a flexible way for your customers to buy a gift for someone from your web shop.
This has several advantages, for both you and your customers.
- Full freedom of choice for the recipient of the gift card
- Cash upfront for you, for goods not yet sold
- New customers introduced to your web shop by happy customers
The gift card is added as an additional product type – similar to the Service product type – allowing you to place it in your web shop to have it bought like any other product. A unique gift card code is provided with the order receipt or by email.
You can provide your customers with a selection of fixed amount gift cards or allow them to type in a custom gift card amount.
The gift card is applied during the checkout process by entering a gift card code in the gift card field.
The customer will:
- Add a product to the shopping cart and proceed to checkout
- Enter a valid gift card code in a gift card field
- Fill out the standard order details – name, address, payment method, etc.
- Complete the order
If the gift card total is larger than the order total, the remaining balance will be preserved and can be used another time. If the gift card total is smaller than the order total, the remaining order total is paid with the selected payment provider.
Gift cards and currency
It is not possible to buy products on another currency than the one the gift card is registered with on creation. By default the current order setting is used for currency if none is given.
Creating a gift card product
To create a gift card product, follow the standard procedure for creating product – but select the gift card product type under settings (Figure 31.1):
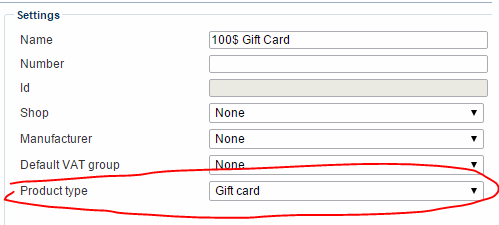
A gift card does not have a stock state – and you must manually deactivate it if you don’t want it available in your shop anymore.
Other features not available with the gift card product type are Variants, Prices, Discounts, Parts List, Units and VAT Groups.
Creating custom-amount gift cards
If you sell fixed amount gift cards, you don’t need to change your product templates – the gift card is listed and bought like any other product.
If you want to allow your users to type in a custom amount for the gift card, you must render an input field instead of the price when the product is a gift card (Ecom:Product.Type=3).
To do so:
- Navigate to the paragraph with your product catalog module attached and open the module settings
- Modify your product template to render en input field if the product is a gift card – see ProductGiftCard.html for an example
- Save
Your customers can now enter a custom amount for any gift card purchased before adding it to the shopping cart.
The gift card overview
Once gift cards are set up, you can get an overview of all the gift cards sold on your solution – and their current status – by going to Management Center > Ecommerce > Orders > Gift Cards (Figure 33.1).
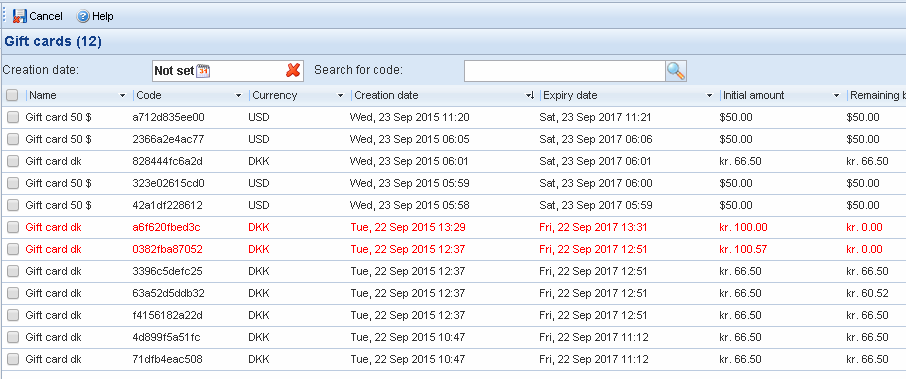
From the overview, you can see:
- The name of the gift card product
- The gift card code and currency
- The creation and expiry date
- The initial gift card amount and the remaining balance
Red cards are either expired or used – and with the search field and creation date filter you can identify either specific cards or cards created on a particular day, if need be.
Click any gift card to see a list of order for which the card has been used (Figure 33.2)

Gift cards and the order receipt
Once a gift card has been purchased, you should display the unique gift card code in the order receipt.
During the order receipt step, you can also list any gift cards used during the transaction – including initial amount, remaining amount and expiry date.
For an example, please see the ReceiptGiftCard.html template.
Creating a gift card field in the checkout flow
To enable your users to use a gift card, you must create a field in the checkout flow (e.g. during the Information step) allowing them to enter their gift card codes during checkout.
The field must be an input field with EcomOrderGiftCardCode as the name and ID, and <!--@Ecom:Order.GiftCardCode-- > as the value.
Dynamicweb provides an Information-template to use with Gift cards:
- Navigate to a page with the Shopping cart module and open the module settings
- As your Information step template, select InformationWithStatesGiftCards.html (Figure 35.1) – or modify or create your own template to suit your needs
Save the module settings

Customizing the expiration date
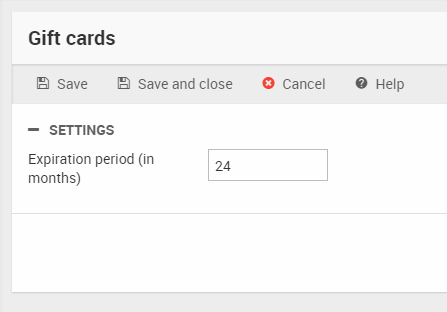
You can customize the expiry date for all issued gift cards.
The default is 24 months, as per Danish law, but if you do business in other countries, change it to suit your needs.
To do so:
- Go to Management Center – Ecommerce – Advanced configuration – Gift Cards (Figure 36.1)
- Change the expiration period to suit your needs
- Save
The expiry date is defined as the purchase date + the number of months defined in this field. The expiry date is calculated once - upon creation of the gift card.
Custom Product fields
You can create custom product fields , which are then added to all products on the solution.
You will then have access to the custom product fields when creating or editing a product.
Custom product fields on a product could look like Figure 37.1.

Creating a custom product field
To create a custom product field:
- Go to Management Center > Ecommerce > Product catalog > Product fields
- Click New field in the toolbar (Figure 38.1) – Or if editing an existing field, simply click it.

- This opens the Product field view (Figure 38.2)
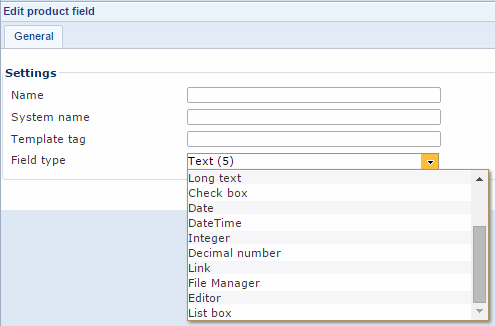
From here, you must:
- Specify a name and a system name for the field
- Provide a template tag-value for the field. Use this value in your templates to render the field content on the frontend.
- Select a field type for the field – see table below
Field types for custom product fields
The field types available to you are:
|
Field type |
Function |
|
Text (5-255) |
Standard text field where you can type between 5 and 255 characters |
|
Editor |
Inserts a WYSIWYG editor where you write a text using various text editing tools. |
|
Long text |
Inserts a text box where you can type several thousand characters. |
|
Checkbox |
Inserts a checkbox |
|
Date |
Inserts a drop down where a date can be selected |
|
Date/time |
Inserts a drop down where a date and time can be selected |
|
Integer |
Inserts a field where integers can be entered |
|
Decimal number |
Inserts a field where decimal numbers can be entered |
|
Link |
Inserts a field where you can enter a link to another web page or a file in your File Manager |
|
File Manager |
Inserts a field where you can select a file from your File Manager |
|
List box |
Inserts a list of options that can be selected/deselected. This option comes with extra settings, see below. |
Note: Fields of the editor-type can be found at the bottom of the description view.
List box options
If you create a list box field, you will have extra options available to you (Figure 39.3).
You must:
- Choose between list box types, radio button, checkbox, dropdown, and multiselect, in the Display as dropdown
- Specify a name and a value for each of the list box options
- Choose whether you want each option to be selected by default or not

Tags and loops for custom product fields
Custom product fields are rendered with the CustomFieldList loop or with the template tags that you provided in settings.
Comments, Ratings & Comparisons
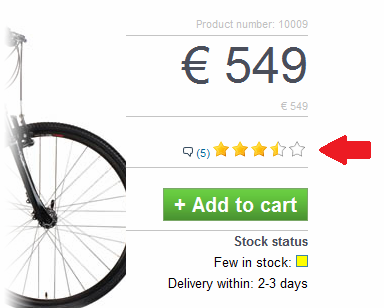
The ability to comment and rate products (Figure 41.1), and to compare two or more similar products, are features which many end-users have come to expect from an Ecommerce solution.
With Dynamicweb you can implement this with a minimum of effort – here’s how.
Comments & Ratings on pages & news module articles
You can use the Comments & Rating functionality to rate and comment on pages and news-items as well:
- Copy Comment.cshtml from /Templates/eCom/Product to either your News module template folder or your design folder (/Templates/Designs/YourDesign/)
- Include the Comment template in your news or page template
- Change the first if defined check from checking Ecom:Product.Rating to checking Comments.Rating
You then need to change some of the input fields in the form:
- Change the Comment.ItemType value from ecomProduct to page or news depending on your needs
- Change the Comment.ItemID value from @GetValue("Ecom:Product.ID") to @GetInteger(“DwPageID”) or @GetInteger(“News:ID”) depending on your needs
Comments on a product also use a Comment.LangID, but that’s not necessary for News or Page comments.
Adding comments & ratings to your products
To add comments and ratings to your product catalog, you must include the standard Comment.cshtml file in your product template.
To do so:
- Go to the paragraph with your Product Catalog module and open the module settings
- Scroll down to the Templates section and open your product template (Figure 42.1)

- Include the Comment.cshtml template where you want the comments to show up
Minimizing spam comments
By default the ability to make comments and ratings will be available to all your visitors. However, by using the If Defined() template tag, you can edit your product template to only allow logged-in users to comment and rate a product. This will likely minimize problems with spam or unwanted comments.
Adding compare functionality
To add compare functionality to your product catalog, you must select or modify the product list template and use the compare template.
To do so:
- Go to the paragraph with your Product Catalog module and open the module settings
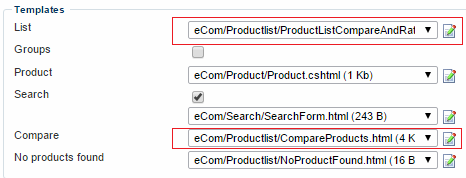
- Scroll down to the Templates section and:
- Select the list-template ProductListCompareAndRating.html
- Select the compare-template CompareProducts.html (Figure 43.1)
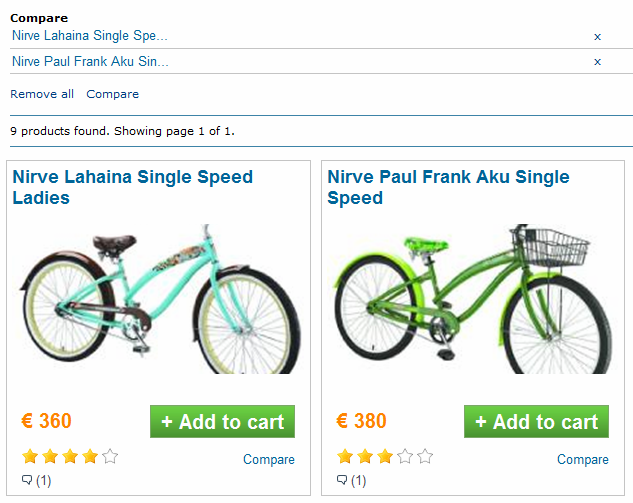
On the frontend, you users will now be able to click compare on products to add them to a compare list (Figure 43.2).
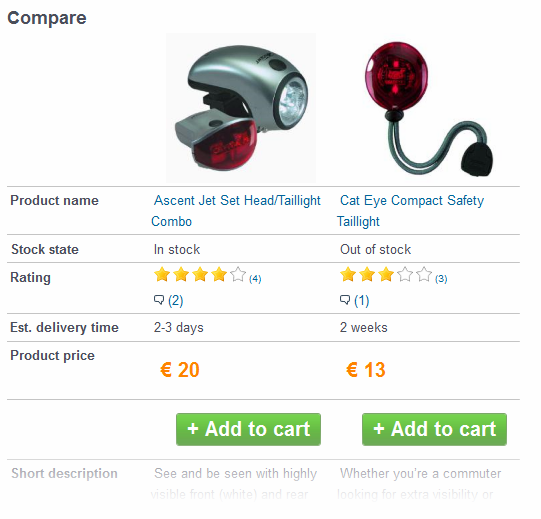
From the compare list, they will be able to click compare to go to a compare screen (Figure 43.3).
Moderating comments and ratings
Once comment and rating functionality has been implemented, you will be able to view and moderate product comments from the backend by clicking the comment button in the ribbon bar.
This will take you to the comment window (Figure 44.1).

From here you can view, delete, add or edit comments (by clicking it).
Note: Comments added from the backend will not show up until a comment has been added from the frontend.
Comments, Ratings & compare tags & loops
To implement comments, ratings & compare functionality, you have access to the Comments loop and related tags from the Product lit and details template – read more here.
You may also use the following loops to display information about related views and searches - originally introduced with the comments, ratings & compare functionality.
To control how many views are needed for a product to be added to the customers who saw also saw list, go to Management Center > Ecommerce > Advanced configuration > General and check the appropriate checkbox under the Power pack section.
Product units
Some products are sold by the kilo, some are sold in pairs, and others are sold in boxes.
In Dynamicweb, you can create product units – like kg, pair, and box - and use them both to render the correct term for a particular product (like a pair of glasses) and to make different product units available for one product, and let customers choose between ordering e.g. a pack, a box and a pallet of pencils.
From the product ribbon bar, you have access to the Units-button (Figure 46.1), from which you can specify a default unit type for the product.

Before you can specify a default unit type, however, you need to create them – see the next section.
Creating a product unit
Some products are sold by the kilo, some are sold as pieces, and others are sold as pairs – trousers and glasses, for instance.
To be able to offer your products for sale with the right unit labels, and to allow you to create and work your own unit types, Dynamicweb allows you to create custom product units.
To do so:
- Go to Management Center > Ecommerce > Product catalog > Product units
- Click New product unit in the toolbar (Figure 47.1). This opens the edit unit view

- Provide a name for the unit, e.g. boxes or kilos.
- Click Save and close
You can edit a product unit category by clicking it and entering a new name – or delete it by clicking delete product unit in the toolbar.
Units and localization
You can only create new product units when your default language is selected in the toolbar. Once a product unit has been created, you can create language-specific version of it by changing the language and saving the product unit in the new language. If you don’t, no unit category label will be rendered in the frontend for that language. Read more about localization in Dynamicweb.
Using product units
Once you have one or more product units created, it’s time to actually use them for something.
There are several ways to use product units:
- You can set a default unit for products which are customarily sold as e.g. pairs of trousers, glasses, gloves etc.
- You can make a product available in several different product units, and price them accordingly using the price matrix
To set a default unit on a product, go to the product and click Units in the ribbon bar, then select the default unit for the product using the dropdown. The default product unit is then available from your product list template using the StockUnits loop, and from the product detail template using the Units loop.
If you want to use several units for a single product, this is slightly more complicated.
Use the Stock button in the ribbon bar to open the stock matrix (see more below) and create a new stock location for each product unit you want to make available for the product (Figure 48.1) – note that specifying a location is not actually necessary.

You can now access all the units from frontend:
Adding a unit selector to the Add to cart form in the Product details template:
Adding a unit selector to the Add to cart form in the Product List template:
Different prices per stock unit
Different product units usually mean different prices per unit – normally, you want a box of items to be more expensive than a single item.
To make that possible, open the price matrix and create a price per product unit (Figure 49.1) – if you can’t select any of your units, it’s because you haven’t added them to the stock matrix for the product as outlined above.

You now have access to product unit prices from the Units loop in the product details template:
Adding to cart with correct unit & price
To add a product (from product details page) to the shopping cart with the correct unit and price, you simply use cartcmd in the standard manner but include a unitID:
You can use Javascript to change the price in frontend according to price, or show different units in table with the unit price, and add to cart buttons.
Please note, that orders in the backend do not show the unit for an order, but you can use an order line field to show the correct UnitID. Read more about order line fields here.
To do so add an order line field to add to cart command (if you have more than one order line field remember an if statement to use the right one):
Be aware!
Please be aware that using the Ecom:Product.Form.Clean tag to generate the hidden-fields automatically, the default unitID will always be used as the unitID.
So instead of using the tag simply create and submit the hidden-fields manually. An example of the hidden-fields you need to create can be seen in Figure 50.3 – the minimum requirements being product ID, variant ID, unit ID, and cartcmd=add

The Stock Matrix
From the ribbon bar, you have access to the Stock button (Figure 51.1).

The Stock button opens the stock matrix, which allows you to create and maintain information about stock units and stock locations (Figure 51.2).

To create a new stock matrix entry:
- Click Add a new row to open the stock information window (Figure 51.3)
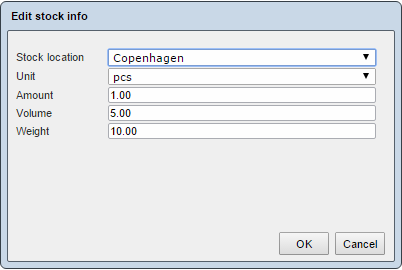
- Specify a stock location (optional), read more about stock locations below
- Specify a unit type (of the types created in your management center) and an amount of this unit type you have in stock.
- Specify the weight and volume of the unit type – this is important if you use weight and volume to calculate shipping fees.
You can limit the stock locations available on a shop level – read more here. If a product belongs to more than one shop, the stock locations selected for both shops will be available.
The stock matrix and orders
When designing your stock matrix, keep in mind that when an order is completed, the products are removed from stock and from the first location on the list that has the product in stock. This may or may not be relevant for your solution – Dynamicweb is not a full-fledged ERP system, and in many cases, the stock matrix will be corrected by an integration process.
Stock locations
Some products may be available only in select locations, or you may want to estimate delivery times in your checkout flow depending on where the physical product is located. This is where stock location are useful.
To create a stock location:
- Go to Management Center > Ecommerce > Product catalog > Stock location
- Click New in the toolbar (Figure 53.1). This opens the edit stock location view.

- Provide a name and (optionally) a description for the stock location
- Click Save and close
You can edit a stock location by clicking it and entering a new name – or delete it by clicking Delete in the toolbar.
Stock locations and localization
You can only create new stock locations when your default language is selected in the toolbar. Once a stock location has been created, you can create language-specific version of it by changing the language and saving the stock location in the new language. If you don’t, no stock location label will be rendered in the frontend for that language. Read more about localization in Dynamicweb.
Stock tags and loops
Stock units are rendered with the StockUnits loop, and stock locations are rendered with the StockLocations loop.
Read more about the tags and loops available to you in the TemplateTag documentation.
Back-in-Stock notifications
Back-in-Stock notifications are a feature, which lets customers add themselves to a notification list when they are interested in a product which is temporarily out of stock.
You can then set up a scheduled email to alert users on the notification list once the product is back in stock.
To set up Back-in-Stock notifications:
- Edit your product details template to let both registered and anonymous users add themselves to the notification list
- Create a recurring email using the back-in-stock recipient provider
Once a user – anonymous or registered – has signed up for a back-in-stock notification, they will appear on the Notifications list, which is accessible from the Notifications node in your backend product catalog area (Figure 55.1).
For anonymous users, the notification is tied to an email they provide – for registered users it is tied to the UserID. Once a notification has been sent, it is automatically removed from the list. In the notification email, you should include an unsubscribe link – this will cancel all pending notifications tied to the email or userID in question.

Back-in-Stock notification entries are created by your users from the frontend, when they add themselves to the notification list for an out-of-stock product.
To allow them to do so, you should render an appropriate input (for anonymous users) or link/button (for registered users) once a product is out of stock:
Once you have made it possible for your users to add themselves to the Notifications list, you must create a scheduled email in the standard manner, using the back-in-stock recipient provider to pull recipients from the Notifications-list.
The Price Matrix
Dynamicweb Ecommerce provides you with a flexible and powerful way of customizing product prices; the price matrix.
With the price matrix, you can differentiate the price of a product according to a variety of criteria – in a format similar to classic ERP systems.
To access the price matrix, click the Prices button (Figure 56.1) in the ribbon bar.

This opens the price matrix (Figure 56.2).

The price matrix consists of a number of rows, each with associated criteria and a price.
If the criteria for a row are fulfilled, the price will be used by the system. If more than one price row has fulfilled criteria, the lowest price will be used.
You can edit an existing price row by clicking it – or delete it completely by clicking the red X-icon in the delete column.
Customizing the price matrix rows
You can customize the rows in the price matrix, as well as the sort order, by going to Management Center > Ecommerce > Advanced Configuration > Prices and customizing the list option (Figure 57.1)
Informative prices
A price marked as informative is excluded from the prices loop – this makes it possible to add e.g. retail prices or previous prices to a product (and show them in the frontend with Ecom:Product.InformativePrice.* and Ecom:Product.InformativePrice.IsInformative), without ever applying them (or temporarily make prices informative to show e.g. pre-sale prices).
Creating a Price Matrix row
To create a new price row in the price matrix, click Click here to add a new row on the price matrix.
This opens the edit price window (Figure 58.1), which allows you to specify a price and a number of criteria for the price to be applied.
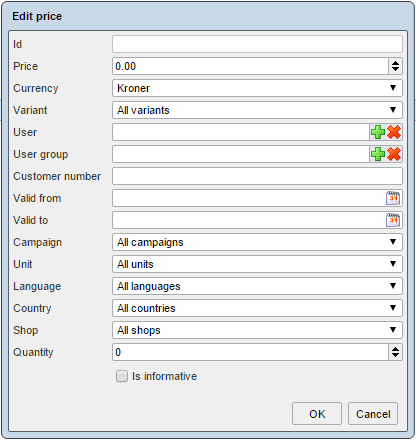
You can:
- Specify a price and a currency for the price (of the currencies created on your solution)
As for your price matrix criteria, you can apply prices based on:
- Variants
- User and user groups – or customer number
- A specific time span
- Whether a specific campaign is running or not
- The product unit selected
- The eCommerce language or country
- The particular shop the product is bought from
- The quantity in which a product is bought
Don’t forget to save the product after you have created your price matrix rows.
Manufacturers
All products have a standard manufacturer field for storing information about the manufacturer.
Before you can add manufacturer information to a product, you must create a manufacturer record.
To do so:
- Go to Management Center > Ecommerce > Product Catalog > Manufacturers
- Click New manufacturer in the toolbar (Figure 59.1)

This opens the manufacturer settings (Figure 59.2).
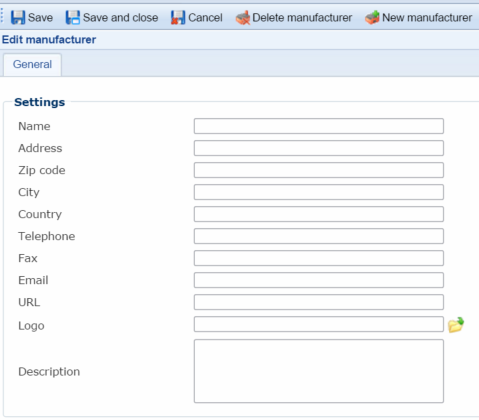
The options are pretty self-explanatory – you can:
- Specify details about the manufacturer
- Add a logo and description
Don’t forget to save before exiting. If you want to delete a manufacturer, use the delete manufacturer button in the toolbar.
Publication Periods (Campaigns)
If you need to set publication periods on more than a few products, e.g. for special Christmas or Easter products, you can create publication periods in the backend and select them on the activate product product details field.
To create a publication period:
- Go to Management Center > eCommerce > Product Catalog > Publication periods
- Click New period in the toolbar (Figure 60.1)

This opens the publication settings (Figure 60.2).
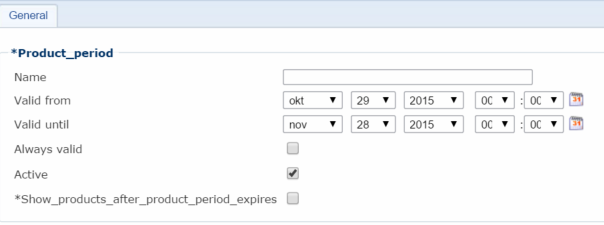
From here, you can:
- Specify a name (e.g. ‘Christmas’ or ‘Halloween’
- Set a start date and end date for the publication period (or, if you want no end date, check the always valid checkbox).
- Make it active (or deactivate it) for selection on your products
- Choose to show products after the publication period has expired, if you want to show the product with the default price outside the publication period.
Once you have created the publication period, it will now be available for selection under the Activate product settings in the Product details view.
Direct URLs to backend editing of products
You can link directly to a product from e.g. your ERP system by using the product ID or number in the URL, as in yourwebsite.com/admin/?ProductID=123 or yourwebsite.com/admin/?ProductNumber=123QWER. If following this link while not logged in or with auto login disabled, the user will be prompted to log in then redirected to the product in question.
If frontend editing is enabled on your solution, you can use the @Ecom:Product.EditInBackendUrl tag to add URLs pointing directly at the backend setting of the product you are editing.
Advanced product field configuration options
By default, all backend users have access to all product fields, and most field values are not allowed to be differentiated across languages and variants.
However, you can control product field behavior by going to Management Center > Ecommerce > Advanced configuration > Fields and modifying the field settings (Figure 62.1)
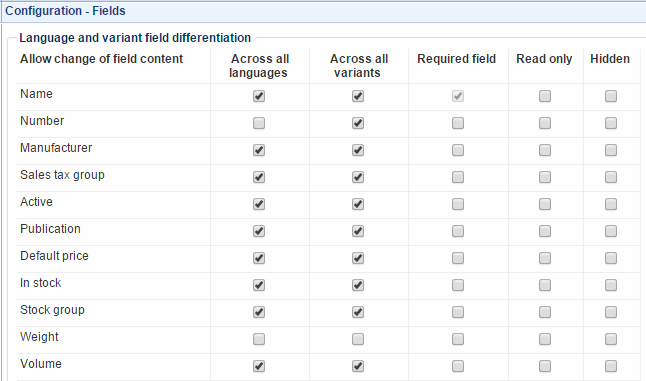
You can:
- Allow differentiation of fields across all languages – read more about languages here
- Allow differentiation of fields across all variants – read more about variants here
- Make fields required, read only, or hidden (for non admin-users - admins and administrators will continue to have access to all fields)
If you have created any product categories they will appear below the standard product fields, and can be modified in the same manner.


