
Recurring Orders
Recurring orders – or subscription orders – is a feature which makes it possible for customers to create a series of future orders, which are then automatically generated and paid at intervals selected by the customer during checkout (Figure 1.1).
Once set up, the default customer order flow is:
- Login with an extranet login.
- Add product(s) to the shopping cart.
- Go to shopping cart
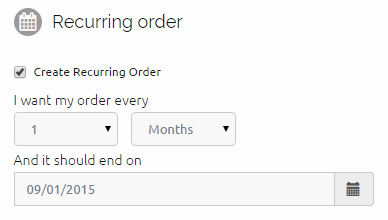
- In the information step check the “Create recurring order” checkbox (Figure 1.2)
- Select the frequency (how often you want the order to recur)
- Select the dates that you want the recurring order to start and end
- Fill out standard order details, e.g. name, address, payment method, shipping method etc.
- Complete the order
When the customer places a recurring order, a base recurring order is created in the Ecommerce system, and a scheduled task takes care of generating actual orders from it at the appropriate point in time.
Customers can then view and interact with their recurring orders from the Customer Center module, and Administrators can view base recurring orders from the recurring order list in Ecommerce > Recurring orders, or from the user details page of the user who placed the recurring order.
Here’s how to add and work with recurring orders on your solution.
Note: Recurring orders are implemented with the following checkout handlers:
- Stripe
- ChargeLogic
- Quickpay Payment Window
- DIBS Payment Window

Basic Concepts
In this section, you will learn about:
- Base recurring orders, from which each recurring order is generated
- How to manage recurring orders
- The recurring orders log
Base recurring orders
Once a recurring order is placed, the system creates a base order in Ecommerce > Recurring Orders, containing a list of calculated future deliveries.
The base order is a template for future orders, but is not itself a real order, and is not posted to the payment provider (i.e. you won’t find REC##-orders in the administration interface for your payment providers).
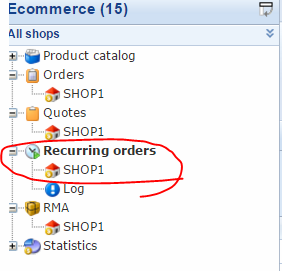
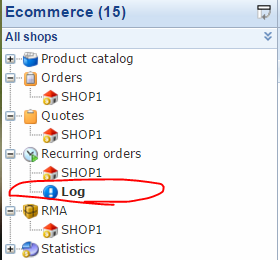
You can access all base recurring orders from the recurring orders node (Figure 3.1.
As with a regular order list, you can click a shop to see base orders from that shop only.
Managing recurring orders
To manage your recurring orders, click the recurring orders node to access the list of base orders on your solution (Figure 4.1).
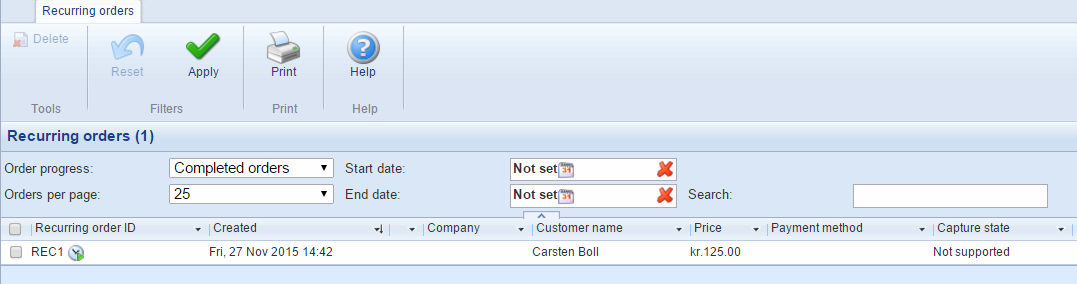
You can search, filter and customize the recurring order list in the same manner as with the standard order list.
Click a recurring order to access the order details of the base order (Figure 4.2) – from which you have access to the recurring tab (see below).
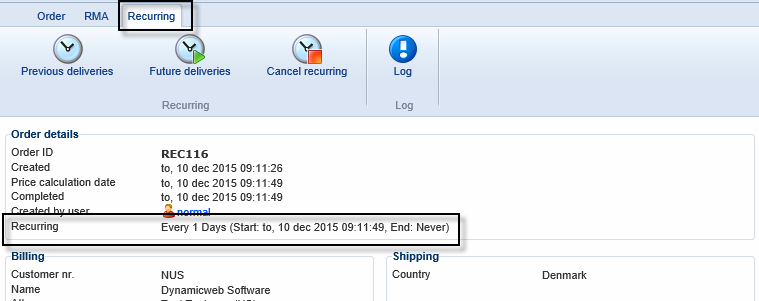
The Recurring-tab on order details
The recurring orders tab (Figure 5.1) is available from the order details view of all orders which are part of a series of recurring orders.
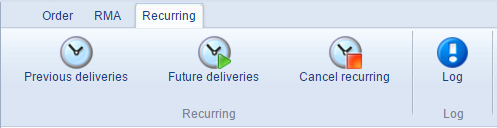
- Access the list of previous deliveries (Figure 5.2) in an order list format. You can also access the previous deliveries overview from the user details of the user who created the recurring order – read more about user details here.

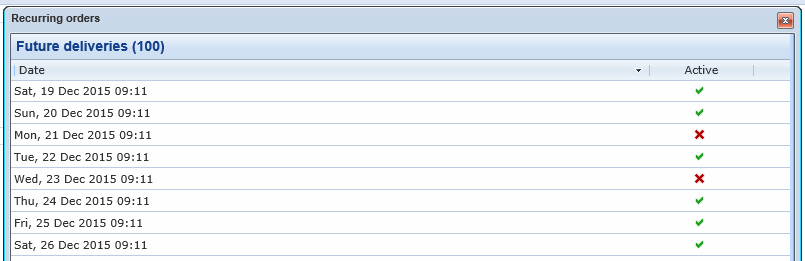
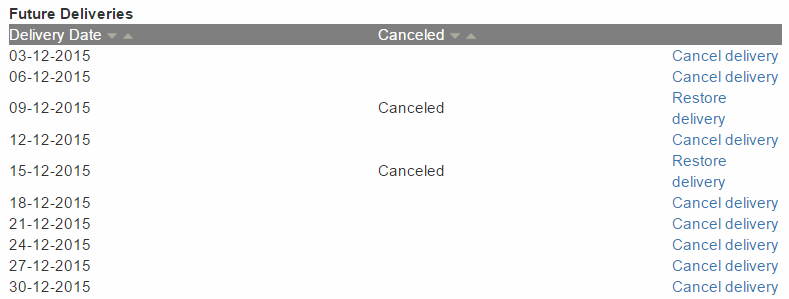
- Access the list of the calculated future deliveries (Figure 5.3). You can click the green checkmark to cancel a delivery, and the red X to reactivate it.
- Cancel the entire recurring order - this cancels all future deliveries based in the base order
- Access the order log
The Recurring Orders Log
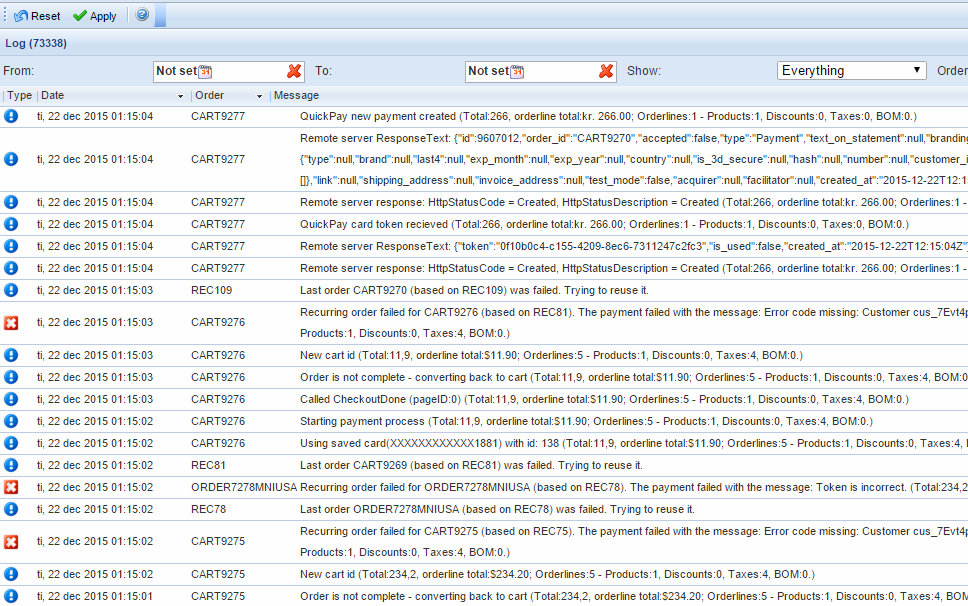
The Recurring orders section has a log node (Figure 6.1), from which you can get an overview of events and errors, e.g. if you need to investigate a recurring order if it has stopped.
By default only errors are listed but you can change one of the filters in order to show both events and errors (“Everything”).
You can filter to see the log for a specific period be selecting a date in From and To.

Implementing
In this section you will learn about:
- The scheduled task which places new recurring orders
- How to configure your modules to implement recurring orders
The Recurring orders scheduled task
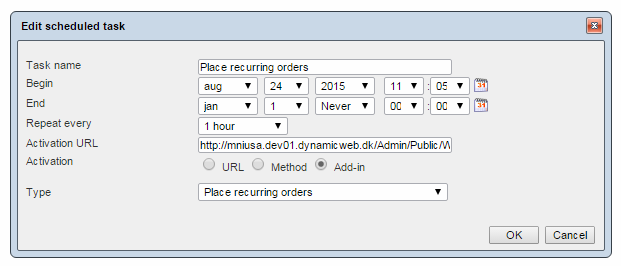
Once the first recurring order is created, a scheduled task will be created in Management Center > System > Scheduled tasks (Figure 8.1). This scheduled task generates recurring orders based on the list of future deliveries on each base order.
The orders are created and processed by the ordinary payment flow, and listed in the ordinary order list with an icon (a clock) indicating that they are part of a series of recurring orders.
By default, the task is run hourly, but you can click it to customize it to your scenario. Be careful not to overload your server, though.
In order to set up automatic recurring payments, a recurring order stores a token from the payment provider using the saved cards functionality. If the saved card is not named by the user on creation, it will be named automatically using the ID of the base recurring order.
Currently, a user cannot change the credit card information saved on a base order, so if a card expires or a customer desires to use a new card for payment the current recurring order must be canceled and a new recurring order created.
Configuring your solution to handle recurring orders
To implement recurring orders on your solution, you need to do two things:
- Modify the order steps on your shopping cart module to allow people to make an order recurring and show them a receipt for which makes sense.
- Modify your customer center module templates to allow logged-in users to view and interact with their recurring orders
Configuring your shopping cart
To set up recurring orders on your shopping cart:
- Go to the page with your Shopping Cart module, and open the module settings
- Select the InformationRecurringOrder template for the Steps > Information step – or modify your current information template with fields for enabling recurring orders, an interval field and an end date field.
- Select the ReceiptRecurringOrder template for your Steps > Receipt step – or modify your current receipt template to show e.g. order intervals and an end date. You can use the tags Ecom:Order.IsRecurringOrder and Ecom:Order.IsBasedOnRecurringOrder to differentiate between the email sent when a base order has been created and the emails sent after each order has been placed.
- Save your module settings
Your customers can now place recurring orders.
Configuring your Customer Center
To set up recurring orders on your Customer Center module:
- Go to the page with your Customer Center module and open the module settings
- In the menu texts section, customize the recurring orders settings (Figure 11.1) to fit your solution or language

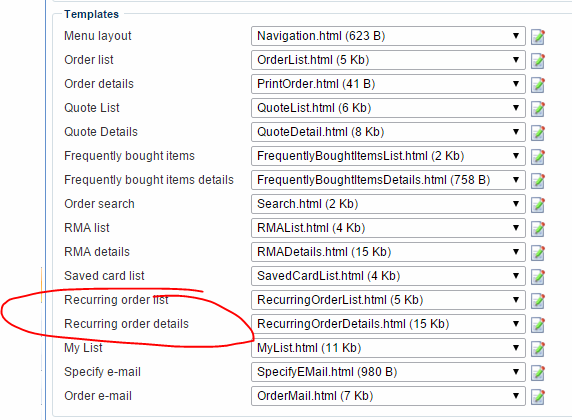
In the Templates section of the module settings, make the following changes:
- For the Menu layout template, select NavigationRecurringOrders.html – or add Ecom:CustomerCenter.RecurringOrders to your current menu layout template
- I your Order Details template add a link to the recurring order details page – see the PrintOrderRecurring.html template for an example.
- For your Order list template, select the OrderListRecurring,html template – or modify your current order list template to include a column with links to the recurring order details page
- Select the RecurringOrderList.html template and the RecurringOrderDetails.html template in the corresponding fields in the templates section (Figure 11.2). They render a list of recurring orders and a recurring order details page.
- Save and close your module settings.
How it works from the Customer Center
Once recurring orders have been added to the Customer Center module, your customers can view and interact with their recurring order – e.g. cancel entire recurring orders (subscriptions) (Figure 12.1.

Or de- and reactivate individual instances of the recurring order from the details view (Figure 12.2).
Completed orders based on the main recurring order, are listed under “Previous deliveries”.


