
Order details
Clicking an order in an order list opens the order details view, from which you have access to the order details, as well as a number of tools and views connected with the order details.
Here’s an overview of what you can do and see when viewing the order details of an order.

Basic Concepts
In this section, you will learn about:
- The order details view, and the information available to you about an order
- The Miscellaneous-view, and the (misc.) information available from there
- Editing an order – and how to view and compare the order edit history
- How to take action on an order from the details view – adding tracking information, capturing payment, creating shipping documents, or viewing the order log and transaction details.
The order details view
The first thing you will see when opening an order is the order details view (Figure 3.1).

From the order details view, you can see:
- The Order ID, creation, price calculation and completion dates. The Creation date indicates when the order was created from a cart, while the Completion date indicates when the order was finally placed by the customer.
- The visitor/user details available of the customer who places the order. If the customer was logged in, the name is linked to the user in User Management. If an anonymous user has created the order, you can click a Details icon which opens the Visitor details window from Leads
- If Impersonation was been used when order was placed, an ‘On behalf of’ field is visible. It shows the user name of the user which created the order on behalf of the other user.
- If the order is a base recurring order you will see information about the order frequency, and the start and end date
- Any billing and shipping information provided by the customer
- An overview of the order items, including the price calculation details
In the Additional information area, you may have access to one or more custom order fields or order line fields – read more below.
Consolidating taxes in the order details view
Per default, the order view shows all taxes on separate orderliness – but this can get confusing if many taxes are applied to the order, e.g. when using the Avalara AvaTax provider for the US market.
To make your order details less confusing, you can consolidate the taxes into a single order line. To do so:
- Go to Management Center > Ecommerce > Advanced configuration > General
- Locate the Taxes in backend settings (Figure 3.3) and configure them to suit your purposes.

The Miscellaneous-view
The miscellaneous button (Figure 4.1) gives you access to further order details, and comment fields for writing customer and order comments. The information and fields available here are a de-facto extension of the order detail, which is why they are described here.

The miscellaneous-view typically looks like Figure 4.2.

From here, you can type in order and customer comments, and see details about the order – such as the shop it was bought from, the IP of the customer, and so forth.
Editing an order
Before you can edit an order, you need to enable order editing on your solution. To do so, go to Management Center > Ecommerce > Advanced configurations > General and check the Allow edit order for all users checkbox. You cannot edit an order which has already been captured.
Occasionally, a customer may contact you to let you know that they want to change their order in some way, or you may want to apply a discount to an existing (but not processed) order.
With order editing in Dynamicweb, you can:
- Edit customer information
- Edit shipping details
- Add or remove products and product discounts
- View and compare order versions
To edit an order, simply click the edit button in the toolbar (Figure 5.2).

This opens an editable version of the product details.
From there, you can edit billing and shipping information (Figure 5.3).

You can also edit the order items (Figure 6.1).

From the order items list, you can:
- Edit the quantity and price of order items – or remove them altogether
- Add order discounts to an order with the
 icon
icon - Add products (with or without a product discount) to an order (and remove them again) with the product-icon
- Edit order line fields, if available – read more about order line fields below.
When adding or removing a product or a discount from an order, the total price of the order is recalculated automatically.
If you want to resend edited orders to the customer, you can set up a new order state – e.g. ‘Resend order’ – and automate the process. Read more about order flows and order states here.
Limitations & Advanced behavior
- You cannot add a discount which makes the total price less than 0
- Payment and shipping fees are not recalculated.
- There is no recalculation of the order if you change the amount of items in a part list, and the main product is set to e.g. Fixed price plus changes.
You can further configure the order edit behavior on your solution by going to Management Center > Ecommerce > Advanced configuration > General and configuring the Edit and delete permissions (Figure 6.3). You can:
- Allow edit orders for all users if you want all backend users to be able to edit orders
- Allow edit order price to exceed original order price if you want that behavior - and even then, you cannot capture more than the amount the order was created and authorized with by the payment provider (for security reasons).
- Disable the delete button for orders if you want to disallow backend user from deleting orders
- Disable the delete button on shops, groups and products for non-administrators

Viewing and comparing order edit history
To see if and when an order has been edited, click the Show history button (Figure 7.1).

This opens the order edit history (Figure 7.2).

From the order edit history, you can:
- Click the show icon to see a snapshot of the order from right before the next edit
- Click the compare icon to open a window comparing the current version with a selectable previous version, including a column highlighting the changes between the two versions (Figure 7.3)

Order detail tools
In addition to viewing the order details, you have access to a number of order detail tools when working with orders – they are available to you from the order details ribbon bar (Figure 8.1).

At the most basic level, you can:
- Save, Save & close, Close and Delete and order
- Use the Navigate orders buttons to navigate to the next or previous order in your order list
- Set a new order state with the state dropdown – read about order states and order flows here.
The other tools available to you are described below.
Adding a Track & Trace code to an order
If your solution has track & trace configured, you can click the Track & Trace button in the toolbar will open the delivery window (Figure 9.1) and enter tracking details for an order.

The delivery window allows you to:
- Select a Track & Trace URL scheme
- Enter data into the required data fields (e.g. a tracking code & languages ID, depending on your scheme)
- Click the look up button to verify that the information entered is correct
Once created, you can use the track & trace template tags in order receipts and email notifications to generate tracking URLs for your customers.
Read more about creating Track & Trace schemes in the Implementing section below.
The Capture & Print buttons
From the order detail ribbon bar, you have access to the Capture and Print buttons ([figureref}).

These can be used to capture payment from and print the current order.
Viewing the Order log
If you need to take a closer look at the flow of an order – e.g. for error handling – click the log button in the toolbar (Figure 11.1).

This allows you to take a closer look at the order log (Figure 11.2), to see the time and date where the order entered various order states.

Viewing transaction details
Once an order has been paid, the transaction button (Figure 12.1) gives you access to transaction details from your payment provider.

Clicking it gives you access to the information in Figure 12.2).

The transaction details are returned to Dynamicweb from the payment providers, and consequently the information available may vary between providers.
Typically, the transaction number (in the payment provider system), status, card type & card number (masked, except last 4 digits) are returned, but some providers may not provide any information at all.
Creating shipping documents
If your shipping provider supports it, you can click the Create shipping documents button (Figure 13.1) to create a .csv file (GLS) or send the data to the PacSoft webservice (Post Danmark) with the delivery details of an order, and use that with third party software to create labels automatically.

The GLS provider creates a .csv file in the folder specified in the shipping provider settings (default is the /Files folder) – you must manually import this to the GLS Interline 7.0 service.
The Post Danmark provider send the data to the PacSoft webservice, and also saves the data to DB:EcomOrders >> OrderShippingDocumentData.
Creating shipping documents is implemented for the:
- GLS shipping provider - compatible with GLS Interline 7.0 (Uni-Connect).
- Post Danmark Servicepoints provider - compatible with PacSoft
Please note, that the order details transferred correspond to the shipping details, not the billing information.

Implementing
In this section you will learn about:
- Creating and using custom order fields and custom order line fields
- Creating and configuring track and trace schemes
Custom order fields
With custom order fields, you can create input fields to be filled by customers during checkout, for example:
- An input field for entering coupon or promotional codes
- A checkbox for requesting an additional service (e.g. a product catalog) with the order (Figure 15.1)

- A text field, for entering order comments
And so on – if you can dream it, you can do it! Provided that you dream about creating custom order field, of course.
Here’s how to make those dreams come true.
Creating a custom order field
Custom order field are created in the management center area of your solution.
To create a custom order field:
- Go to Management Center > Ecommerce > Orders > Order fields
- Click the New button in the toolbar (Figure 16.1)

This opens the order field for editing (Figure 16.2).

From here, you must:
- Specify a name and a unique system name for the field
- Provide a template tag-value for the field. Use this value in your templates to render the field content on the frontend
- Select a field type for the field (see table below)
The field types available to you are:
|
Field type |
Function |
|
Text (5-255) |
Standard text field where you can type between 5 and 255 characters |
|
Long text |
Inserts a text box where you can type several thousand characters. |
|
Checkbox |
Inserts a checkbox |
|
Date |
Inserts a drop down where a date can be selected |
|
Date/time |
Inserts a drop down where a date and time can be selected |
|
Integer |
Inserts a field where integers can be entered |
|
Decimal number |
Inserts a field where decimal numbers can be entered |
|
Link |
Inserts a field where you can enter a link to another web page or a file in your File Manager |
|
File Manager |
Inserts a field where you can select a file from your File Manager |
Using a custom order field
When you have created one or more order fields, you can add them to your shopping cart by modifying the templates used during the checkout process.
Read more about the checkout process in the Shopping Cart documentation, and about the CustomOrderFields template tags in the template tag documentation.
Custom Order line fields
When a product is added to a cart, it is created as an order line.
Order line field are used to allow customers to provide more information about an order before checkout.
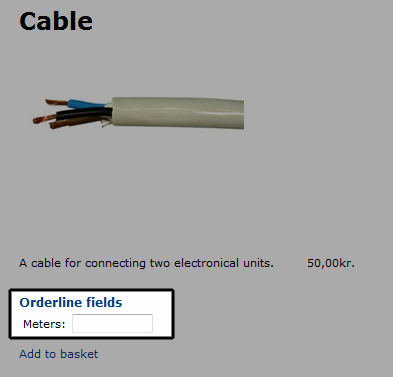
For instance, shops which sell goods by certain measurements – e.g. cables or fabric – may find it useful to allow the customer to specify how many meters or inches of a product they wish to order, either on the product details page (Figure 18.1).
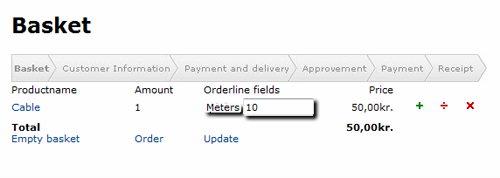
Or in the shopping cart (Figure 18.2).
To use order line fields you must:
- Create order line fields in the backend
- Configure one or more product groups to use the fields
- Change your templates to render the fields in the frontend
Creating an order line field
To create an order line field:
- Go to Management Center > Ecommerce > Orders > Order line fields
- Click New in the toolbar (Figure 19.1)

This opens the edit order line field view (Figure 19.2).

From here you must:
- Provide a name and a system name for the field
- Specify a field length in characters
Once created, you must attach the field to a product group - read more in the product groups documentation.
Rendering order line fields in the frontend
Order line fields can be rendered both on the product details page and in the shopping cart. This allows customers to enter the field values both before adding the product to the cart and when the product is in the cart.
- To render order line fields from the product details template, use the Product.OrderLineFields loop. This is optional (but recommended).
- To render order line fields from the shopping cart template, use the Order.OrderLineFields loop. This is required.
If the same product with the same order line data is added to the cart twice the two product instances are stacked as one product, unless they are parts lists (which are always show as separate products).
If two instances of the same product with different order line data are added to the cart, they products are listed as two separate products.
You can use the customer input from the order line field to calculate product prices, but you need to use the Dynamicweb Ecommerce API.
Creating track & trace schemes
In order to integrate Track & Trace information in your orders, you need to create and configure your Track & Trace schemes in the Management Center.
A track & trace scheme is simply an URL schema with a set of parameters associated with it.
To create a Track & Trace schema:
- Go to Management Center > Ecommerce > Orders > Track & Trace
- Click New track and trace in the toolbar (Figure 21.1)

- This opens the Edit track & trace window ({figureef})

From the edit window, you must:
- Name the track & trace scheme. It’s usually a good idea to use the shipping provider’s name.
- Provide an URL schema – these are particular to your delivery service, and you should contact them if in doubt. The URL schema should contain a number of parameters, which are unique to each delivery.
- Create the required number of parameters matching the parameters in the URL schema– and provide them with a name, and optionally a default value and a description
- Save and close your tracking schema


