
Customer Center
The Customer Center module allows users to access and interact with Dynamicweb Ecommerce in various ways.
They can:
- View and interact with previous orders
- See their frequently bought items
- Create and email lists of products to non-registered users (wish lists)
- View and interact with any quote requests they have submitted
- View, create and interact with RMAs
- View and interact with any recurring orders they may have created
- View and cancel any saved cards associated with their account
As such, the Customer Center is an essential part of Dynamicweb Ecommerce – especially when it comes to working with Quotes, RMAs, Saved Cards and Recurring orders, which are inaccessible to users without the Customer Center.
Here’s a rundown of how to set it up, and what you can do with it.

Basic Concepts
In this section, you will learn about:
- Adding the module to a paragraph
- The basic module settings and configuration options available to you
Adding the module to a paragraph
To use the Customer Center module, it must be added to a paragraph on a page.
From the paragraph you then have access to the module settings window (Figure 3.1).
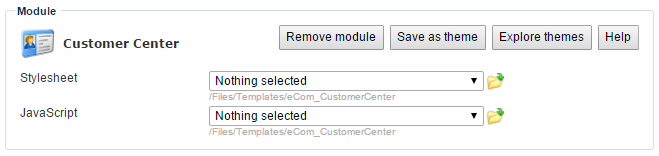
From here, you can control the behavior of the module – or remove it altogether.
Read about your settings and configuration options below.
We strongly discourage you from creating new sites using stylesheets, Javascript, or the theme-functionality. This is old technology, and is supported for legacy reasons.
Basic module settings
Once added to a paragraph, you have access to all the module settings and configuration options available for the Customer Center.
Here’s a quick view at what they allow you to do.
Shop settings
The shop settings (Figure 5.1) control whether the customer center should show orders from all shops or subset of your shops.
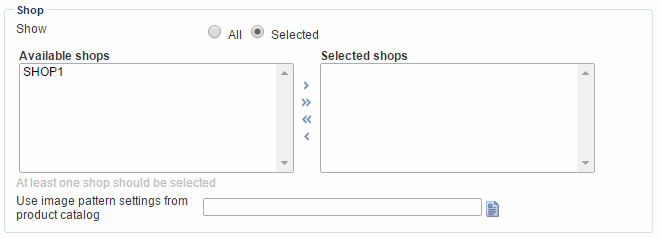
You must select either all or selected in the radio button menu.
If All is selected, you can select the shops you want the module to be active for by moving them from the left column to the right column.
In addition, if you use image patterns on your product catalog and want to use them in the customer center too, you can select a specific product catalog module to mirror on the Customer Center.
Paging settings
The paging setting (Figure 6.1) control, well, paging on e.g. the lists of orders displayed in the Customer Center.
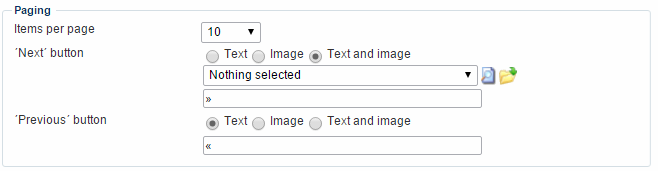
You can:
- Select the number of items to display on each page
- Specify how to render the Next and Previous buttons – using text, an image, or a combination of text and image
Bought from date-settings
The bought from date-settings (Figure 7.1) control the maximum age of orders which appear in the Customer Center.

Simply pick a date in the date field – order placed before that date will not be displayed.
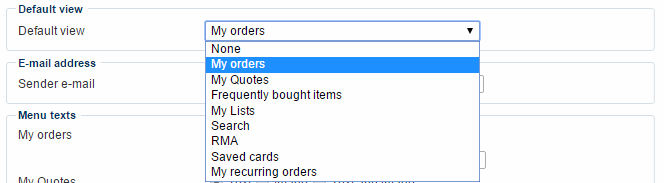
Default view settings
With the default view settings (Figure 8.1), you can control which of your customer center pages should be the default (starting) page.
Email address settings
The Customer Center supports sending the details of an order to someone.
With the email address setting (Figure 9.1), you can control which email should be used as the sender email. If no email is specified, info@dynamicweb.dk is used.

Menu texts settings
With the menu texts settings (Figure 10.1), you can control the layout of the menu tab buttons in your Customer Center.
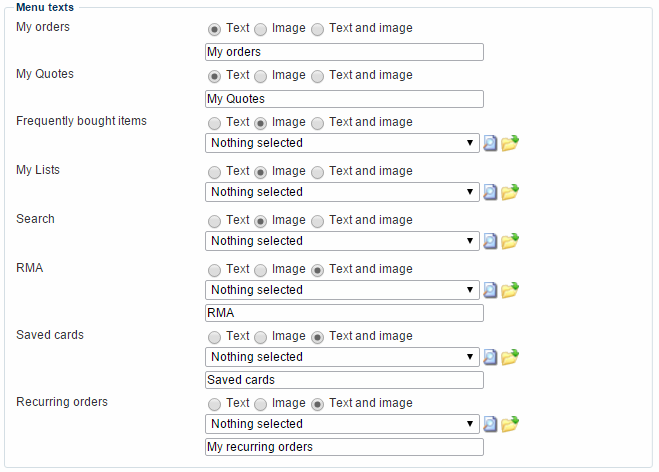
For each of the possible tabs, you can use text, an image, or a combination of text and image.
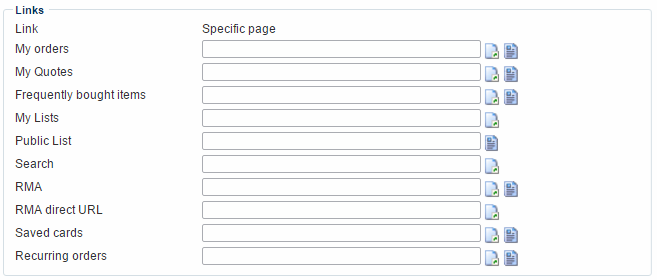
The Links section
The links section (Figure 11.1) allows you to enter or select an alternative link for the Customer Center tabs.
The Templates section
The templates section (Figure 12.1) allows you to select or edit the templates used to render the different areas in the Customer Center.
The most important template being, of course, the menu layout template – from which your users will access the areas you make available to them.
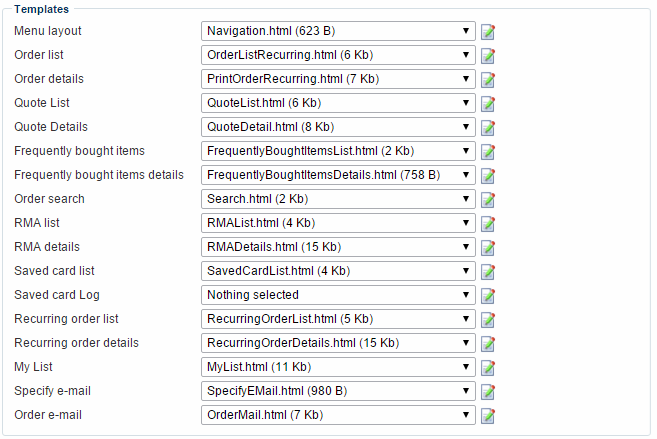
Dynamicweb Ecommerce ships with a large number of showcase templates showing you how to integrate or implement various features from the system.
You can select and edit them from the drop down menus above, or find them in the Templates/eCom/CustomerCenter folder.
My List email settings
If you use the My Lists functionality, your customers can email lists from the Customer Center to non-registered users.
The My List email settings (Figure 13.1) allow you to select or edit the email template used for that email – and to pre-fill the subject, sender name and sender email fields when sending the list to someone.

Read more about the My Lists functionality below.

Implementing
In this section you will learn about:
- Adding a function to the Customer Center
- The My Lists (wish lists) functionality
Adding a functionality to the Customer Center
The Customer Center allows you to integrate with several core parts of the Ecommerce system, but most are not activated by default.
The process of adding a function to is pretty straight forward.
Simply add it to the menu layout template – by default Navigation.html, using one of the following tags:
| Tag | Functionality |
| <!--@Ecom:CustomerCenter.MyOrders--> | An overview of previous orders – controlled by order list and order details templates accessible from the Templates section |
| <!--@Ecom:CustomerCenter.FrequentlyItems--> | An overview of the most frequently bought items – controlled by frequently bough items and frequently bough items details templates accessible from the Templates section |
| <!--@Ecom:CustomerCenter.MyLists--> | Access to creating, publishing and emailing custom lists of products, such as wish lists. Read abou My Lists below. |
| <!--@Ecom:CustomerCenter.MyQuotes--> | Access to creating and responding to quote inquiries. See quotes documentation for further information. |
| <!--@Ecom:CustomerCenter.RMA--> | Access to creating and interacting with RMAs. See RMA documentation for further information. |
| <!--@Ecom:CustomerCenter.RecurringOrders--> | Access to viewing and interacting with Recurring Orders. See orders documentation for further information. |
| <!--@Ecom:CustomerCenter.SavedCards--> | Access to viewing and interacting with Saved Cards. |
| <!--@Ecom:CustomerCenter.Search--> | Interface for searching through your old orders – works in conjunction with the MyOrders list. |
After adding the tag to the menu, you will have access to the area – and to the templates, which you can of course modify to suit your particular needs.
My Lists (wish lists)
The My Lists functionality makes it possible for users to create lists of products, which they may want to buy for themselves or others.
The lists can also be shared with others by email, directly from the Customer Center – and visited by recipients of the email (provided you create a page where lists can be published).
Working with My Lists requires you to:
- Setup My Lists in the Customer Center module – customize your menu and add them to the navigation
- Setup a Show List module to show lists to non-registered users
- Customize your product templates to allow customers to add products to lists
Here’s how!
My Lists in the Customer Center
To set up My Lists in the Customer Center, you must:
- Go to your Customer Center paragraph and open the module settings
- In the menu texts section, provide a solution appropriate text or image (or both) to use in the Customer Center menu to access the My Lists area
- Open the menu layout template (usually navigation.hml) and add <!--@Ecom:CustomerCenter.MyLists--> | to the div-container. This adds a MyLists tab to the Customer Center navigation.
- In the templates section, select the MyList.html template in the My List dropdown – or create your own template to control how lists are displayed in the Customer Center.
Once you have set up a Show List module, you must also select that paragraph in the links section Public List field. This lets the system know where you want to display lists which are emailed to someone – without requiring them to log in.
The Show List module
In order to show lists (which are usually only accessible to logged in users) to non-registered users, you must create a paragraph somewhere and attach a Show List module (Figure 18.1) to it.
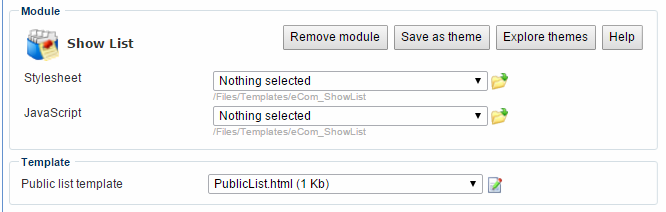
The show list module is actually incredibly simple – it consists of a template for rendering a list publicly.
Once you have created your Show List module, don’t forget to open your Customer Center module settings and select the paragraph with the Show List module attached in the links section, under Public List.
Enabling customers to add products to a list
Lists are pretty useless if you don’t allow your customers to add products to them.
For that purpose, you have access to the CustomerCenter.ProductLists loop and the CustomerCenter.ListTypes.Lists loop.
For an example of how to add products to a list, see the ProductListCustomerCenterList.html template.


