
Forms for Editors
With Forms for Editors you can create reusable forms. With forms, you can collect data from your visitors in a structured manner.
For instance, you could create forms to handle;
- Brochure orders
- Price inquiries
- Questionnaires
- Contact information
- Etc.
Forms are created from the Dynamicweb administration backend, and then added to a paragraph on your website using the Forms for Editors module.
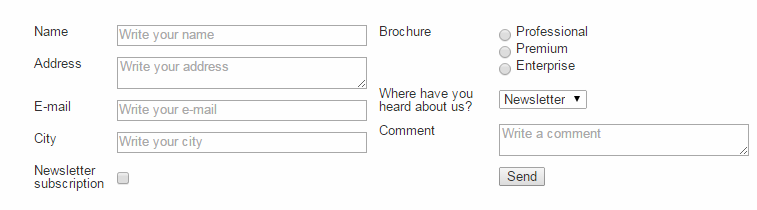
To visitors on your website, a form might look like Figure 1.1).
In this document, you will learn to work with, implement, develop and integrate with the Forms for Editors module.

Basic Concepts
In this section, you will learn about:
- Creating a form
- Adding form fields to a form
- Your options when using the Forms for Editors module to publish a form in frontend
- How to access and export form data
Creating a form
Forms for Editors are created and configured in the Dynamicweb administration, and then later added to a paragraph using the Forms for Editors module.
To create a new form:
- Go to Modules > Forms for Editors
- Click New form in the toolbar
- Name the form
You have now created a(n empty) form (Figure 3.1).
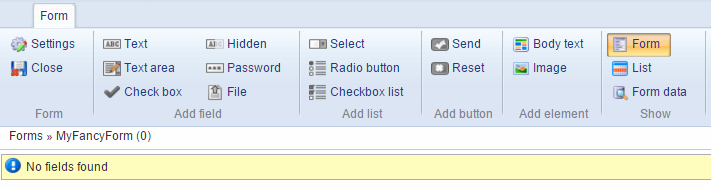
The empty form will appear in the previously empty forms-list under the Forms for Editors module.
Right click a form to access the form actions (Figure 3.2).
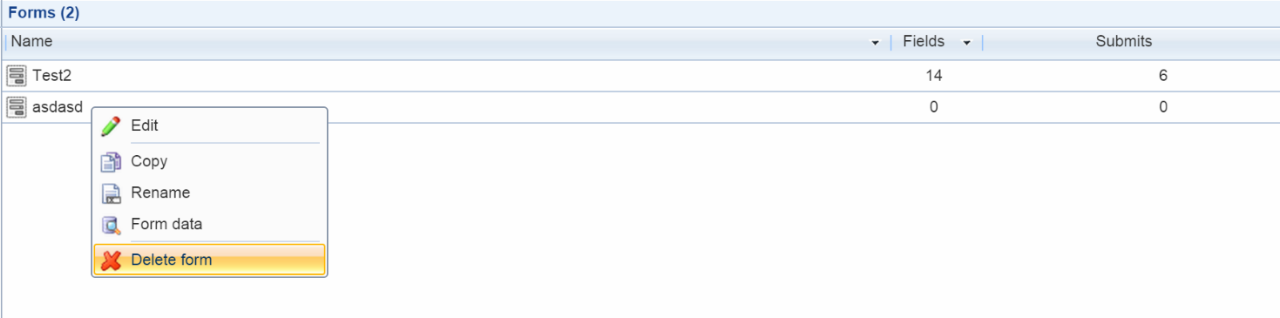
From the right-click menu, you can:
- Edit, copy, rename or delete the form
- Go directly to the form data submitted by users using this form
Adding form fields
An empty form is pretty useless, but luckily you can use the forms for editors ribbon bar buttons (Figure 4.1) to add content – form fields – to the form.

You can add the following types of content:
- Fields
- Lists
- Buttons
- Elements
Your Field options are:
|
Name |
Description |
Why you need it |
|
Text |
A text field for entering a single line of text |
You may need users to submit their name, address, email, etc. |
|
Hidden |
A hidden field |
Allows an implementer to pass temporary, or session-based data, from one form to another or to store information that has already been entered in by the user. |
|
Text area |
A text-area for entering several lines of text |
Describing a problem, adding a comment, or adding a multi-line address |
|
Password |
A password field |
Used for capturing user input. It disguise each character with an asterisk (*) instead of displaying the entered digits in order to offer an on-screen privacy while entering a password. |
|
Check Box |
A checkbox for users to check or leave unchecked |
Accepting user agreements, opting in, and so forth |
|
File |
A file selector button, for submitting files |
|
Your List options are:
|
Select |
A dropdown list of options for the user to select from |
|
|
Radio Button |
A list of options; users select one |
|
|
Checkbox list |
A list of checkboxes – users may check more than one |
|
Your Button options are:
|
Send |
A button for submitting the form content |
|
|
Reset |
A button for resetting the form |
|
Your Element options are:
|
Body text |
Add a text to the form |
|
|
Image |
Add an image to the form |
|
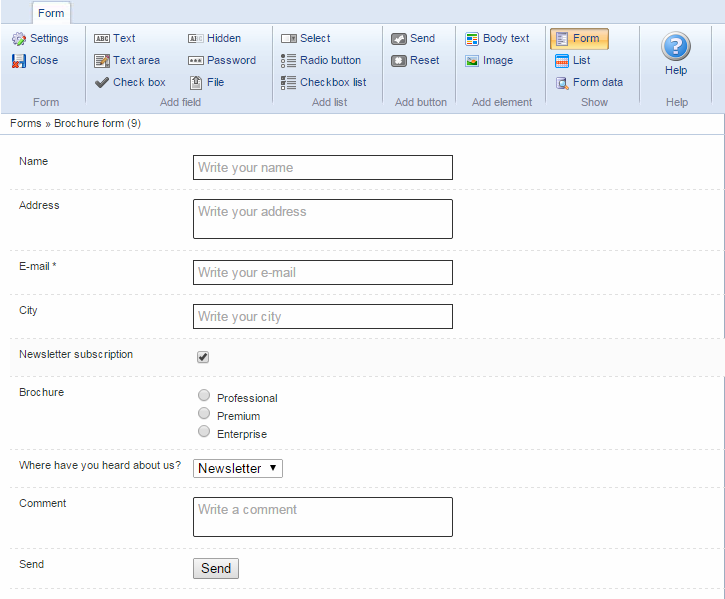
You can add any combination of these fields to the form to create the forms you need (Figure 4.2).
Editing, sorting and copying form fields – etc.
If you right-click a form field, you can select a number of tools (Figure 5.1) for managing and editing the field.

From the right-click menu you can:
- Edit the field
- Activate or deactivate the field
- Make the field required
- Insert a new field before or after the field
- Delete the field
From the form toolbar, you can also use the Show buttons (Figure 5.2) to switch to a list view.
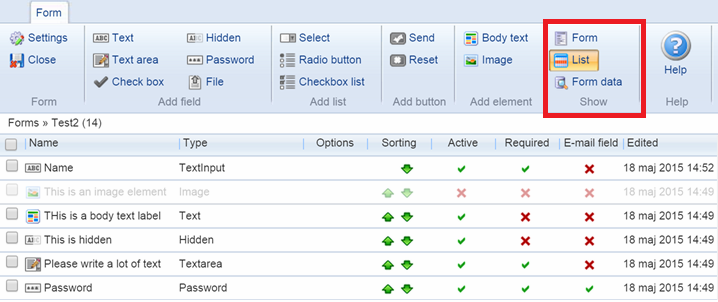
The list view allows you to sort, activate/deactivate, and set field to be required – and to see when a field was last edited.
You can also set a field to be an Email Field – this allows you to add the correct sender-email to the automatic on-submit-emails you can set up using the Forms for Editors module.
The Forms for Editors module
To allow website visitors to fill out and submit your form, you must add it to a paragraph on a page on your website. You do so by using the Forms for Editors module.
The forms for Editors module allows you to select and style the form in frontend, and to control what happens when the form is submitted.
Here are the settings available to you.
Module settings
The first thing you will see when adding the module to a paragraph is the module settings (Figure 7.1).
From here, you can control the behavior of the module – or remove it altogether.

We strongly discourage you from creating new sites using stylesheets, Javascript, or the theme-functionality. This is old technology, and is supported for legacy reasons.
Form settings
The form settings (Figure 8.1) are the fundamental module settings.
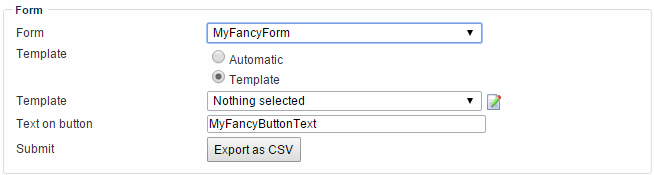
With the form settings you:
- Select a form to publish
- Select a template for rendering the form. Choose between the automatic system template or select or create a custom template from the dropdown menu
- Specify a custom text for the form submit button (e.g. for localization purposes)
- Export the submitted form data as a .csv file
When submitting form settings
The when submitting form settings (Figure 9.1) allows you to control what happens when, well, a user submits a form.
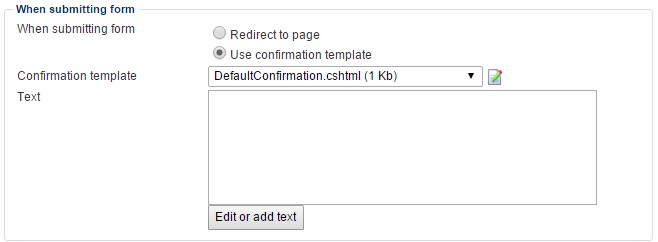
With the when submitting form setting you can:
- Specify a page to redirect the user to after they submit the form, OR
- Select or create a confirmation template to use, and specify a text to publish using that template
Email settings
The email settings (Figure 10.1) allow you to set up automatic email notifications when a form is submitted.
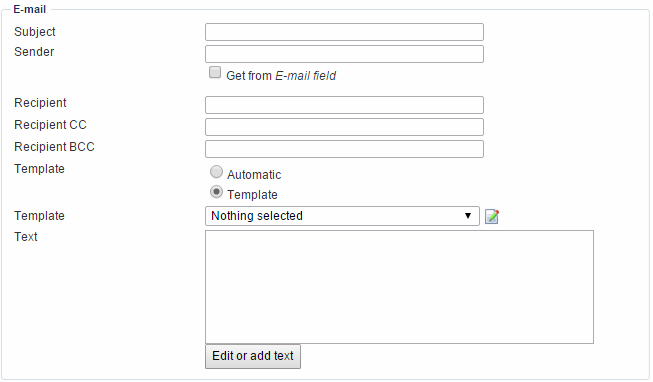
With the email settings you can:
- Specify a subject for the email
- Specify a sender for the email – or retrieve it from the form using the Email field setting from the list view
- Specify one or more recipients (CC or BCC)
- Select a template for rendering the email. Choose between the automatic system template or select or create a custom email template from the dropdown menu
- Enter a text (if using a custom template)
Receipt settings
You can use the receipt settings (Figure 11.1) to email a receipt to the visitor submitting the form.

With the receipt settings you can:
- Specify a subject for the email
- Specify a sender for the email – or retrieve it from the form using the Email field setting from the list view
- Specify one or more recipients (CC or BCC)
- Select a template for rendering the email. Choose between the automatic system template or select or create a custom email template from the dropdown menu
- Enter a text (if using a custom template)
Max submits settings
The max submit settings (Figure 12.1) allow you to control if and how the form should limit users from submitting form data.

With the max submit setting you can:
- Specify how many times a form can be submitted from this page
- Specify what to do when a max submits limit is reached:
- Redirect the visitor to a specific page
- Select or create a template to render
Upload settings
Finally, you can use the upload settings (Figure 13.1) to specify a path to where you want user-submitted files to be stored.

Form data
Once a form has been filled out and submitted, the data is stored in Dynamicweb. It can then be accessed and downloaded from the Dynamicweb backend.
To access submitted form data, you can either right-click the form on the Forms for Editors form list and select Form data, or you can click Form data under the show settings (Figure 14.1) when editing a form.

Either way will take you to the Submits overview (Figure 14.2).

From the Submits overview you can see all submits for the current form, including:
- The submit ID
- The date and time of submission
- The page id of the page from which the form was submitted
- The user name of the submitter (if the user is registered)
- A summary of the form data (click the date column to see the full data for each submit)
- The number of fields filled out in the form, and the IP & session key of the visitor
From the toolbar, you can export all the submitted data as either .csv or a .xls file.

Implementing
In this section you will learn about:
- The tags and loops available to you
- How to override the Forms for Editors module settings
- Overriding form field values
- How to both redirect to a new page on form submit AND show a confirmation template
- How to upload more than one file from a file field
Tags & Loops available to you
Forms for Editors uses the following templates:
- Form template – controls the general layout of the form.
- Confirmation template – controls the content in the confirmation e-mail.
- Email template – controls the content in the form e-mail.
- Receipt template – controls in the receipt e-mail.
- Max submits template – controls the message that appears when the maximum allowed submits are reached
Read more about the tags and loops available to you in the template tag documentation for Content.
Overriding Forms for Editors module settings
You can override any setting from a Forms for Editors module by creating a field in the form (hidden or not) with the same name as the setting.
For instance, to override the subject of the mail being sent to the website owner when a form is submitted, create a field (hidden or not hidden) with the name “MailSubject”. Then the form handler will pick up the value from the form and use that instead of the value set on the paragraph module settings.
Example:
Overriding form field values
When rendering the form, it is possible to override the value of the form fields by either submitting a value to the form with the same name as the field system name, or by adding a query string parameter with the system name and a value.
For example:
By accessing the page with the form with the URL parameter ’?firstname=John&20Doe’, the field will be filled with that value automatically.
See below for examples for specific field types.
Checkboxes
Checkboxes can be set to checked by passing either “True” or the specified value of the checkbox:
By accessing the page with the form with the URL parameter ‘?enable=true’, the field will be checked:
Checkbox lists, radio buttons and select boxes
For checkbox lists, radio buttons and select boxes, by adding the field system name with the desired selected value to the query string the default selected option is bypassed, and the option(s) whose values are in the query string are set to selected.
A comma separated list of values can be used to set several options to selected for checkbox lists.
For instance, consider the following checkbox list:
By accessing the page with the form with URL parameter ‘?Pleasechoose=Extra,Additional’ the specified fields will be checked (selected):
Post backs
You can also use query string parameters to post the form to itself and keep the values of the form.
When the form is submitted, the default action is the URL of the page the form is on.
The form has a hidden element called cmd with the value “save”.
To use this type of post back of the form, set the hidden cmd field value to nothing.
Set the value of the field cmd to save when the content of the form is ready to be saved. When the form is submitted with cmd=save, the form will be saved, mailed and a confirmation sent.
Redirect AND show receipt
When a form is submitted, there are usually two options for showing a receipt on screen:
- Using a confirmation template on the same page, that will replace the form with the result of the form submit
- Redirect to another page with alternative content
In order to do both – redirect AND show a receipt in the page you redirect to – simply setup the forms module with the same form and the desired confirmation template on the redirect page. The redirect will contain a submit token that will allow the receipt page to load the result of the form and display the information on the page.
Uploading more than one file from a file field
Files are saved to the folder /Files/System/FormUploads/Form-Name/ where Form-Name is the name of the form uploading the files.
If 2 uploads have files with the same name, they are named Filename_(n).ext, where n is a consecutive number
The file location is saved to the field’s value on submit:
-
/Files/System/FormUploads/Form-Name/file.pdf
Multiple files can be uploaded on one field.
If the File field has a system name of “UploadImage”, any number of file uploads can be made for that field naming additional upload controls “UploadImage_{N}” – for example:
All the files are saved to the upload folder and a comma-separated string of file locations is returned to the value of the field. e.g.:
- /Files/System/FormUploads/Form-Name/file.pdf, /Files/System/FormUploads/Form-Name/file2.png


