Websites & Language Layers
A Dynamicweb solution consist of one or more websites, and optionally one or more language layers.
- A website is a collection of web pages – documents accessed through the internet – such as the one you’re looking at now.
- A language layer is a website which structurally follows a master website – i.e. contains the same pages & paragraphs – but allows for the language layer content to be localized.
Each website and language layer then has a (large) number of properties associated with it, allowing you to control website behavior, appearance and interaction with the rest of Dynamicweb – and much more.
Read more below!

Basic Concepts
In this section, you will learn about:
- The website management view and the website tools available to you
- How to create a new website on your solution
- The website settings
- Language layers and how to create them – and how to translate website content
Website management
A Dynamicweb solution may consist of multiple websites and language layers, each configured to suit their particular purpose.
To help you create and manage the websites and language layers you need, access the website management area of Dynamicweb:
- Go to your content tree
- Right-click the website-selector and click the websites node (Figure 3.1)
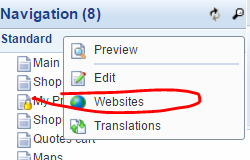
This opens the website management view (Figure 3.2).
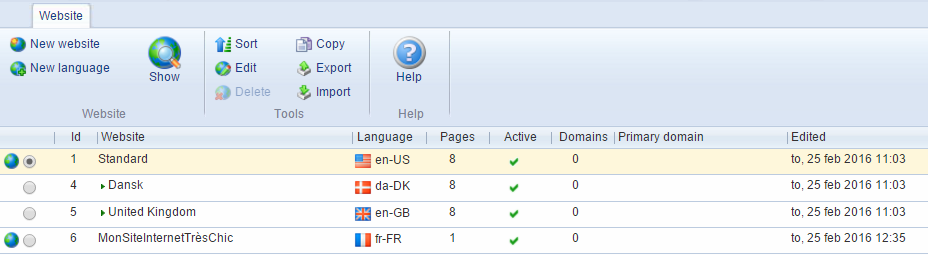
From here, you can create, configure and manage your websites and language layers.
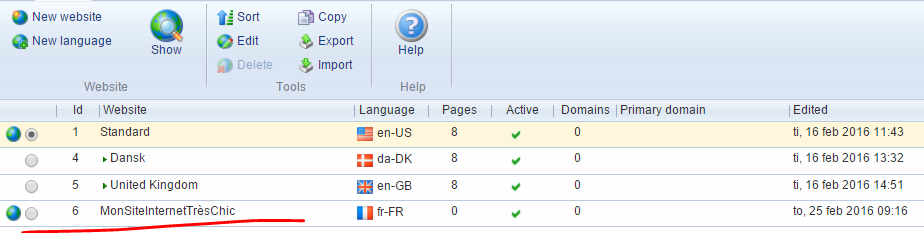
You can also see the id, name, language, page count, active-state, total domain count and the primary domain for each existing website or language layer – and when it was last edited.
Right-click any of the existing websites or language layers to open access the right-click menu (Figure 3.3).
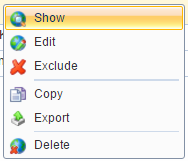
With the right click menu, you can:
- Click show to open the website
- Click edit to open the website settings
- Click copy to copy a website
- Click export to export an XML for translation purposes
- Click delete to delete the website
You may also access the website management view by going to Modules > Websites.
Website management tools
From the website management view, you have access to a number of tools for working with websites (Figure 5.1).

With the toolbar, you can:
- Create a new website or a new language layer – read more below
- Click the large Show-button to open the website or language layer selected.
- Sort your website management view (language layers can’t be sorted)
- Edit a website or language layer – taking you to the website settings view
- Delete a website or language layer
- Copy an existing website or language layer – read more below
- Export or import a website or language layer – read more below
Copying a website or language layer
Copying a website or language layer is a convenient way of saving effort when creating new websites.
The copy-tool comes with a number of options for which parts to copy, e.g. permissions or website-settings only, giving you a degree of freedom when creating new websites.
To copy a website:
- Select the website/language layer
- Click Copy in the toolbar to open the copy website interface (Figure 6.1)
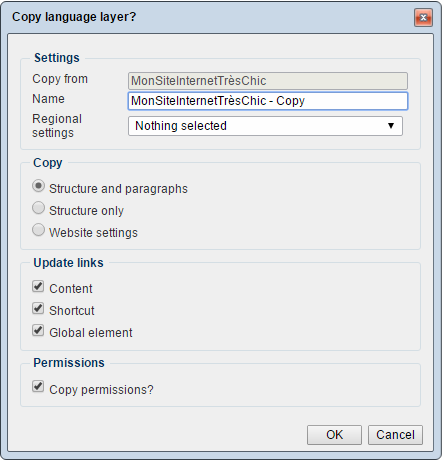
From the copy website interface, you must:
- Name the copy and select a regional setting (website language)
- Specify what to copy:
- Structure & paragraphs
- Structure only
- Website settings
- Decide if you want to update link references on the new website to point to the copied content, pages & global elements – or if they should continue to point to the original website. Normally, you want them to be updated.
- Decide if the website permissions should be copied
Exporting and importing websites
The Export and Import tools allow you to export an XML of a website, have the contents translated, and then importing the XML to your website again.
Exporting and importing currently only works for websites without items, and can only be imported to the exact same solution and website it was exported from, provided no changes are made in the meantime.
Currently, export and import of websites does not work as intended, and we recommend you have your translations done in other ways.
Creating a website
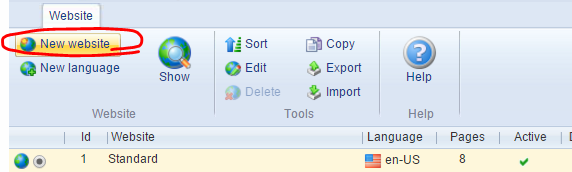
To create a website, click the new website button in the toolbar (Figure 8.1).
You will be prompted (Figure 8.2) to name the website and select a regional setting.
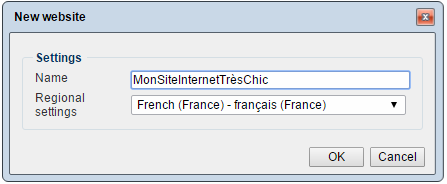
Click OK – and that’s it. You’ve added a new website to your solution (Figure 8.3).
It’s a pretty useless website, though, as it has no content and has not been configured yet.
After creating a new website, you will usually need to:
- Configure the general website settings
- Configure the website Ecommerce settings
- Apply a design to the website – read more about designs and layouts here
After these steps, you will only return to the website settings on occasion, when a particular situation warrants it.
Website settings
Once created, both websites and language layers must be configured.
To access the website settings, either:
- Select the website or language layer in the website management area and click the edit button
- Right-click the website and select edit
This will open the website settings view – and here’s an overview of the various configuration options you have available when editing the website settings.
Name & Regional settings
To start with, you can edit the name and the regional settings of the website (Figure 10.1).

Master pages also have a weird little checkbox called rename languages.
If you check this and save your website, all language layers will be renamed to: “[Master page name] (Language code)”.
Meta settings
The meta-setting (Figure 11.1) are used for SEO optimization purposes.

You can:
- Provide a title and description for the website
- Describe the content of the website using keywords
Most search engines no longer use keywords. For those that do, we recommend you use a maximum of 13 keywords, and put the most important words first.
Details settings
With the details settings (Figure 12.1), you can control your domains and your 404-handling practices.

You may:
- Enter a number of domain names associated with the website
- Select a primary domain for the website – you can limit the primary domain so it will only be able to reach this website, not other websites on the solution
- Specify a HTTP 404 page to redirect visitors to if an URL cannot be found. The 404 page is only active for the domains specified above, and will be used instead of the one defined in your solution settings. This means that you can create separate 404-pages for websites and language layers.
URL settings
The URL settings (Figure 13.1) allow you to view the URL associated with the website or language layer.

With the URL settings, you can also:
- Exclude the URL from appearing in subpage URLs – i.e. trim the URLS
- Check the Redirect first page to ‘/’ to prevent search engines from indexing your first page as duplicate content.
The redirect setting is only available if you use Location and page name (/Path/…/Page name.aspx)” as the URL type under Management Center > Web & HTTP > Customized URLs. The setting also has no effect if:
- No domains have been added to the details settings
- No primary domain has been selected in the details settings
- The page has parameters in the URL
Content Delivery Network settings
A Content Delivery Network is a network of servers - usually located at various sites around the world - that deliver cached static content from websites, such as images, CSS and JavaScript files. With the CDN settings you are able to use CDNs for static resources.
You can set up CDN in your global settings, by going to Management Center > Web & HTTP > CDN – but each website can also have a local setup (Figure 14.1).
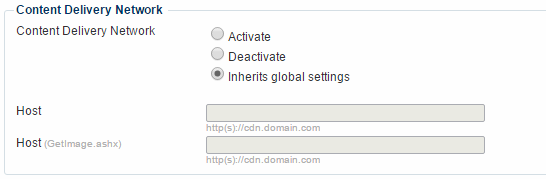
With the Content Delivery Network settings, you may:
- Activate or deactivate CDN for the website – the host settings are disabled if CDN is deactivated
- Inherit the global settings – if set. If CDN is activated but the global settings are not inherited, you must provide an URL for the CDN host and an URL for the CDN host for GetImage requests
The Website-toolbar
At the top the website settings page is the toolbar (Figure 15.1), from which you have access to a number of more advanced tools for website management.

Naturally, you can save, save and close or cancel your changes to the website settings using tools on the left side of the toolbar.
In addition, you can:
- Apply a static frontpage to the website
- Customize the robots.txt file content– see below
- Export the website for translation (currently not recommended)
- Select a date format for the website
- Select a workflow for the website – read about workflows.
With the advanced and HTTPS settings, you can:
- Set up website permissions – read more about permissions here
- Open the Ecommerce settings for the website – see below
- Select item types for extending the website or page properties on the website – read more about extending your website or page properties here
- Override the general cookie settings on this particular website – read more about cookies in Dynamicweb
- Configure the HTTPS settings for the website (requires a SLL Certificate):
- Default allows visitors to use both HTTP & HTTPS
- Force SSL forces a 301 redirect to HTTPS
- Un-force SSL forces a 301 redirect to HTTP
Robots.txt (SEO settings)
The Robots.txt button opens the robots.txt settings (Figure 16.1), giving you a degree of control over how crawlers index your website.
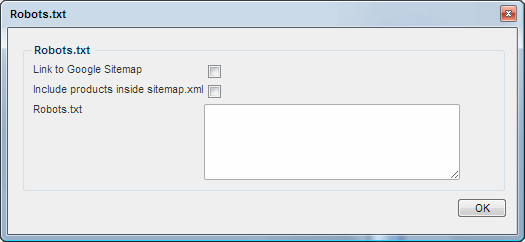
You can:
- Allow or disallow crawlers access to the Google Sitemap for your website
- Include all products in the sitemap.xml (this requires a primary group on all products)
- Enter the content for the robots.txt file for the website
The contents of the Robots.txt file specified here should be considered virtual, e.g. an actual file will not exist on the disk. Instead it will be served by the 404 handler in Dynamicweb (Admin/public/404.aspx) which has to be set up in the IIS settings in order to work. If an actual robots.txt file exists on the disk, the virtual content specified in the field will not be used.
By default Disallow: /*?cartcmd=* is added to Robots.txt to avoid bots from indexing carts (the command is not visible from the Robots.txt input field).
The settings will not work on websites located on a *.dynamicweb.dk domain, as these domains are excluded from search engine indexing.
Website Ecommerce Settings
The website Ecommerce settings (Figure 17.1) allow you to configure a number of essential parameters when working with Dynamicweb Ecommerce on your website.
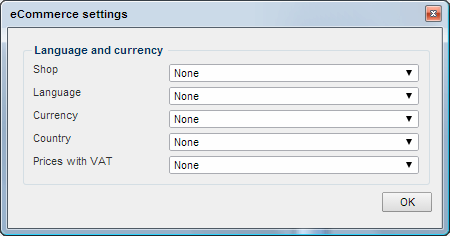
You must:
- Select a default shop – read about
- Select a default language
- Select a default currency
- Select a default country
- Select a Prices with VAT configuration, controlling whether prices should be displayed with VAT by default. Basically, this is a way to specify at the website-level how prices should be displayed. This setting affects all price tags that have price tag extensions; tags like Ecom:Order.Price are affected, but tags like Ecom:Order.OrderLines.Total.Price are not affected. The state can also be changed using the PricesWithVat query string parameter, with the values true or false.
- None means the setting is not set (no state selected) - in practice, this is equivalent to selecting Yes explicitly.
- No means that VAT is not displayed on the frontend (e.g. for B2B websites)
- Yes means that VAT is displayed in the frontend, based on the most specific VAT rate set for the product
Please note that the website Ecommerce settings are very important – even if you have only one shop, currency or language on your solution – as a number of tools and functionalities rely on the connection between e.g. a website ID and a default shop ID being made. In fact, make it a habit to always configure the Dynamicweb Ecommerce settings when building a new website.
The Layout-tab
At the top the website settings page is the layout tab (Figure 18.1), from which you have access to a number of more advanced tools for website management.

Naturally, you can save, save and close or cancel your changes to the website settings using tools on the left side of the toolbar.
You may also:
- Select a website layout. A layout is an html-file containing the markup which controls the website layout. You can read much more about layouts in the designs & layouts article.
- Select device layouts for phones and tablets
- Select a default item page layout for each of your page-items
- Select a default item paragraph layout for each of your paragraph-items
- Specify which type of HTML you are using on the website
Language layers
Language layers are identical to websites in all respects, but are created and maintained as structural mirrors of a master website.
This means that:
- Language layers contain the same pages and paragraphs as the master website
- New content created on the master website is instantly created on each language layer as well
This means that you are free to translate, add or delete any text or images within paragraphs, but that you are not allowed to create, copy, delete, move or sort either pages or paragraphs. The latter operations must be done on the master website, where they will be copied to all language versions. This will ensure that you maintain structural consistency between a master and its language versions.
To create a language layer:
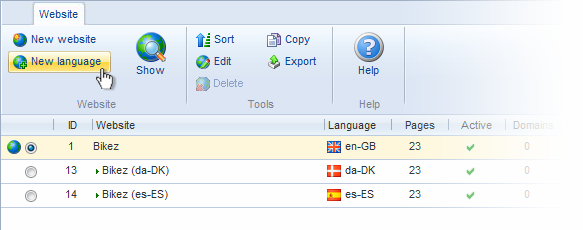
- Go to the website management view
- Select the website you want to add a language layer to
- Click New Language in the toolbar (Figure 19.1)
This opens the New language window (Figure 19.2).
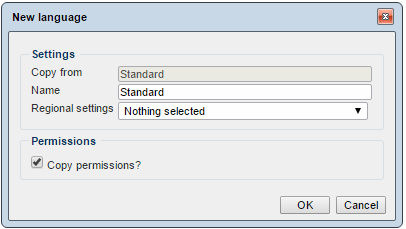
From the new language window, you must:
- Name the language layer
- Select a regional setting for the language layer – i.e. the actual language of the layer
- Decide if you want to copy the permissions from the master website
- Click OK to create the language layer.
You can edit the website settings of a language layer in the standard manner.
Switching between websites/language layers
Once you have more than one website or language layer on your solution, you can switch between them by clicking the down-arrows on the content navigation pane to open the website selector (Figure 20.1).
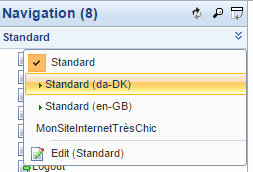
With the website-selector, you can:
- View the currently selected website – here Standard
- Select one of the language layers under a website – here Standard (da-DK) and Standard (en-GB)
- Select a separate website – here MonSiteInternetTrèsChic
- Click the Edit option to go to the website settings of the currently selected website
On pages and paragraphs, you can also switch between language layers using the language button.
Working with language layers
When navigating between websites and language versions, the following tips should prove useful.
- Color coding
When editing content on a master website, the breadcrumb trail will have a yellow background. When editing content on a language layer, the breadcrumb trail will have a green background (Figure 21.1)

- Change indicator
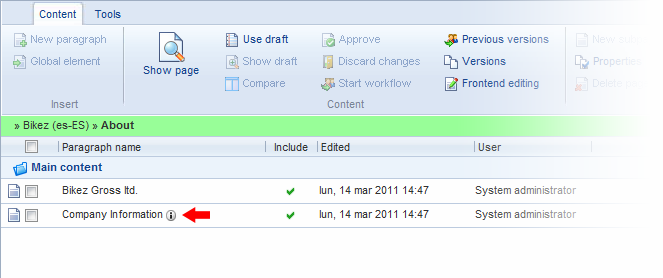
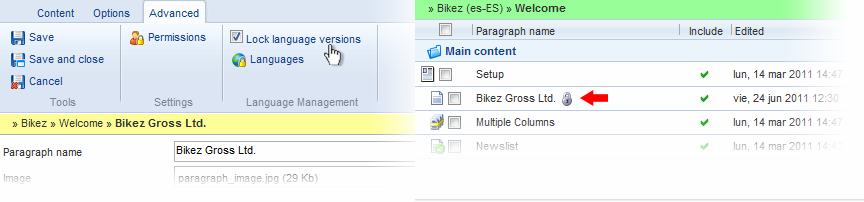
When working on language versions, an exclamation mark icon next to the title of a paragraph indicates that changes have been made to its master paragraph (Figure 21.2). This will help you in determining which paragraphs of a page that needs to have their contents translated and/or updated to be consistent with the master.
- View all changes
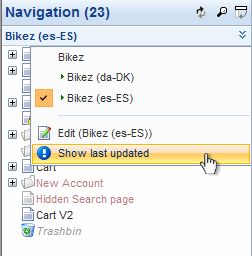
While the change indicator provides you with an overview of the changed paragraphs on an individual page, the Show last updated function (Figure 21.3) will give you an overview of all paragraphs on the currently selected language layer which have been changed on the master website. This will help you maintain a workflow where the translators responsible for individual language layers can easily determine what parts of a language page that needs to be updated.
- Lock pages/paragraphs
When creating or editing a page/paragraph on a master website it is possible to lock that particular page/paragraph, so it cannot be changed on any language versions of the website. To lock a master page/paragraph select the Advanced tab and check the field Lock language versions – the content will be locked on all language layers, as indicated by the padlock icon (Figure 22.1).

Implementing
In this section, you will learn about:
- How to modify language layer behavior using the Language Management settings
Language Management
Remember when I wrote that you cannot create new paragraphs from a language layer? Yeah, about that… I lied.
Using the Language Management settings (Figure 24.1), you can change or customize several aspects of working with language layers.
To access the advanced language layer settings go to Management Center > Control Panel > Modules > Language Management
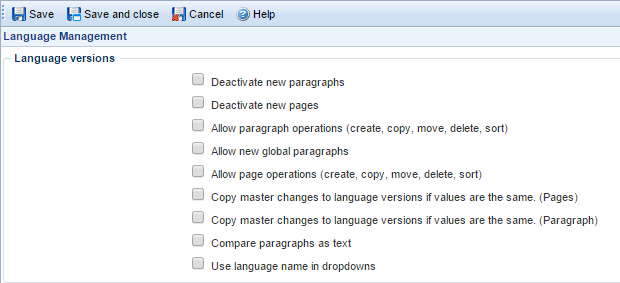
With the language management settings, you can control how newly created paragraphs and pages behave on language layers:
- Deactivate new paragraphs on language layers, when created on the master website. They must then be manually activated on each language layer. This is useful if you do not want to publish paragraphs on a language later before they have been translated.
- Deactivate new pages on language layers, when created on the master website. They must then be manually activated on each language layer. This is useful if you do not want to publish pages on a language layer before they have been translated.
You can also allow certain content operations from a language layer:
- Allow paragraph operations (create, copy, move, delete, sort) on language layers – that is, with this checked you can create and work with paragraphs on language layers in the standard manner. Please note, that structural changes made on a language layer are not reflected on either the master page or any other language layers you may have. This may lead to mayhem if (when) you later try and rearrange your content.
- Allow page operations (create, copy, move, delete, sort) on language layers – that is, with this checked you can create and work with pages on language layers in the standard manner. Please note, that structural changes made on a language layer are not reflected on either the master page or any other language layers you may have.
- Allow new global paragraphs to be created from a language layer – read more about global paragraphs here.
You can also customize if and how changes made to a master paragraph should be automatically copied to language layers:
- Copy master changes to language versions if values are the same (pages). When enabled, all changes made to the properties of a master page will automatically be copied to any language versions of that same page, but only if their values are already identical. If, for example, you change the Title value on a master page from "Frontpage" to "MyCompany", then only the language versions of the page that also has "Frontpage" as Title value will be changed. If, on the other hand, the title of a language version page differs in any way from its master, it will not be affected by the master changes. Note that even though the value of one field, such as the Title, differs from its master, it will not prevent the update of any changes made to the other fields on that page, assuming they are identical to the master.
- Copy master changes to language versions if values are the same (paragraph). When enabled, all changes made to the content of a master paragraph will automatically be copied to any language versions of that same paragraph, but only if their content is already identical. If the content of a language version paragraph differs in any way from its master (depending on the Compare paragraphs as text setting below), it will not be altered by changes made to the master.
- Compare paragraphs as text. If you enable this setting, any markup language will be ignored when comparing master and language version paragraphs for the purpose of the above setting: Copy master changes to language versions if values are the same (paragraph). This means that content changes made on a master paragraph will be copied to language versions even if a language version uses different markup, as long as the text itself is still identical to that of the master.
Finally, you can use website names rather than language names in the language layer selector dropdown:
- Use language names in dropdowns. This checkbox is mislabeled. When checked, the website name is used on the language dropdown on pages/paragraphs when switching between language contexts, instead of the default option, which is using the language name.
Restoring a language layer to match the master layer
If you allow content to be created in language layers, there will come a time where you will fall on your knees, look to the heavens and beg for the nightmare to be over. Or, at least, you may find that managing content and ensuring everything works as intended across language layers to take up too much time.
In those cases, you can restore a language layer to the master. To do so:
- Go to the page properties of the master page
- Navigate to the Advanced tab
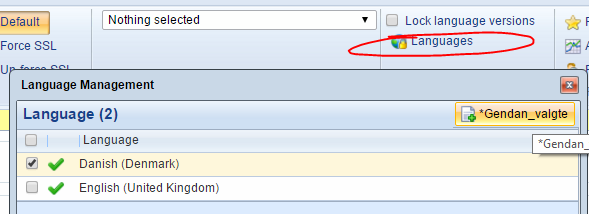
- Click the languages button to open the restore-window (Figure 24.3)
- Select the language layer you want to restore
- Click the Restore button