
Endpoint Management
The Endpoint Management tool introduced in Dynamicweb 9.8 allows you to define & test various endpoints – but why do you need endpoint management?
Well, integration between multiple systems almost always requires communication between multiple endpoints. Not only do these endpoints differ in the data they expose (e.g. contact, orders, products), they also differ in their origin (development, staging, production servers).
Over the course of a development project there is a need to manage these endpoints:
- Developers might need to add new endpoints as changes to the business requirements necessitates new data sources
- User credentials might need to be updated as passwords and permissions are changed for an endpoint
- Eventually it is necessary to change servers when the project progresses from development to staging and finally production
All of these management tasks are made much easier by using the Endpoint Management tool.
To use the Endpoint Management tool, go to Settings > Integration > Endpoint Management (Figure 1.1).
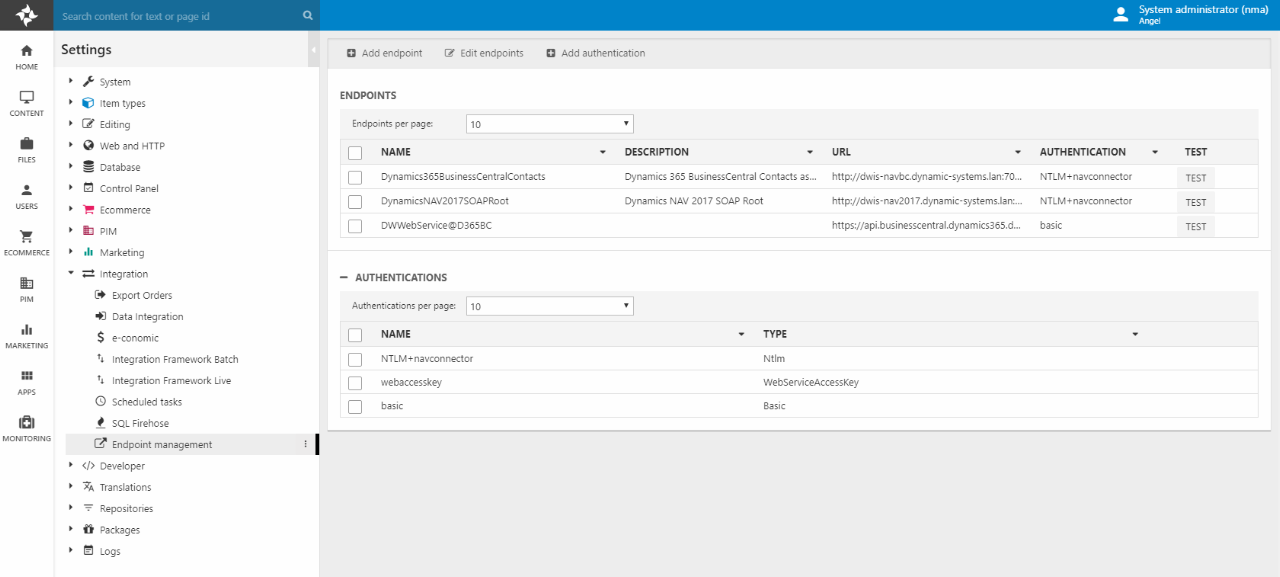
You can now do four things:
- Add an endpoint
- Add an authentication
- Test an existing endpoint
- Edit one or more existing endpoints
Endpoints can be used with the following placed:
- In the Import data with custom request add-in
- In the Live Integration
Adding an endpoint
The Endpoint Management tool is built with two specific types of endpoints in mind:
- OData RESTful endpoints exposed by NAV/D365 Business Central
- SOAP endpoints exposed by a Dynamicweb plug-in installed on a Microsoft Dynamics ERP system
This is not to say that the tool cannot be useful with other RESTful or SOAP-based endpoints, e.g. an Azure Table or a proprietary SOAP web service – but you should regard this as a bonus and not the purpose for which the tool is built, or something which will necessarily be prioritized in the future.
To add an OData RESTful endpoint:
- Click Add Endpoint
- Add a Name and a Description
- Add the URL of the OData endpoint you want to connect to
- Select type GET
- Select an Authentication from the list of authentications (see next section)
- Save
A configured OData RESTful endpoint could look like Figure 2.1)

To add a SOAP endpoint connected to a Dynamicweb ERP plugin:
- Click Add Endpoint
- Add a Name and a Description
- Add the URL of the SOAP web service exposed by the Dynamicweb ERP plugin
- Check the Connects to a standard Dynamicweb codeunit service checkbox
- Add a GetEcomData request – see more here
- Select an Authentication from the list of authentications (see next section)
- Save
A configured SOAP endpoint could look like Figure 2.2.
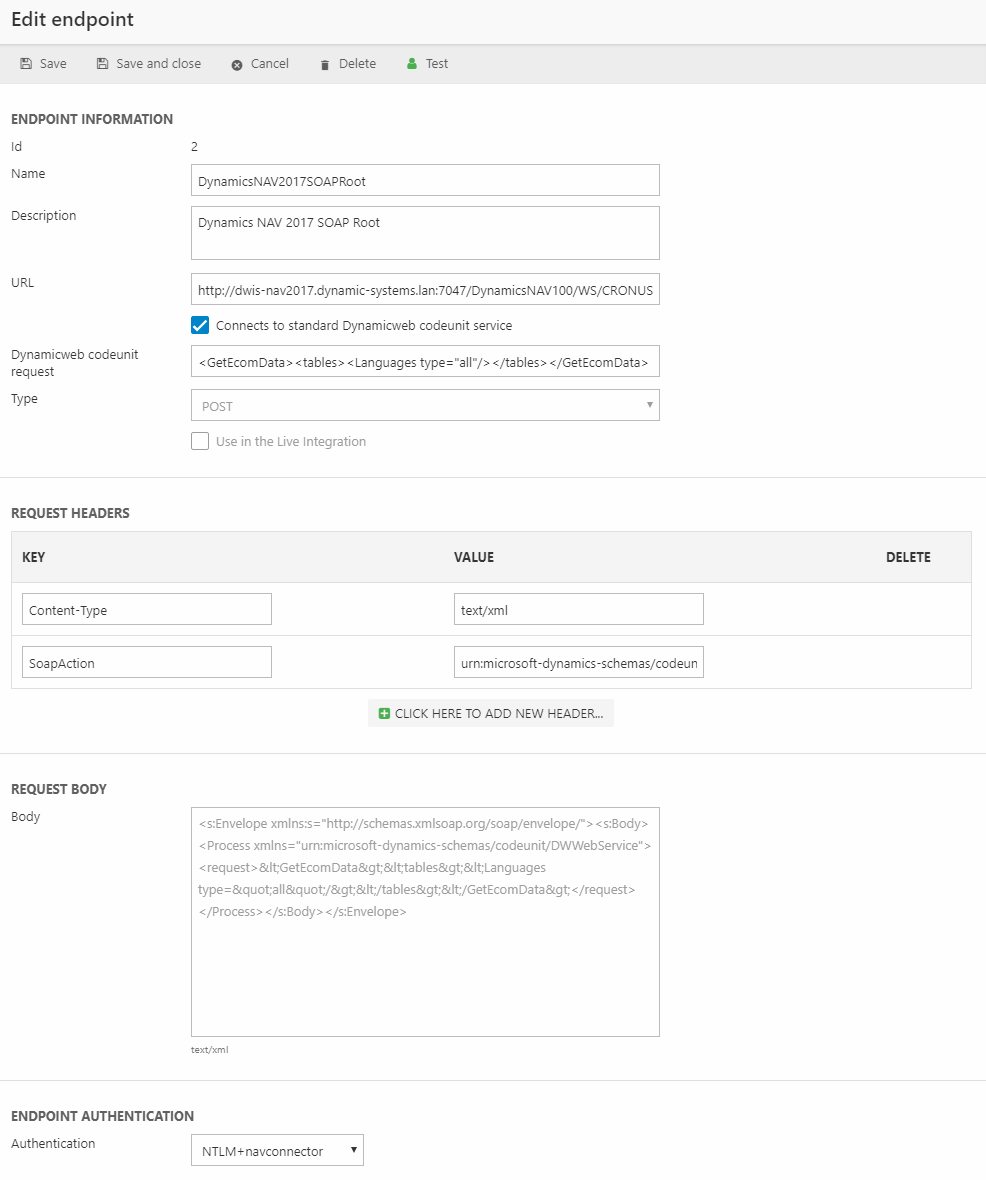
Connects to a standard Dynamicweb codeunit service
The Connects to a standard Dynamicweb codeunit service checkbox does three things:
- Forces the type to POST
- Adds two headers – Content-Type and SoapAction – with appropriate values
- Adds a request body
This is because SOAP, while using HTTP, envelopes each message with headers and a body. Endpoint Management does all of this for you when you connect to a standard Dynamicweb Service. It then adds your GetEcomData request to the body of each message.
Of course, you can also configure an endpoint like this manually.
Adding an authentication
To add an authentication:
- Click Add authentication
- Add a Name
- Select a Type:
- Basic: Authentication with a username and a password
- WebServiceAccessKey: Business Central can assign web access keys to users. These keys can be valid from one date and be invalid after a certain date. These keys are auto-generated and is used instead of a password. WebServiceAccessKeys can be used for on premise solutions as well as cloud-hosted test enviroments.
- Ntlm: NTLM is an authentication protocol used in windows networks. It allows you to provide a domain and windows user to access endpoints within the same network as the Dynamics ERP system. This is useful in development and on premise scenarios.
- OAuth2: A method of authentication managed in Microsoft Azure Active Directory. As of April 2021 the use of OAuth is mandatory when interacting with APIs of cloud hosted Business Central enviroments. You can access a guide on establishing an OAuth authentication for Business Central endpoints here.
- Add username, password, webservice access key, and/or domain according to the selected authentication type
- Save
Please note that a single authentication can be used across multiple endpoints – for example; an authentication using the NTLM protocol to access endpoint with a network domain and windows user. This user is subsequently added as a Business Central user with access rights to the endpoint.
Filtering endpoints
To filter the records exposed by the endpoint a query parameter can be added in Endpoint Management.
A query parameter consists of a key value pair and could look like the following example (filtering 365BC sales orders):
The first example filters the OData so that it only includes records where the value of the sell_to_Country_Region_Code is equal to the string ‘GB’. Resulting in the endpoint only exposing orders made to customers in Great Britain.
The second example restricts the endpoint to only importing the first 20 records of the entity.
Once a query parameter has been added to the endpoint and the endpoint itself has been saved, the full URL (including the added query parameter) will be visible in the endpoint editor.
For a full documentation on Business Central API filters click here.
Testing an endpoint
The Endpoint Management tool contains functionality for testing requests to and responses from an endpoint – in a manner reminiscent of Postman and similar tools.
To test an endpoint:
- Select an endpoint from the list of endpoints
- Click Test (or click Test directly from the list of endpoints)
- Click Send request
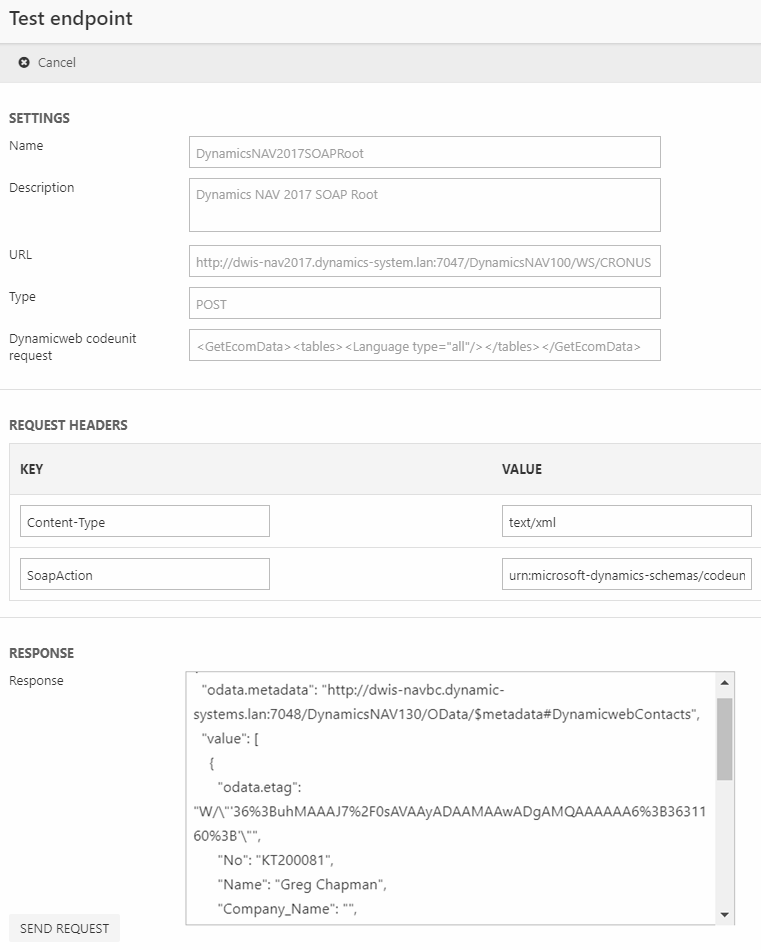
- Review the response
The test page for an OData endpoint could look like Figure 5.1 – in this case the endpoint exposes the Contacts page in D365 Business Central, and the response is therefore contact data formatted as JSON.
Editing endpoints
At some point, for instance when you move from development to staging and from staging to production, you want to edit existing endpoints. This can be done in two ways:
- Clicking a single endpoint in the endpoint list, changing something, and saving it
- Clicking Edit endpoints in the toolbar and edit multiple endpoints at once (Figure 6.1)
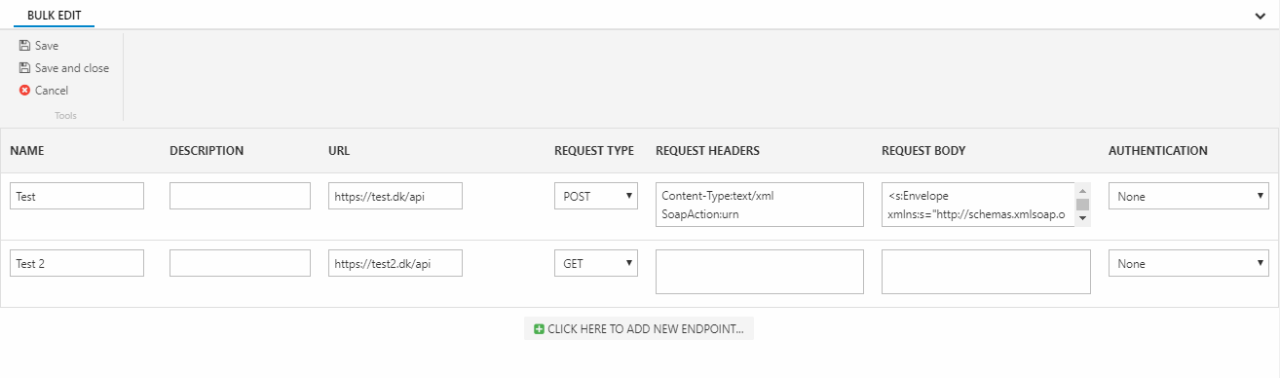
Note how you can also add new endpoints from the bulk edit page.