
Voucher Emails
In this article, you will learn how to set up an automatic email flow for sending a voucher to users who sign up for receiving emails from you.
Of course, to send out email marketing emails legally you need explicit consent from the customer.
This article presupposes that you have already created the following on your solution:
- A voucher list
- A discount triggered by the voucher
Since these types of emails need to have their content rendered for each recipient – because they have unique content for each user – we suggest you create and configure separate top folder for them.
To do so:
- Go to your Marketing area
- Right-click on the Email Marketing node and click Create new top folder
- Name the folder – e.g. Vouchers for new signups
- Check the Render content for each recipient checkbox
- Save and close the top folder settings
Your setup could look like (Figure 2.1).

The Voucher Renderer app
In Dynamicweb, emails are actually pages which are wrapped in en email template and sent to your recipients.
A voucher email can therefore contain whatever you like – just like other emails – but in order to render the voucher code it must also contain a voucher renderer app (Figure 3.1).

The voucher renderer app is very simple - it consists of:
- A dropdown for selecting a voucher list
- A template for controlling how the voucher code is rendered
Create an email and add this app to it, selecting the voucher list you want to distribute vouchers from. Select or create a template which fits the overall email template.
Creating a ‘New signups’ smart search
To automate the voucher email flow, you must create a smart search which finds users who:
- Have updated their email permission within the previous 24 hours
- Have email permission set to true
- Have not received a voucher email already
To do so:
- Go to Users > Smart searches
- Click New smart search
- Add the appropriate rules (Figure 4.1)

This finds all users who have changed their permission to true within the last 24 hours, and who have not previously received a voucher email (to prevent abuse).
Configure the rest of the email in the standard manner.
Scheduling the campaign
When ready to schedule the campaign, click the Scheduled send button (Figure 5.1).

This opens the scheduling window (Figure 5.2).
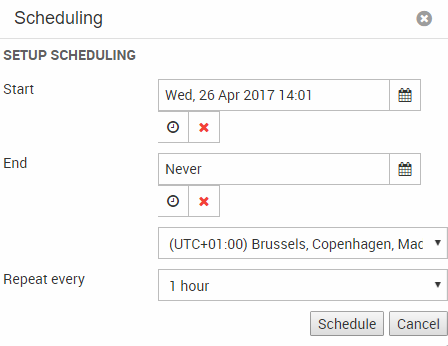
You must:
- Select a start date and time and an end date and time. If you want to let the campaign run for an unlimited time, select never as the end year.
- Select a time zone and a repeat interval suited to your setup – here, once a day seems appropriate
- Click schedule
And that’s it! You're done.