
Abandoned shopping cart campaigns
Want to know what the most shocking number in e-commerce is?
68%
According to the Baymard Institute, that’s the percentage of online shopping carts which are abandoned before the customer completes a sale.
That means that for every 100 customers who add products to their shopping cart, two-thirds will abandon their cart before checking out – and only 32 end up making a purchase.
Or – in other words – you lose two-thirds of your potential sales.
Now, it may not be possible to persuade all of those customers to return to your shop – but you can try! And one of the most obvious ways is to set up an email marketing campaign targeting users with abandoned shopping carts.
Here’s how!
Creating a campaign folder
Since these types of emails need to have their content rendered for each recipient – because they have unique shopping cart contents – you should create and configure a separate folder for abandoned cart emails, as this will allow you to preselect a lot of necessary settings.
To do so:
- Go to your Marketing area
- Fold out the Email Marketing node and right-click on the Campaigns folder and click Create new folder
- Name the folder – e.g. Abandoned Cart Campaign
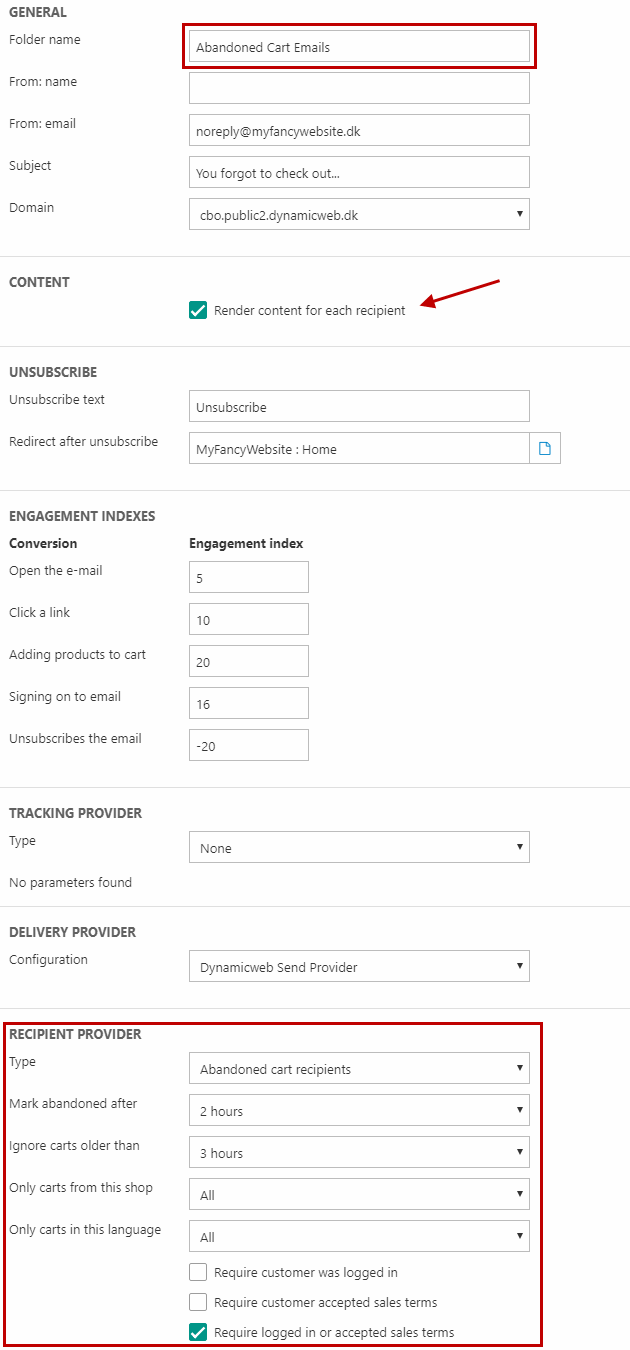
- Check the Render content for each recipient checkbox
- Select the Abandoned cart recipients recipient provider, and configure it:
- Set Mark abandoned after to e.g. 2 hours
- Set Ignore carts older than to e.g. 3 hours
- Check Require customer was logged in/accepted sales terms/logged in OR accepted sales terms as appropriate
Your setup should look like (Figure 2.1).
Rendering the abandoned cart
In Dynamicweb, emails are actually pages which are wrapped in an email template and sent to your recipients. An abandoned cart email can contain whatever you like – but usually you want to render the abandoned cart and provide the recipient with a link directly to the cart.
To do that, you must use the context order renderer app (Figure 3.1).
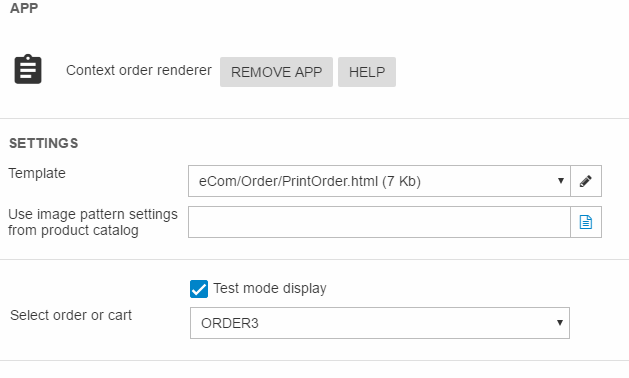
To use the context order renderer app:
- Create a new page somewhere in your content tree – e.g. within a dedicated emails folder
- Add a new paragraph to the page and attach the Context Order Renderer app to it
- Select or create an appropriate template for rendering the cart content and a Checkout Now link
- Save and close
You can use the OrderLines loop to loop through and render the contents of the abandoned cart.
To render a Go to Cart button which will send the email recipient to the abandoned cart without relying on a cookie use the loadorder cart command along with a LoadingOrderSecret retrieved from the context.
See the following example:
Scheduling the campaign
Once the abandoned cart email-page is to your liking, go to Marketing > Email Marketing and create a new email in your Abandoned Cart Emails folder.
Set it up in the standard manner.
When ready to schedule the campaign, click the Scheduled send button.
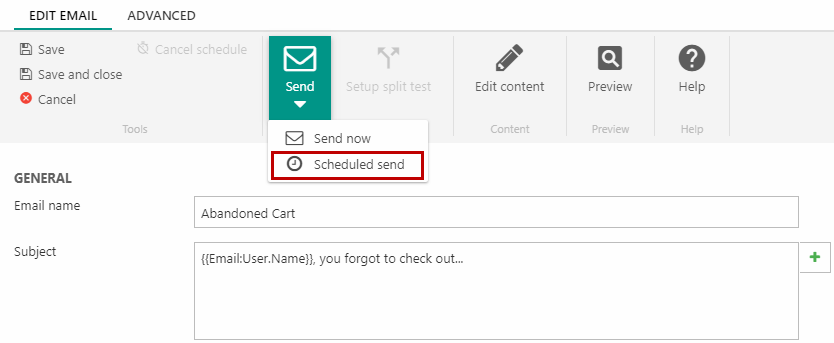
This opens the scheduling window (Figure 4.2).
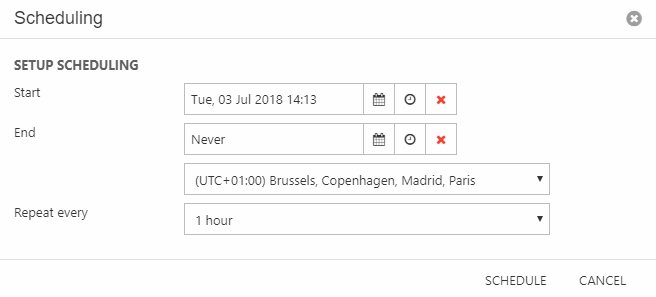
You must:
- Select a time zone and a repeat interval suited to your setup – here, 1 hour seems appropriate
- Select a start date and time and an end date and time. If you want to let the campaign run for an unlimited time, select never as the end year.
- Click schedule
And that’s it! Every hour, the task will run, finding recipients with an abandoned cart between 2 and 3 hours old, and send them a personalized email rendering their abandoned cart.
Suggestion: Follow up emails
Many companies send out abandoned cart emails more than once to ensure a higher conversion rate - to do this you should setup multiple emails like the one describe above, but with different abandoned cart recipient provider settings, e.g.:
- 1st mail
- Mark as abandoned: 2 hours
- Ignore carts older than: 3 hours
- Repeat every: 1 hour
- 2nd mail
- Mark as abandoned: 1 day
- Ignore carts older than: 2 days
- Repeat every: 1 hour
- Etc.
If you want to set up follow-up emails, please use a separate top folder configured for the new mark abandoned/ignore settings – or override the top folder settings by using the local recipient provider setting on the 2nd and 3rd emails. If not, the follow-up emails will inherit the top folder settings from above.