
Quotes
A quote is a document sent to a potential customer offering to sell goods or services at a certain price under specified conditions.
In Dynamicweb, quotes (or more properly inquiries) are created and submitted by users from the frontend, then evaluated from the backend, before being converted to a quote sent back to the user. The user can then decide to take you up on the offer and create an order based on the quote – or reject it.
Working with quotes in Dynamicweb requires you to:
- Familiarize yourself with the backend quotes management interface.
- Implement quotes in frontend, using the Product Catalog app, the Shopping Cart app, and the Customer Center app.
Quotes lists are lists of quotes submitted to you by frontend users - it is from this list that you will process quote inquiries and return them to the customers.
To access quotes:
- Open the Ecommerce area
- Click on the Quotes node (Figure 2.1) to fold it out
- Click on a shop located under the Quotes node shows the quotes list for that shop

This opens the Quotes list view (Figure 2.2).
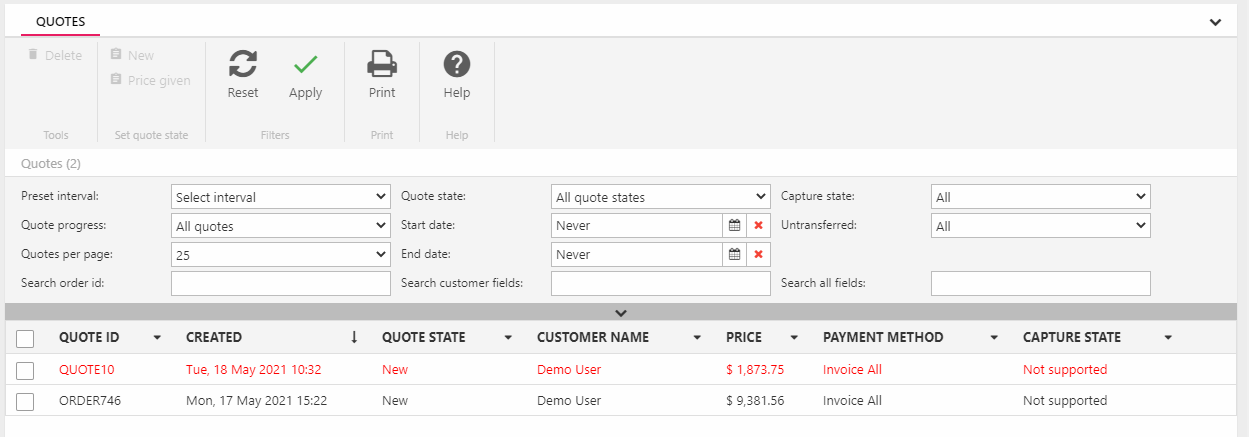
From the Quotes list you can see the following information for each quote:
- Quote ID
- Creation date and time
- Quote state
- Customer name
- Price
- Payment method
- Capture state
From the Quotes list view you can also filter and search the quotes list – or click a quote to access the quote details.
Quotes are red until they have been accepted by a customer and set to Completed - after completion they appear in black.
Filtering and searching the Quotes list
From the Quotes list toolbar (Figure 3.1) you can filter and search the Quotes list.
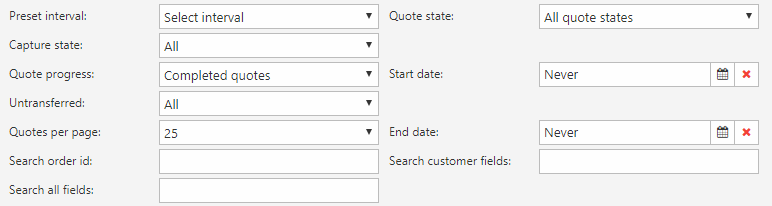
With the filtering a search option, you can:
- Find quotes based on start and end date, or on a preset interval (like today or latest week)
- Filter on quote state (custom work-flow states), quote progress (system controlled) or capture state (depending on payment provider details)
- Isolate quotes which have been transferred to Dynamicweb Ecommerce from an outside system (via the integration framework)
- Search your orders
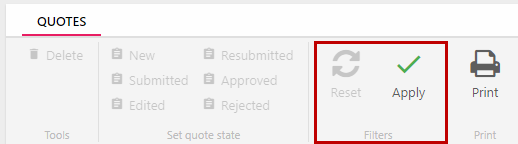
Once a set of filters and criteria have been selected, click the apply button to apply the filters – or the reset button to reset the selection (Figure 3.2).
From the quotes list view you can click an individual quote to access the quote details.
You can hide the filter settings to get a better overview of the orders by clicking the arrow under the filter settings area.
Your filter settings are automatically remembered by the system. This means that when opening the order list the next time, all filter settings will be pre-filled. If the filter area is hidden, then the area will blink shortly to indicate that special filter settings has been applied. To reset the filter settings, click Reset in the toolbar.
Printing quotes
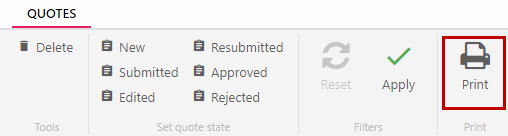
If you want to print one or more quotes for offline use, simply select the quote(s) and click the Print button in the toolbar (Figure 4.1).
This opens a print-friendly preview of the quote and a toolbar where you can:
- Print the order
- Access (and modify) the printer-friendly template to your liking
- Refresh the page (if you’ve made any template changes)
- Close the print view (and return to the quote list)
You can also print a quote from the quote details view.
Quote details
The quote details view (Figure 5.1) is almost identical to the order details view - which is hardly surprising, since it will hopefully be converted into an order on acceptance from the customer.

The basic quotes details provide you with a view of:
- The OrderID, the quote completion date
- The list of order items and any discounts, order line fields, unit, and stock location associated with each item
- The payment and shipping methods selected - and any fees associated with them
- The order subtotal, total, and totals excluding VAT & Taxes
- The billing and shipping address details
In the upper right corner of the view you can access the edit quote button if permitted on your solution (you may need to collapse the navigation tree).
Below the basic quote details you have access to the collapsible quote detail boxes.
Consolidating taxes
By default all taxes are shown on separate orderlines – but this can get confusing if many taxes are applied, e.g. when using the Avalara AvaTax provider.
To make your order details less confusing, consolidate the taxes into a single order line by going to Settings > Ecommerce > Advanced configuration > General and activating the Taxes in backend settings (read more about the settings here).
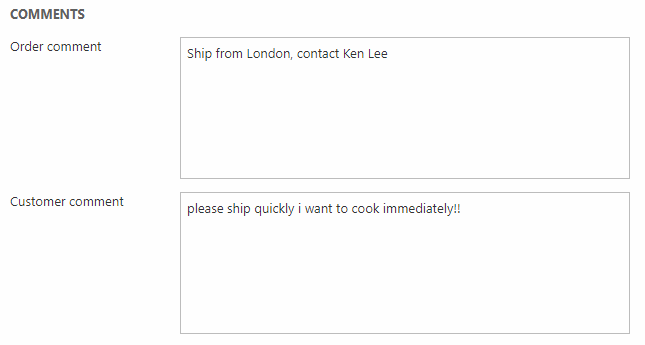
Order Comments
The Comments box (Figure 6.1) lets you view and edit both the order comments and any customer comments.
Additional information
The Additional information box (Figure 7.1) contains any custom order fields present on your solution. Order fields are simply fields can be filled by either frontend user or backend staff, or during integration, and are a flexible way of working with custom order data in Dynamicweb.

You can read more about custom order fields in this article.
Order data
The order data box (Figure 8.1) provides you with access to various technical data about the order.
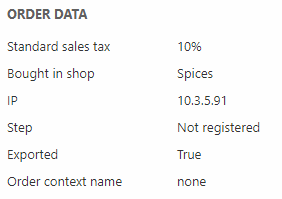
You can view:
- The standard sales tax or VAT rate
- The shop the quote was created from
- The IP address of the computer usd to place the quote
- The last step in the order process (currently broken)
- The exported info (returns true if order has been exported)
- The order context of the order (if completed through an order context cart)
Order currencies
The currencies box (Figure 9.1) shows you the the details of the currency of the order.
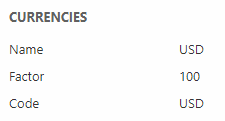
You can review:
- The name of the currency used for this order
- The factor (exchange rate) compared with the default currency
- The code for the currency
Transaction details
The transaction box (Figure 10.1) lets you review transaction details from the payment provider used for the order.

Since this is a quote, the provider won't return any transaction information at all.
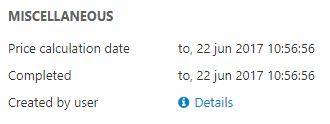
Miscellaneous details
The Miscellaneous box (Figure 11.1) lets you review the price calculation date and the completion date. You can also access the user details of the (registered or unregistered) user who placed the quote by clicking Details.
Processing a quote
Processing a quote in Dynamicweb means editing it and setting a new quote state, preferably one which alerts the customer that a quote is ready to be accepted or rejected.
Before you can edit quotes, order editing must be enabled on your solution in advanced configuration:
- Go to Settings > Ecommerce > Advanced configuration > General
- Check the Allow edit order for all users checkbox (read more about the settings here)
To edit a quote, click the quote in the Quote list. Then in the Quote details, click the Edit icon (Figure 12.1).
When editing a quote in Dynamicweb, you can:
- Edit the billing and shipping information about the user who created the quote – this is not usually of interest when it comes to quotes
- Edit the quantity and price of order items – or remove them altogether
- Add order discounts using the $-icon
- Add products (with or without a product discount) to an order using the box icon - you can also remove them again
- Edit order line fields, if available – read more about order line fields.

Once edited to your satisfaction, click Save and return to the Quotes list.

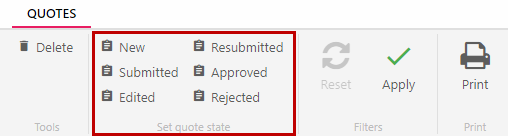
In the Quotes list, check your quote and change the quote state in the ribbon bar (Figure 12.3) to let the customer know that they have received a quote, which they can then accept (and create an order from) or reject.
Only one quote can be added to the cart at the time, and you cannot add regular products to a cart along with a quote.
The default quote states are:
- New – the default state when a new quote is created. Means the quote is ready to be processed.
- Submitted – once processed, this quote state lets the customer know that they can now take action on the quote they have been sent – reject or approve it
- Approved – this state means that the customer has approved the quote, and have (if allowed) created an order based on it
- Rejected – this state means that the customer has rejected the quote
You may need to customize the default quote flow to match your needs or to allow or disallow certain actions – read more about custom quote flows below.
Implementing quotes
To enable your users to ask for quotes from the frontend, you must setup and configure your solution to support it.
Specifically, you must:
- Create an order context and a quotes cart for creating quotes
- Modify your product catalog templates to allow users to add products to the quotes cart
- Allow your users to interact with (and create orders from) their quote inquiries from the frontend, through the Customer Center app
Creating an order context
To create a new order context for handling quotes:
- Go to Settings > Ecommerce > Orders > Order contexts
- Click New order context from the menu
- Name the order context and select a shop for it to work with
- Save the order context
You can read more about order contexts and context carts in the Shopping Cart documentation.
Creating a quotes cart
Once your order context has been created, you must create and configure your quotes cart – the Shopping Cart app – dedicated to handling quotes.
To create a quotes cart:
- Create a new paragraph on the page where you want your quotes cart and add the Shopping Cart app to it
- Click App to edit the app settings
- In the settings area (Figure 15.1), select your shop in the shop-dropdown and your order context in the context cart-dropdown
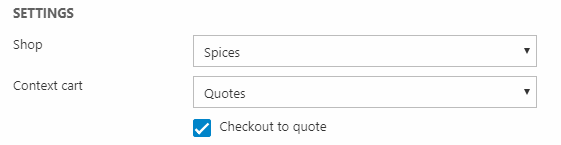
- Check the Checkout to quote checkbox
- Don’t forget to Save and close the app settings
With the proper order context and the quotes cart set up, you need to enable users to add products to the quotes cart.
Add products to the quotes cart
To enable users to add products to the quotes cart, you must create an ‘Add to Quotes Cart’ button in either the product list template or the product details template – or in both.
To do so:
- Edit your product details or product list template
- Insert the OrderContexts loop where you want an Add to cart button
- Create an Add to cart link using the OrderContext.ID tag to render all context carts that are available for the selected shop
See example below.
Once your templates have been modified to your satisfaction, your customers will be able to add products to the quote cart and check out. You will then be able to view and process the quote request in the backend, and send it back to the customer.
In order to enable the customer to react to your quote – e.g. to create an order from it – you must modify your Customer Center app (or add one to your solution).
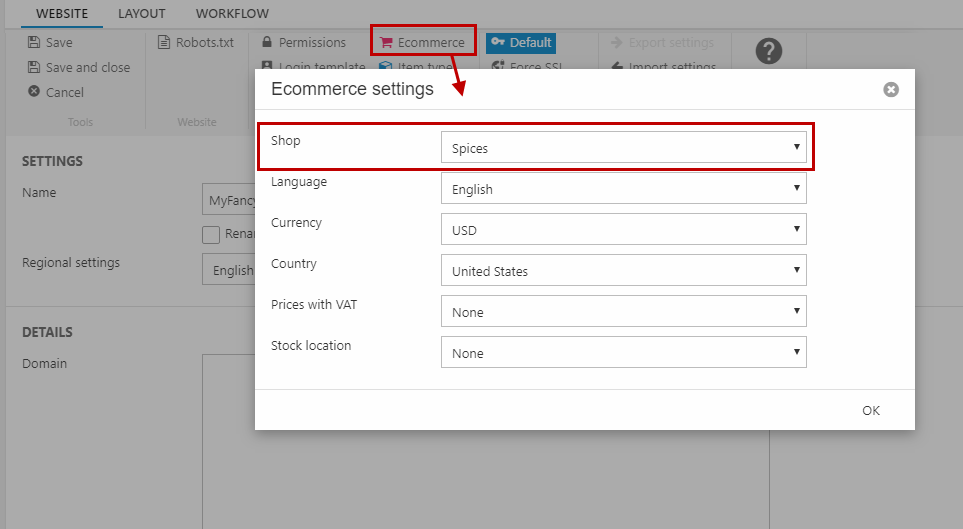
The OrderContexts loop is not rendered unless you set a shop under Website settings > Ecommerce > Shop (Figure 16.3).
Add quotes to the Customer Center
In order to finalize your quotes setup, you must modify you Customer Center setup.
To do so:
- Open you Customer Center app settings (or create a page & paragraph and add the app to it)
- Edit the My Quotes menu text to suit your solution
- In the Templates section:
- Select the NavigationQuotes.html template in Menu layout (or add <!--@Ecom:CustomerCenter.MyQuotes--> | to your existing navigation template)
- Select the QuoteList.html template as the Quote List template
- Select the QuoteDetail.html template as the Quote Details template
- Save and close
Your logged in customers will now be able to react to quotes, as per your quote flow design. Read about creating or editing your quote flows below.
Quote Flows
Quote flows consist of a set of quote states – states, like New or Approved which are used when processing a quote.
The default quote flow contains the following quote states:
- New – the default state when a new quote is created. Means the quote is ready to be processed.
- Submitted – once processed, this quote state lets the customer know that they can now take action on the quote they have been sent – reject or approve it
- Approved – this state means that the customer has approved the quote, and have (if allowed) created an order based on it
- Rejected – this state means that the customer has rejected the quote
If necessary, you can modify or create custom quote flows or quote states to suit the quote handling process.
Custom quote flows
To create a custom quote flow:
- Go to Settings > Ecommerce > Orders > Quote flows
- Click New quote flow (Figure 19.1)
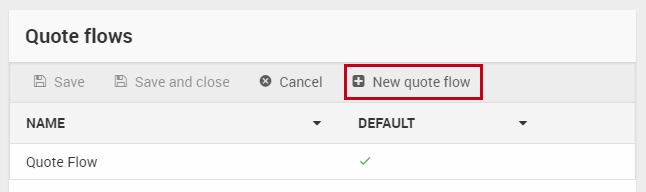
- Name the quote flow, optionally provide a description for it – and decide if this should be the default quote flow or not
- Save and close the quote flow – and then click it to open it again.
This reloads the toolbar and allows you to add quote states to the flow.
Custom quote states
Quote states are individual steps in a quote flow, which can be configured to control the quote flow behavior on your solution.
To create a new state:
- Click New quote state
- Configure the quote state settings (Figure 20.1)
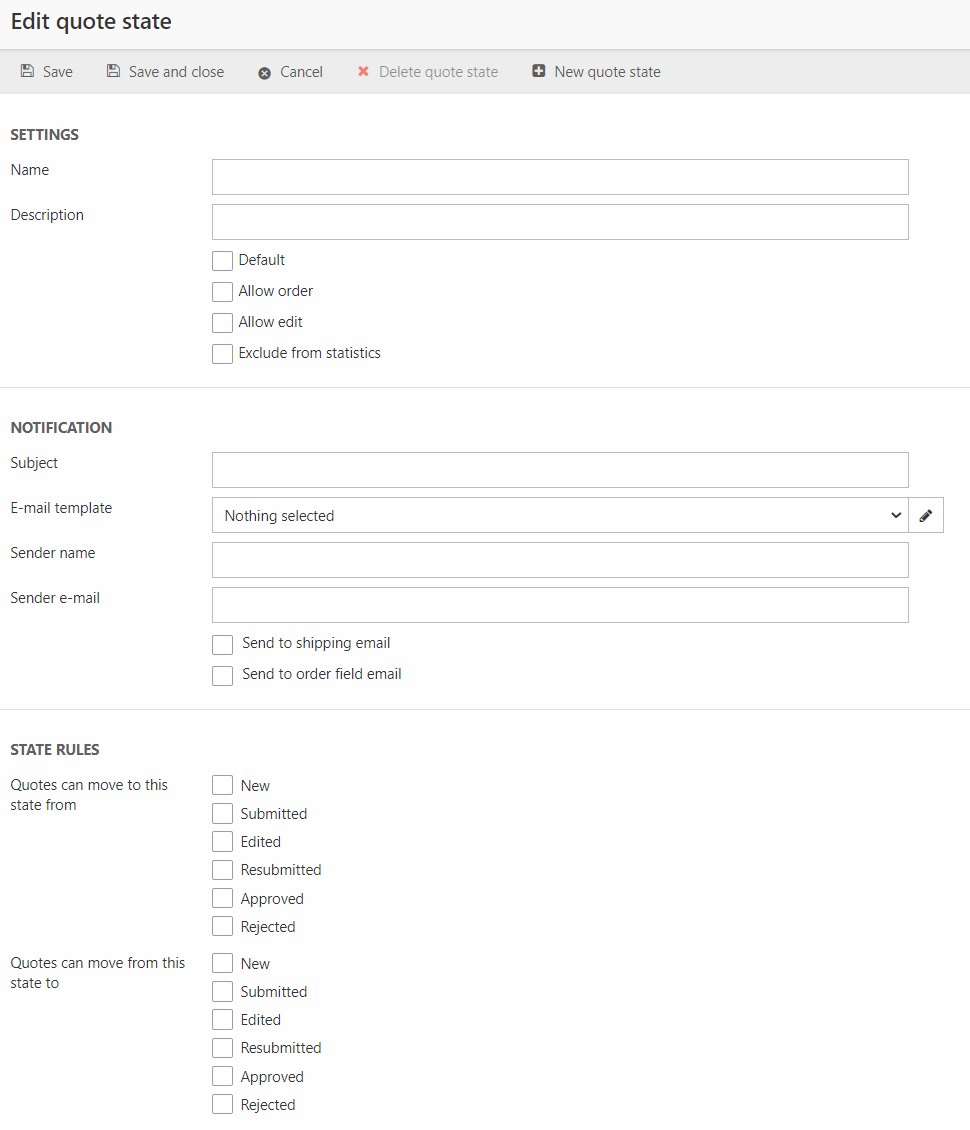
From the settings area you should provide a name and description (optional) for the quote state, and then configure the quote state behavior:
- Default means new quotes are created in this state
- Allow order means a quote in this state can be converted to an order
- Allow edit means that this quote can be manipulated in frontend from a shopping cart
- Exclude from statistics means the quote is, well, excluded from Ecommerce statistics
To add the quote to a cart and edit it, use the Ecom:CustomerCenter.Quotes.AddToCart tag in the Customer Center app with an appropriate order context parameter, e.g. &OrderContext=ORDERCONTEXT5. Once the quote has been edited, it can be converted to an order - or a new quote can be created, in which case the quote will get a new quote-id (e.g. QUOTE9).
From the Notification area, you can set up notification emails for when an order enters the order state. This is particularly useful for notifying a customer that you have sent them a quote:
- Specify a subject for the email
- Select (or create/modify) an email template to use
- Specify a sender name and email
- Specify the recipient: use either the shipping email or an email from a custom order field
Finally, you can control the quote flow by restricting how a customer can move a quote between states in the Customer Center:
- Specify which existing states a quote can move from to this state
- Specify which existing states a quote can move to after this state
Don’t forget to save the quote state before exiting.
