
How to deploy Swift to another solution
This guide will be a walkthrough on how to deploy Swift on other solution such as a Rapido solution.
Throughout the guide we will use the terms Source and Target. The meaning of these terms are:
- Source – The Swift solution you will be copying from
- Target – The Rapido solution you want a Swift-site on
This walkthrough will be using the Dynamicweb Deployment Tool. Documentation for this tool can be found here.
It is important to follow the walkthrough thoroughly as the order of the deployment matters!
Ensure Source and Target same version
All steps are on the Source unless otherwise stated.
Any steps starting with “Deploy” is made from the deployment tool.
Make sure Source and Target is the same version of DW. In order to support Swift 1.10.0 you need to run on DW 9.13.6 or newer.
You can locate the version number by logging in to the backend and looking either at the browser tap or at the bottom right corner on the home screen.
If you need to upgrade your DW you can find information about it here.
Should you encounter compatibility errors, even though the Source and Target are the same version, you can add a setting to your Global Settings on the Source site.
/Globalsettings/Settings/Deployment/SkipCompatibilityCheck = true
Make sure to restart your application pool afterwards.
Create destination
Next up is creating the destination. This is done in the deployment tool.
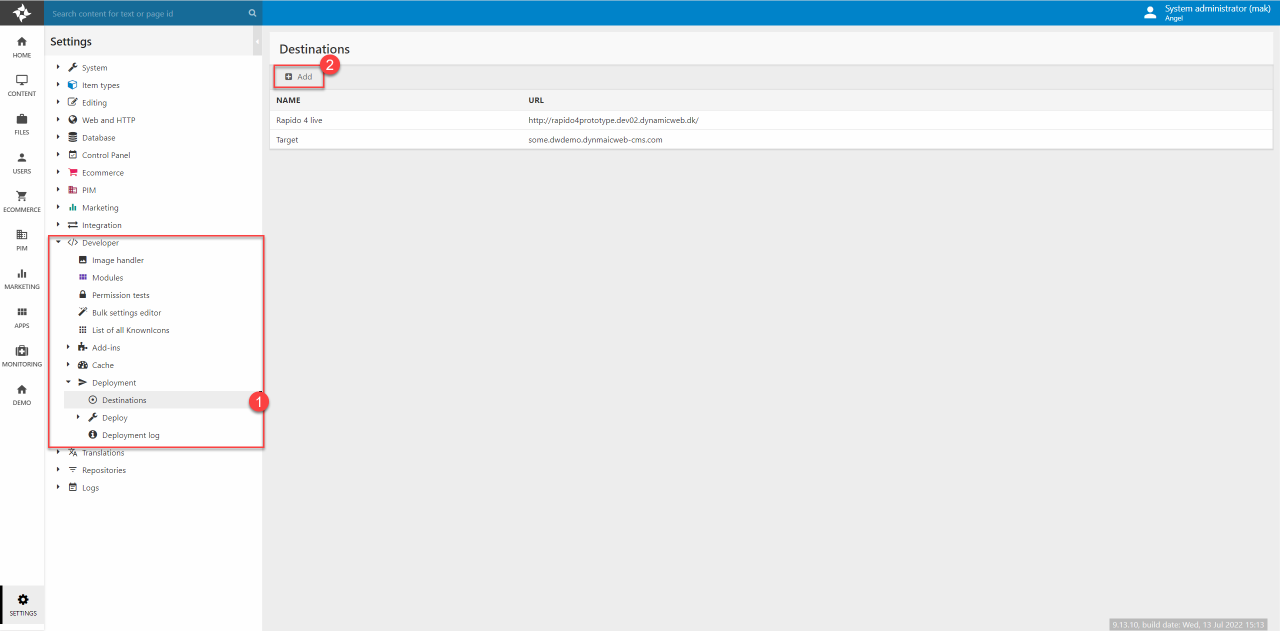
- Go to Settings/Developer/Deployment/Destinations
- Click "Add" to add a new destination
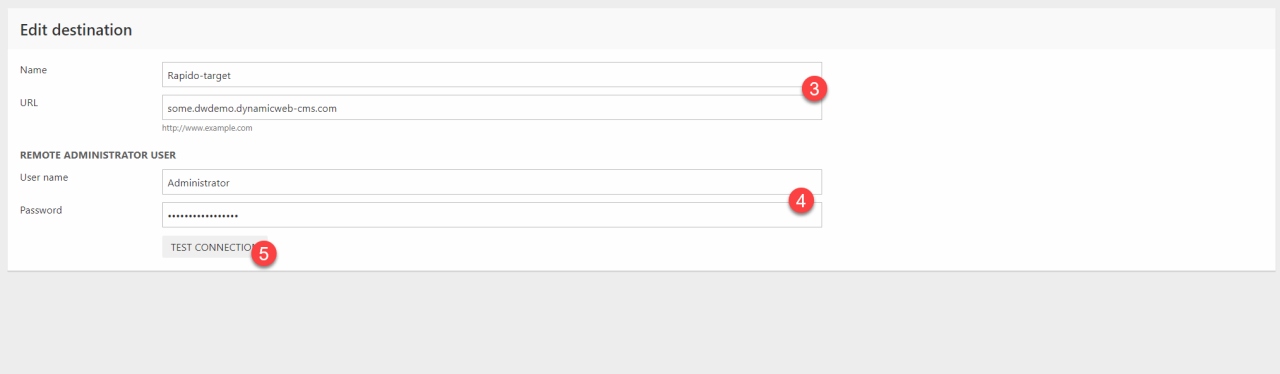
- Give the destination a Name and a URL
- Write the credentianls for a user with administrator rights on the solution. If you dont' know the credentials for a user with administrator rights, you can make one on the Target site
- Test the connection to the Target site by clicking the button "Test connection"
When all this is done remember to hit Save and close.
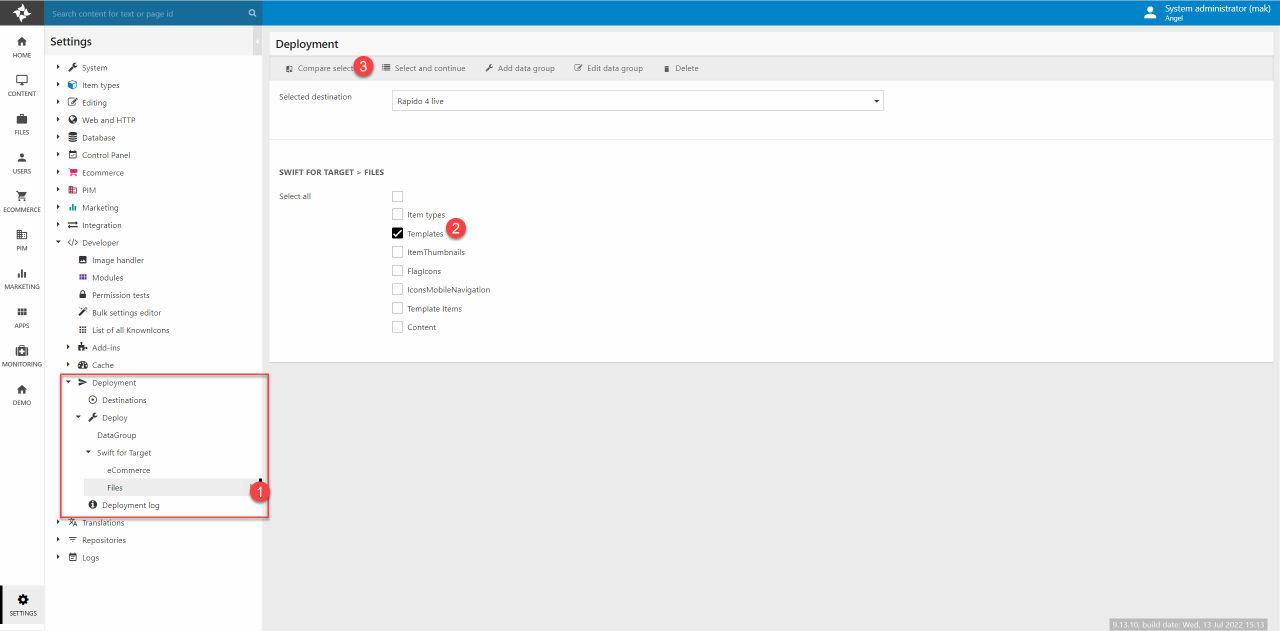
Deploy Item types, Templates, ItemThumbnails and TemplateItems
To Deploy Items types:
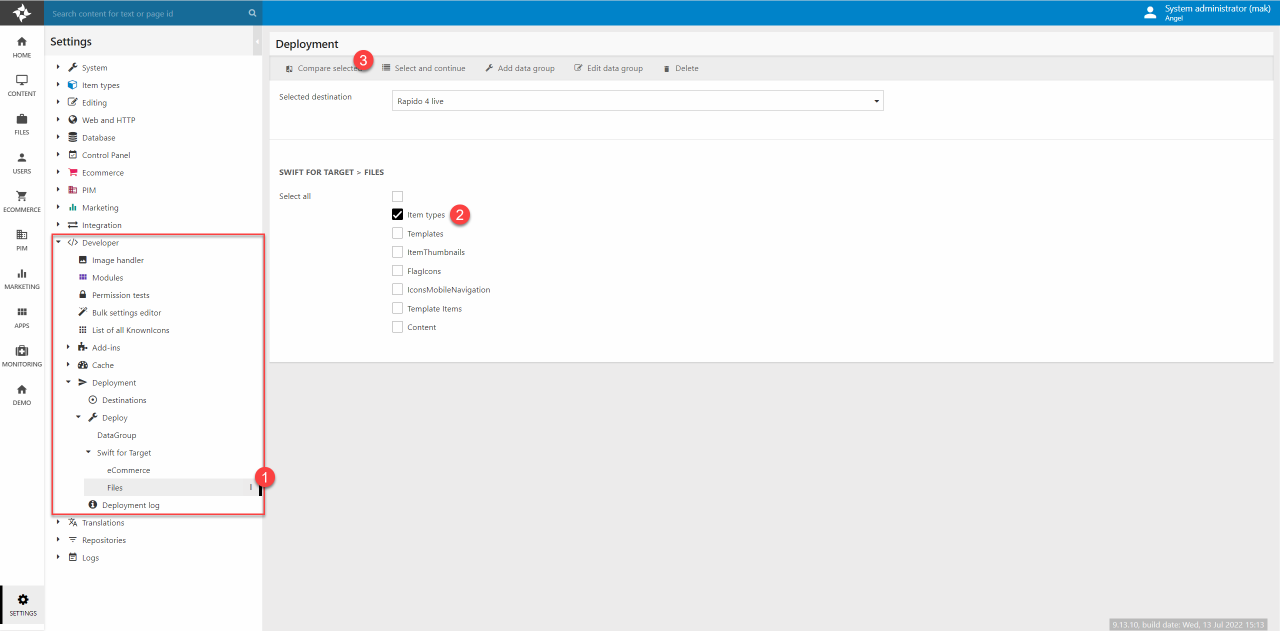
- Go to Settings/Developer/Deployment/Deploy/Swift for Target/Files
- In the Swift for Target > Files check "Item types"
- In the top menu click "Compare Selected" to make sure the settings are correct
- When it has been confirmed that everything looks right, check "Select All"
- In the top menu click "Transfer Selected"
If this doesn't work properly, click "Export Selected" instead. You will then have to import it with the Deployment tool on the Target website.
To Deploy Templates:
- Go to Settings/Developer/Deployment/Deploy/Swift for Target/Files
- In the Swift for Target > Files check "Templates"
- In the top menu click "Compare Selected" to make sure the settings are correct
- When it has been confirmed that everything looks right, check "Select All"
- In the top menu click "Transfer Selected"
-
If this doesn't work properly, click "Export Selected" instead. You will then have to import it with the Deployment tool on the Target website
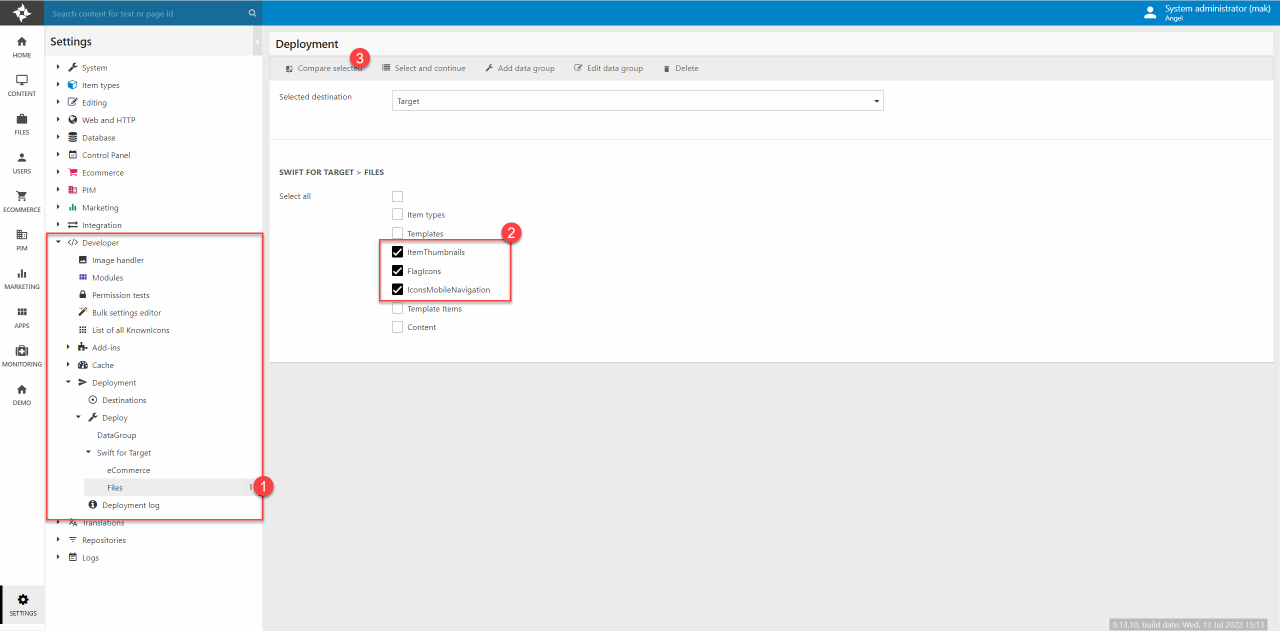
To Deploy ItemThumbnails, FlagIcons, IconsMobileNavigation:
- Go to Settings/Developer/Deployment/Deploy/Swift for Target/Files
- In the Swift for Target > Files check "ItemThumbnails", "FlagIcons", and "IconsMobileNavigation"
- In the top menu click "Compare Selected" to make sure the settings are correct
- When it has been confirmed that everything looks right, check "Select All"
- In the top menu click "Transfer Selected"
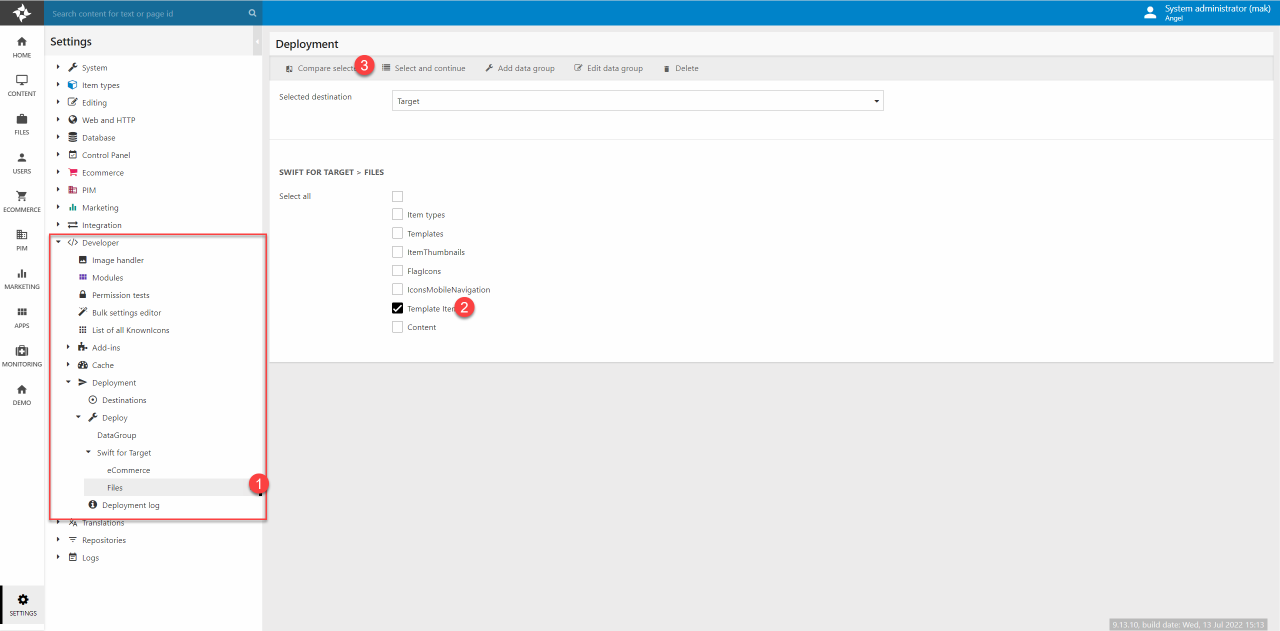
To Deploy TemplateItems:
- Go to Settings/Developer/Deployment/Deploy/Swift for Target/Files
- In the Swift for Target > Files check "TemplateItems"
- In the top menu click "Compare Selected" to make sure the settings are correct
- When it has been confirmed that everything looks right, check "Select All"
- In the top menu click "Transfer Selected"
If this doesn't work properly, click "Export Selected" instead. You will then have to import it with the Deployment tool on the Target website Repository.
Deploy Repositories
To Deploy Repositories (SwiftProducts, Secondary Users, Files):
- Go to Settings/Developer/Deployment/Deploy/Swift for Target/Files
- In the Swift for Target > Files check "Repositories"
- In the top menu click "Compare Selected" to make sure the settings are correct
- When it has been confirmed that everything looks right, check "Select All"
- In the top menu click "Transfer Selected"
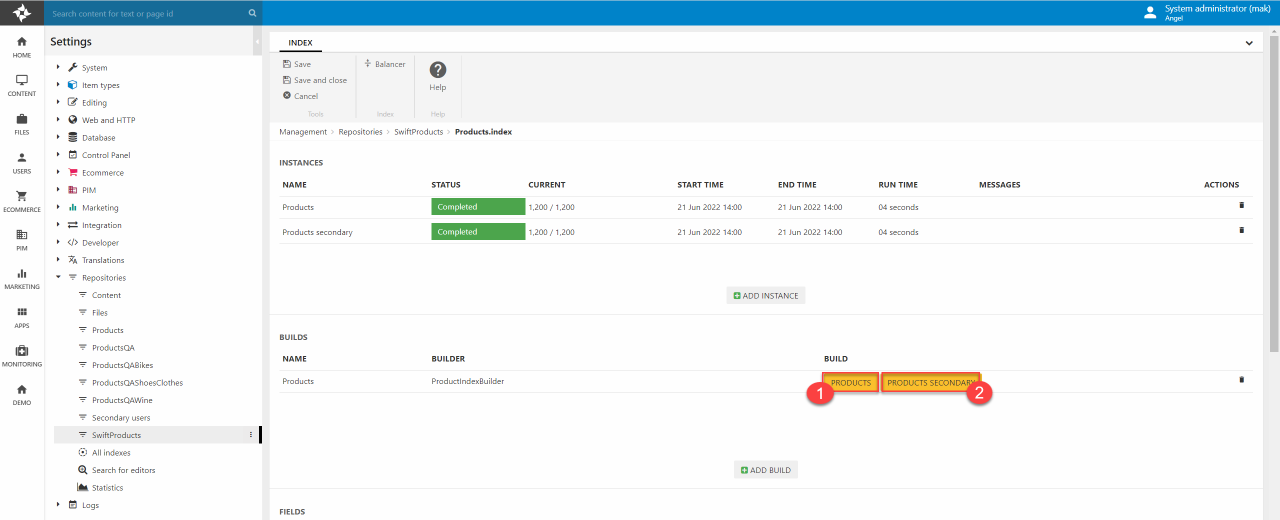
Build index on Target solution
To build the indexes in the Target solution:
- Go to Settings/Repositories/SwiftProducts
- Click on the index called "Products"
- In the Builds section (Figure 8.1) build the "Products"(1)
- Then build "Products Secondary"(2)
Deploy Database Schema for eComProducts and eComGroups
To Deploy Database Schema for eComProducts:
- Go to Settings/Developer/Deployment/Deploy/Swift for Target/eCommerce
- In the Swift for Target > eCommerce section check "EcomProducts_Schema"
- Click on "Compare Selected" to make sure the settings are correct
- When it has been confirmed that everything looks right, check "Select All"
- Then click "Transfer Selected"
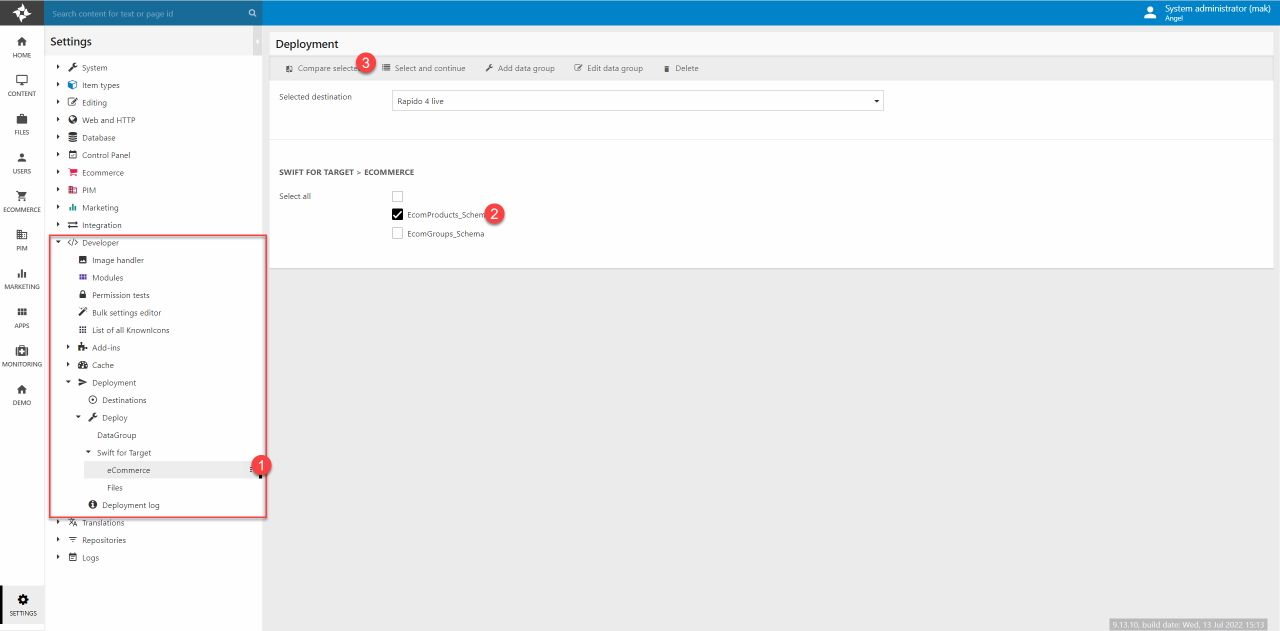
To Deploy Database Schema for eComGroups:
- Go to Settings/Developer/Deployment/Deploy/Swift for Target/eCommerce
- Go back to "DataGroup" and check "EcomGroups_Schema"
- Click on "Compare Selected" to make sure the settings are correct
- When it has been confirmed that everything looks right check "Select all" and click "Transfer Selected"

Deploy Content
To Deploy Content:
- Go to Settings/Developer/Deployment/Deploy/Swift for Target/Files
- In the Swift for Target > Files check "Content"
- Click "Compare Selected" to make sure the settings are correct
- When you have confirmed that everything looks right check "Select All"
- Click "Transfer Selected"

Target solution setup in Website settings for Header/Footer and Themes/Branding
On the Target solution: Set up templates in the Website settings (Figure 12.1).
- In Content, click on the three vertical dots next to the Website name at the top
- In the dropdown menu, click on "Websites"
- Right click your website and click "Edit"
- Scroll to the Master Layout section. Here you should link up the fields as shown on Figure 12.1

- Scroll to the Design section
- Here you should link up the fields as shown on Figure 12.2

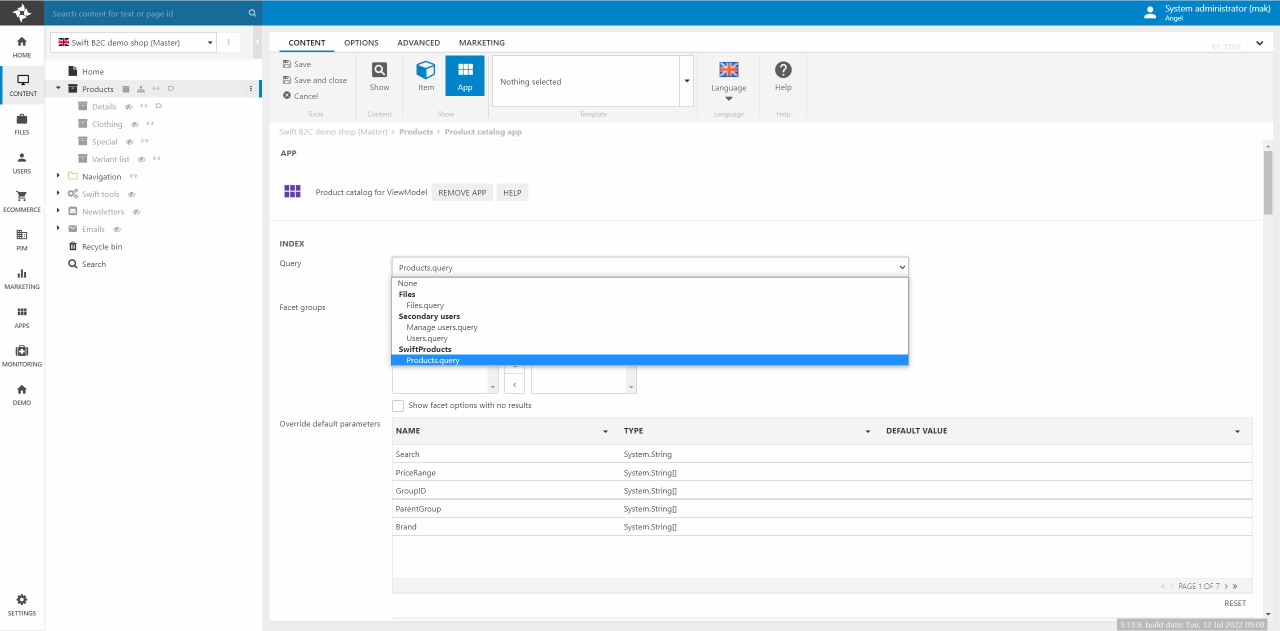
Product catalog is not showing any products
If your product catalog is not showing any products ensure it is pointing on the right repository and you have build the index.
On the Target solution: Ensure the query in the app of the product-page on the new website is pointing correctly to SwiftProdct/Product.query
- In Content, click on your product page in the content tree
- On the product page, click on the product catalog app and go to the app part of the settings
- In the Index section locate the Query field. Select the query on the products (Figure 13.1)
- Hit Save and close
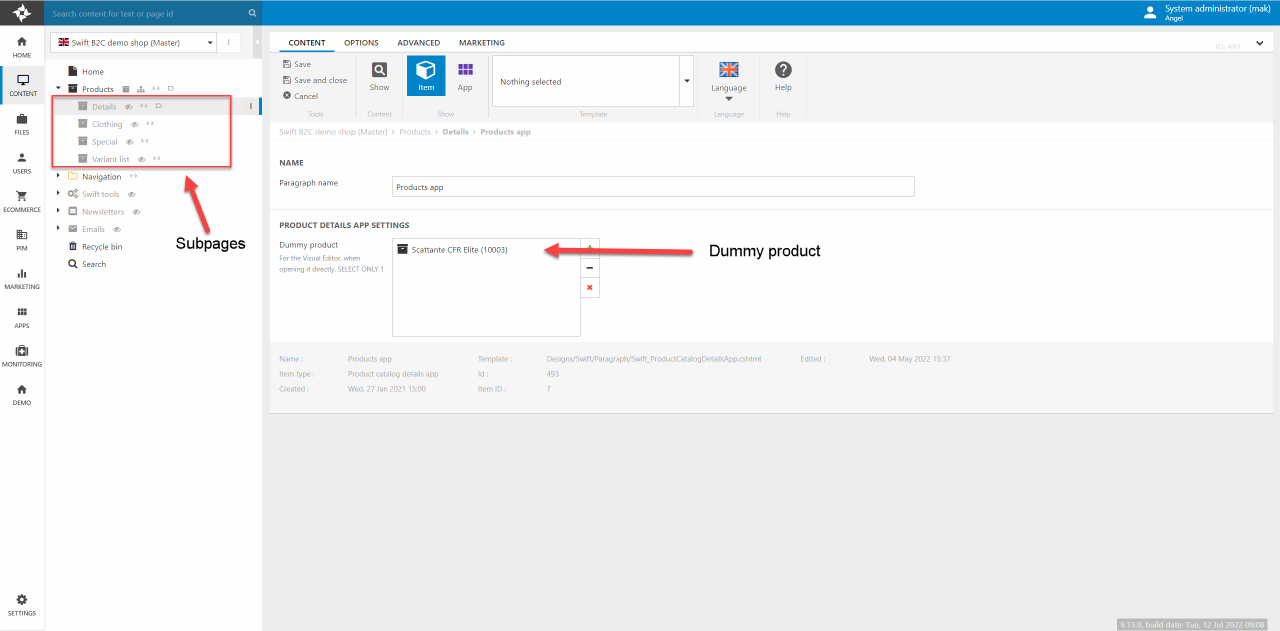
- Do the same for all the product-subpages. On the Swift demo site there are four subpages
- Remember to save your changes
You will also need to set dummy products for the product detail pages (Figure 13.2).
- Click on a product-subpage (Product details page) in the content tree
- Click on the Product catalog app
- In the Item settings of the app, select a dummy product
- Hit Save and close
- Do the same for the other product-subpages
Check Empty field in product.query
On the Target solution: check if any expressions in SwiftProduct products.query are empty. Delete those expressions that are empty.
- Go to Settings/Repositories/SwiftProducts
- In the Query called "Products" locate the Expressions section
- Check if any expressions are empty and delete those that are empty
- If you have made any changes remember to Save
Missing Page titles
On the Swift site on the Target solution you should check if the page names are correct. Otherwise you could have titles as seen on Figure 15.1:
If you see any pages with titles like the ones shown on the example above, you might want to correct them. This is done in the page settings of the page.
- In the content tree, click on the page that needs a new title
- Go to the page settings of the page
- Write a proper title and hit Save and close
Do you see a 404 error on Target solution?
On the Target solution, if you see a 404-error after navigating to the site:
- Click on the three vertical dots next to the website name in the content tree
- Click on "Websites"
- Right click on your website and click "Edit"
- In the Details section, set a Primary domain and check the box "The selected domains can only reach this website"
- Hit Save and close