Extending the Dynamics 365 Business Central plugin-unit

The Dynamicweb D365 Business Central Plugin-Unit is a component in an integration between a Dynamicweb solution and a Dynamics 365 Business Central installation.

In this article you will learn how to extend this plugin - which is, in fact, an extension app in itself - using the AL programming language. 

Extending the plugin-unit in this manner empowers ERP partners to create customer and project-specific code, whilst ensuring that you can always run the latest version of Dynamicweb Plug-In Unit on the latest version of Dynamics 365 Business Central.

This video guide covers the basics of extension development for Microsoft Dynamics 365 Business Central - it shows you:

  • How to use Docker and NavContainerHelper to setup a dev-sandbox
  • How to create a simple Hello World app
  • How you can create an app that extends Dynamicweb Plug-In Unit (which is itself an extension app)

The example in the video is a simple Ping request which can send Pong responses.

Of course, your needs are likely to be more advanced. The rest of this article contains examples of common tasks such as adding fields to a contact or overriding user groups.

There are 70+ events available in the standars plug-in unit to subscribe to - all placed into appropriate codeunits that have a prefix of Dynamicweb and a suffix of Publisher:

  1. DynamicwebPublisher contains global events such as:
    • OnBeforeExecuteRequest: Occurs before any request is processed
    • OnAfterExecuteXmlRequest: Occurs after request that returns xml is processed
    • OnAfterExecutePdfRequest: Occurs after request that returns pdf is processed
    • OnBeforeSendXmlResponse: Occurs before sending response content
  2. DynamicwebUsersPublisher contains events for handling customers, contacts, sales persons, their addresses, impersonations, user groups, exporting users
  3. DynamicwebOrdersPublisher contains events for handling exporting orders, writing order notes, Live integration calculate order and create order requests, sales header and sales line objects extensibility, discounts, shipping fees, etc.
  4. DynamicwebEcomDataPublisher contains events related to countries, currencies, manufacturers, languages, and units
  5. DynamicwebProductsPublisher contains events for handling products, product groups, stock, Live integration product info request, etc.
  6. DynamicwebCustomerCenPublisher contains Customer Center related events for creating PDF-generation, orders lists, and order details

To subscribe to these events choose the appropriate publisher and the events from it. 

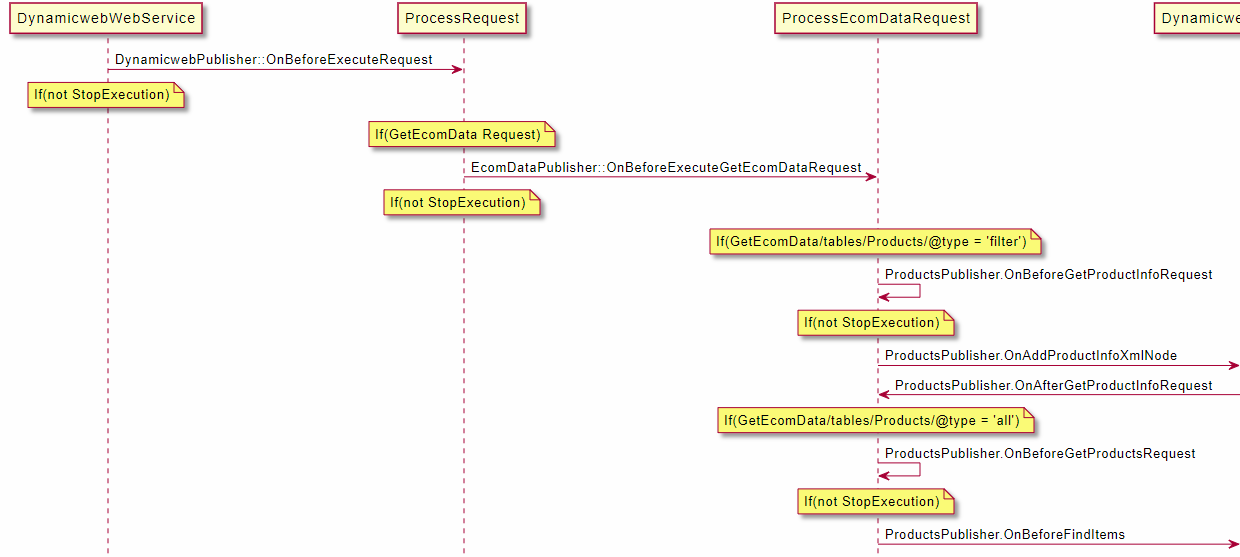
For a quick overview of the many extensibility events, check the UML diagram appendix at the bottom of the page.

The example project contains the example code for a wide range of notifications. In fact, our ambition is to always subscribe to all available notifications in the example project. That way the example project is a complete demonstration of any extensibility point in the Dynamicweb Plug-In Unit. The example project ultimately serves as our documentation of what is possible to extend.

The project tree looks like Figure 4.1.

Figure 4.1 The example project project tree

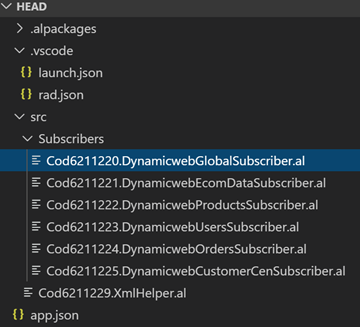
You can use the example project as an inspiration and create a new app and use only the notifications subscribers that you need - or you can comment out/delete the examples subscribers from this project and use it.

For more information about Events and extending Microsoft Dynamics 365 Business Central apps you can read this: https://docs.microsoft.com/en-us/dynamics365/business-central/dev-itpro/developer/devenv-subscribing-to-events

To subscribe to an event you need to use AL syntax like this to create a codeunit with a property EventSubscriberInstance = StaticAutomatic:

codeunit 50100 DynamicwebGlobalSubscriber { EventSubscriberInstance = StaticAutomatic; [EventSubscriber(ObjectType::Codeunit, Codeunit::DynamicwebPublisher, 'OnBeforeExecuteRequest', '', true, true)] procedure OnBeforeExecuteRequest(var requestDoc: XmlDocument; var stopExecution: Boolean; var responseDoc: XmlDocument) }

To subscribe to the event you need to type [EventSubscriber(ObjectType::Codeunit, Codeunit:: and then choose the needed code unit - the subscriber method could look like this:

[EventSubscriber(ObjectType::Codeunit, Codeunit::DynamicwebPublisher, 'OnBeforeExecuteRequest', '', true, true)] procedure MyOnBeforeExecuteRequest(var requestDoc: XmlDocument; var stopExecution: Boolean; var responseDoc: XmlDocument) Begin //todo End;

You can now add your code inside this method. Note that the parameters event, parameters types, and their order cannot be changed as it will give a compile error.

Much of this section is covered in the Video Guide linked above but for the sake of completeness, you also get a text description of what to setup in Visual Studio Code.

If you are new to VS Code and AL please read this: https://docs.microsoft.com/en-us/dynamics365/business-central/dev-itpro/developer/devenv-extension-example

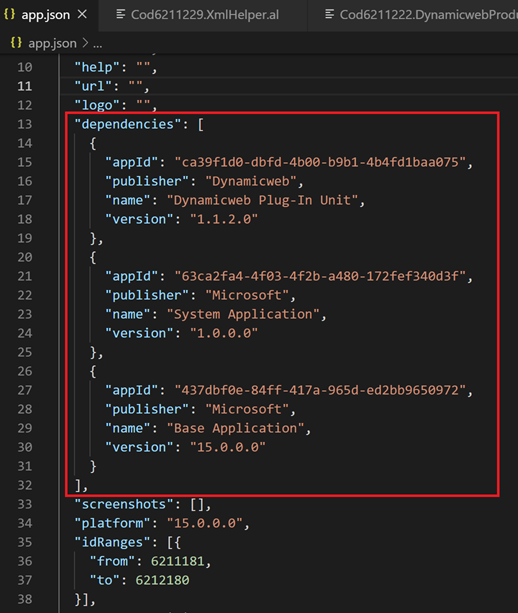
If you want to create an app which extends Dynamicweb Plug-In Unit then you need to add a reference to the Dynamicweb base app in the app.config file and also references to MS base apps:

Figure 6.1 app.config references

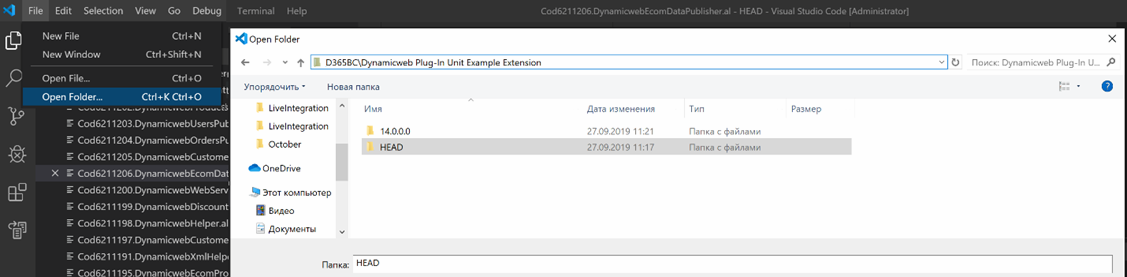
For editing/opening the source code of the example app start Visual Studio Code and choose Open Folder and then select the folder with a sources like this:

Figure 6.2 Open source

After that you need to edit the file .vscode\launch.json - In the “configurations” section add your Business Central server connection info. If you are using MS docker image with Sandbox environment your configuration section may look like this:

{ "type": "al", "request": "launch", "name": "d365bcSandbox", "server": "http://d365bcSandbox", "serverInstance": "NAV", "authentication": "UserPassword", "breakOnError": true, "schemaUpdateMode": "Recreate" }

Where “Server” is a url to your Business Central server and instance is your server instance name. 

This information is shown in the powershell script once you have installed MS docker image

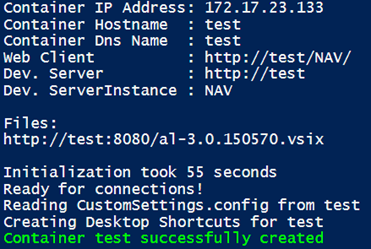
So from this image my config sever name is http://test and the instance name is NAV. If you have an on-premise server setup your config section will be the same except your server name and instance.

You can read more about JSON config file here and about docker containers and AL development on this blog.

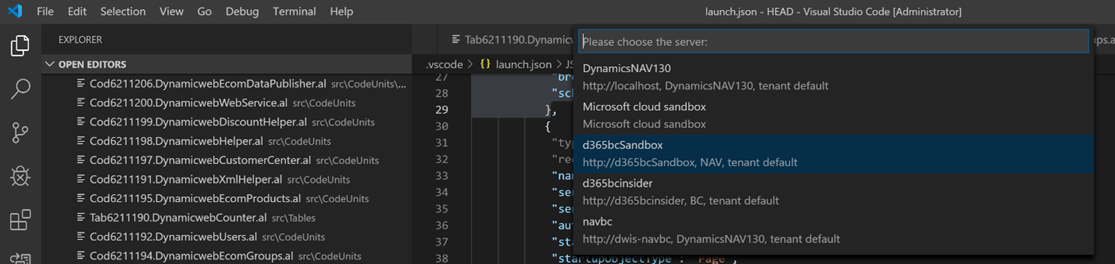
After you have completed the configuration section you can try to connect your app with the Business Central server from VS code by calling Ctrl + Shift + P and choose command AL:Download Symbols and select your configuration server from the drop-down:

Once symbols are downloaded click F5 to compile your app. If the compilation is OK your app will be published in the selected server and you will be redirected to the opened Business Central website in your browser.

You can now use the Dynamicweb Test tool to connect to the Business Central server and run sample requests and check responses.

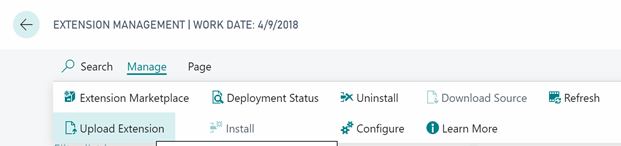
To publish the app just compile the project from VS code and once it is compiled under your D365BC server it will be published there automatically. If you cannot use the VS code you can use powershell and commands that are described here. If you already have the compiled app and want to publish it on the Cloud server you can use the standard functionality from “Extensions” page and choose “Upload extension” (Figure 8.1).

Then select your app and click Deploy:

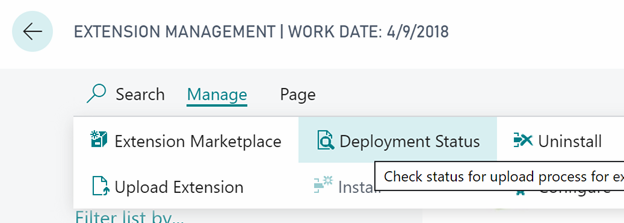
After that track your deployment status in the Extensions -> Manage -> Deployment status:

Subscribe to the OnAddContactXmlNode event:

[EventSubscriber(ObjectType::Codeunit, Codeunit::DynamicwebUsersPublisher, 'OnAddContactXmlNode', '', true, true)] procedure OnAddContactXmlNode(var contactNode: XmlNode; contact: Record Contact; contactCustomer: Record Customer); var XmlHelper: Codeunit XmlHelper; begin //Add custom field XmlHelper.AddField(contactNode, 'AccessUserEmail2', contact."E-Mail 2"); end;

The code above will add the xml like this with contact Email2 value for each contact:

XML
<column columnName="AccessUserEmail2"><![CDATA[email@gmail.com]]></column>

Subscribe to the OnAddAddressXmlNode event:

[EventSubscriber(ObjectType::Codeunit, Codeunit::DynamicwebUsersPublisher, 'OnAddAddressXmlNode', '', true, true)] procedure OnAddAddressXmlNode(var addressXmlNode: XmlNode; contact: Record Contact); var XmlHelper: Codeunit XmlHelper; begin //Add custom field XmlHelper.AddField(addressXmlNode, 'AccessUserAddress3', contact.Address + ' ' + contact."Address 2"); end;

The code above will add the xml like this for each contact address:

XML
<column columnName="AccessUserAddress3"><![CDATA[Parkvej 44 ]]></column>

Subscribe to the OnAddSalesPersonXmlNode event:

[EventSubscriber(ObjectType::Codeunit, Codeunit::DynamicwebUsersPublisher, 'OnAddSalesPersonXmlNode', '', true, true)] procedure OnAddSalesPersonXmlNode(var salesPersonXmlNode: XmlNode; salesPerson: Record "Salesperson/Purchaser"); var XmlHelper: Codeunit XmlHelper; begin //Add custom field XmlHelper.AddField(salesPersonXmlNode, 'AccessUserPhonePriv', 'PhoneFromAnotherSystem'); end;

The code above will add the xml like this to each sales person:

XML
<column columnName="AccessUserPhonePriv"><![CDATA[PhoneFromAnotherSystem]]></column>

Customers example:

Instead of creating one group 'Customers' and placing all users there, then create two groups 'Customers1' and 'Customers2'. Place users in these two groups with a function.

In our example this function just randomly assigns users to each of the two groups. In a real implementation you would add logic which segmented customers into different groups. It could be a grouping from external systems, but it could also be a segmentation based on a field/property of the users.

Sales example:

Instead of creating one group 'Sales' and placing all sales users there, then create two groups 'Senior Sales' and 'Junior Sales'. Place sales users in these two groups based on function.

Again, a real implementation would be more advanced. Either using a grouping from an external system or some kind of sorting/filtering function.

Subscribe to the OnAddGroupXmlNode event:

[EventSubscriber(ObjectType::Codeunit, Codeunit::DynamicwebUsersPublisher, 'OnAddGroupXmlNode', '', true, true)] procedure OnAddGroupXmlNode(var groupNode: XmlNode; groupName: Text); var tableXmlElement: XmlElement; begin //Instead of creating one group 'Customers' //create two groups 'Customers1' and 'Customers2'. if groupName = 'Customers' then begin groupNode.GetParent(tableXmlElement);//get <table> element groupNode.Remove(); //Remove 'Customers' <item table="AccessUserGroup"> node //Add Customers1 AddGroupXmlNode(tableXmlElement, 'Customers1'); //Add Customers2 AddGroupXmlNode(tableXmlElement, 'Customers2'); end; //Instead of creating one group 'Sales' create two groups 'Senior Sales' and 'Junior Sales' if groupName = 'Sales' then begin groupNode.GetParent(tableXmlElement);//get <table> element groupNode.Remove(); //Remove 'Sales' <item table="AccessUserGroup"> node AddGroupXmlNode(tableXmlElement, 'Senior Sales'); AddGroupXmlNode(tableXmlElement, 'Junior Sales'); end; end;

Here is the code for AddGroupXmlNode method:

/// <summary> /// Creates and adds AccessUserGroup <item> to the <table tableName="AccessUserGroup"> xml /// </summary> /// <param name="tableXmlElement">table xml element</param> /// <param name="groupName">group name</param> local procedure AddGroupXmlNode(var tableXmlElement: XmlElement; groupName: Text) var item: XmlElement; node: XmlNode; XmlHelper: Codeunit DynamicwebXmlHelper; begin //add <item> to the <table> xml structure that looks like that: // <table tableName="AccessUserGroup"> // <item table="AccessUserGroup"> // <column columnName="AccessGroupName"><![CDATA[groupName]]></column> // <column columnName="AccessGroupGroupName"><![CDATA[groupName]]></column> // </item> // </table> //<item> item := Xmlelement.Create('item'); //<item table="AccessUserGroup"> item.Attributes().Set('table', 'AccessUserGroup'); node := item.AsXmlNode(); //Add <column columnName="AccessGroupName"><![CDATA[groupName]]></column> XmlHelper.AddField(node, 'AccessGroupName', groupName); //Add <column columnName="AccessGroupGroupName"><![CDATA[groupName]]></column> XmlHelper.AddField(node, 'AccessGroupGroupName', groupName); //Add <item> to parent the <table> xml tableXmlElement.Add(item); end;

Then you need to change the contact and sales persons user groups association logic like this:

//Contacts [EventSubscriber(ObjectType::Codeunit, Codeunit::DynamicwebUsersPublisher, 'OnAddContactXmlNode', '', true, true)] procedure OnAddContactXmlNode(var contactNode: XmlNode; contact: Record Contact; contactCustomer: Record Customer); var node: XmlNode; element: XmlElement; begin //Update user groups field with custom group name //Instead of placing user to 'Customers' group put it to 'Customers1' or 'Customers2' if contactNode.SelectSingleNode('column[@columnName=''AccessUserGroups'']', node) then begin element := node.AsXmlElement(); if (element.InnerText = 'Customers') then begin element.RemoveNodes(); element.Add(XmlCData.Create(GetContactGroup(contact))); end; end; end; //Get group name based on if contact name contains 'a' letter local procedure GetContactGroup(contact: Record Contact): Text begin if contact.Name.Contains('a') then exit('Customers1') else exit('Customers2'); end; //Sales People [EventSubscriber(ObjectType::Codeunit, Codeunit::DynamicwebUsersPublisher, 'OnAddSalesPersonXmlNode', '', true, true)] procedure OnAddSalesPersonXmlNode(var salesPersonXmlNode: XmlNode; salesPerson: Record "Salesperson/Purchaser"); var node: XmlNode; element: XmlElement; begin //Update user groups field with custom group name //Instead of placing user to 'Sales' group put it to 'Senior Sales' or 'Junior Sales' if salesPersonXmlNode.SelectSingleNode('column[@columnName=''AccessUserGroups'']', node) then begin element := node.AsXmlElement(); if (element.InnerText = 'Sales') then begin element.RemoveNodes(); element.Add(XmlCData.Create(GetSalespersonGroup(salesPerson))); end; end; end; //Get group name based on "Commission %" local procedure GetSalespersonGroup(salesPerson: Record "Salesperson/Purchaser"): Text begin if salesPerson."Commission %" >= 5 then exit('Senior Sales') else exit('Junior Sales'); end;

In this example you want the relation between sales users and their customers/contacts to come from an external system. Subscribe to the OnAddImpersonationXmlNode:

[EventSubscriber(ObjectType::Codeunit, Codeunit::DynamicwebUsersPublisher, 'OnAddImpersonationXmlNode', '', true, true)] procedure OnAddImpersonationXmlNode(var impersonationXmlNode: XmlNode; contact: Record Contact; salesPerson: Record "Salesperson/Purchaser"); var XmlHelper: Codeunit XmlHelper; tableXmlElement: XmlElement; item: XmlElement; node: XmlNode; externalImpersonatorId: Text; begin //Override impersonations: salesPerson - customer contact relation comes from another system externalImpersonatorId := GetExternalContactImpersonator(contact); //if external Impersonator Id is found override salesPerson - customer contact relation if externalImpersonatorId <> '' then begin impersonationXmlNode.GetParent(tableXmlElement);//get <table> element impersonationXmlNode.Remove(); //Remove <item table="AccessUserSecondaryRelation"> node //<item> item := Xmlelement.Create('item'); //<item table="AccessUserSecondaryRelation"> item.Attributes().Set('table', 'AccessUserSecondaryRelation'); node := item.AsXmlNode(); //Add <column columnName="AccessUserSecondaryRelationUserId"><![CDATA[]]></column> XmlHelper.AddField(node, 'AccessUserSecondaryRelationUserId', externalImpersonatorId); //Add <column columnName="AccessUserSecondaryRelationSecondaryUserId"><![CDATA[]]></column> XmlHelper.AddField(node, 'AccessUserSecondaryRelationSecondaryUserId', Contact."No."); //Add <item> to parent the <table> xml tableXmlElement.Add(item); end; end; /// <summary> /// This function will return contact impersonator id from external system /// </summary> /// <param name="contact">contact</param> /// <returns>contact impersonator id if found, otherwise empty string</returns> local procedure GetExternalContactImpersonator(contact: Record Contact): Text begin if contact.Name.Contains('a') then exit('ExternalImpersonatorId') else exit(''); end;

The code above will override the impersonations behavior: if contact name contains a letter ‘a’ in its name the impersonating user id will be set to ExternalImpersonatorId and the xml will look like this:

XML
<item table="AccessUserSecondaryRelation"> <column columnName="AccessUserSecondaryRelationUserId"><![CDATA[ExternalImpersonatorId]]></column> <column columnName="AccessUserSecondaryRelationSecondaryUserId"><![CDATA[E000004]]></column> </item>

Adding custom fields is the norm in any integration project, so it needs to be simple. Subscribe to the OnAddProductXmlNode event:

/// Add custom field to the products xml /// </summary> [EventSubscriber(ObjectType::Codeunit, Codeunit::DynamicwebProductsPublisher, 'OnAddProductXmlNode', '', true, true)] procedure OnAddProductXmlNode(var productNode: XmlNode; item: Record Item); begin //Adds custom field ProductProfitPercent to the product xml node: //<column columnName="ProductProfitPercent"><![CDATA[99]]></column> XmlHelper.AddField(productNode, 'ProductProfitPercent', Format(item."Profit %")); end;

The code above will add the xml like this for each product:

XML
<column columnName="ProductProfitPercent"><![CDATA[22.06439]]></column>

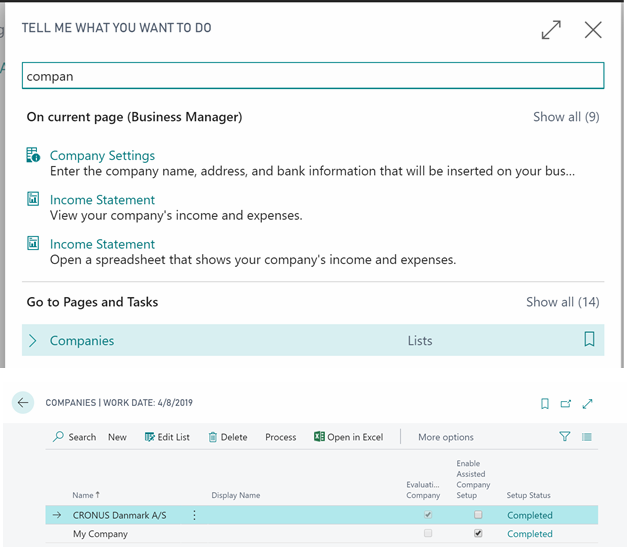
The Video Guide covers the creation of a Ping-request and a Ping-response. For this example let’s assume you want to implement a new Get method to get the Company from the D365BC Company list that shows all companies (Figure 15.1).

Lets define the new Dynamicweb request as <GetCompanies></GetCompanies>.

Next we need to add logic in the subscriber to handle that new request and fill the response xml with our Companies xml:

codeunit 6211220 DynamicwebGlobalSubscriber { EventSubscriberInstance = StaticAutomatic; [EventSubscriber(ObjectType::Codeunit, Codeunit::DynamicwebPublisher, 'OnBeforeExecuteRequest', '', true, true)] procedure OnBeforeExecuteRequest(var requestDoc: XmlDocument; var stopExecution: Boolean; var responseDoc: XmlDocument) var XmlHelper: Codeunit DynamicwebXmlHelper; xmlRoot: XmlElement; xmlRootNode: XmlNode; begin //Example: Adding a new entity with new fields //Returning Companies on GetCompanies request //If request has the xml format of <GetCompanies> then process Companies XmlHelper.GetRootNode(requestDoc, xmlRootNode); if xmlrootnode.AsXmlElement().LocalName = 'GetCompanies' then begin // Set stopExecution to cancel base application processing the request // We will handle it by custom code stopExecution := true; ProcessCompaniesRequest(responseDoc); end; end;

And then add our xml to the response using private procedure like this:

local procedure ProcessCompaniesRequest(var responseDoc: XmlDocument) var company: Record Company; XmlHelper: Codeunit DynamicwebXmlHelper; pXmlElement: XmlElement; xmlRootNode: XmlNode; companyTableXmlNode: XmlNode; companyNode: XmlNode; begin //Create xml with root <tables> element XmlDocument.ReadFrom('<?xml version="1.0" encoding="utf-8" ?><tables/>', responseDoc); if (company.FINDSET(false, false)) then begin responseDoc.GetRoot(pXmlElement); //get root node xmlRootNode := pXmlElement.AsXmlNode(); //add <table tableName='Company'> xml node XmlHelper.AddElement(xmlRootNode, 'table', '', '', companyTableXmlNode); XmlHelper.AddAttribute(companyTableXmlNode, 'tableName', 'Company'); repeat //add company fields to xml XmlHelper.AddElement(companyTableXmlNode, 'item', '', '', companyNode); XmlHelper.AddAttribute(companyNode, 'table', 'Company'); XmlHelper.AddField(companyNode, 'CompanyId', company.Id); XmlHelper.AddField(companyNode, 'CompanyName', company.Name); XmlHelper.AddField(companyNode, 'CompanyDisplayName', company."Display Name"); if company."Evaluation Company" then XmlHelper.AddField(companyNode, 'CompanyEvaluation', 'true') else XmlHelper.AddField(companyNode, 'CompanyEvaluation', 'false'); until company.NEXT = 0; end; end;

After publishing this code and requesting the data with <GetCompanies></GetCompanies> the response will look like this:

XML
<?xml version="1.0" encoding="utf-16"?> <tables version="1.2.0.0_NAV15.0.36510.0"> <table tableName="Company"> <item table="Company"> <column columnName="CompanyId"><![CDATA[{B41F599A-0EEA-454F-907E-BF48B7C480E0}]]></column> <column columnName="CompanyName"><![CDATA[CRONUS Danmark A/S]]></column> <column columnName="CompanyDisplayName"><![CDATA[]]></column> <column columnName="CompanyEvaluation"><![CDATA[true]]></column> </item> <item table="Company"> <column columnName="CompanyId"><![CDATA[{2C45C5E0-EC00-4F45-83F2-16FF7D19CA09}]]></column> <column columnName="CompanyName"><![CDATA[My Company]]></column> <column columnName="CompanyDisplayName"><![CDATA[]]></column> <column columnName="CompanyEvaluation"><![CDATA[false]]></column> </item> </table> </tables>

You can acces diagrams of all extensibility events through the links below.

The diagrams provide a searchable overview of all the possible extensibility events. 

Figure 17.1 Sample screenshot of the UML diagrams.