
AX2012R3 plugin installation and configuration
This article explains the process of deploying and configuring the AX2012 R3 plugin (code unit), which is a component in an integration between Ax2012R3 and a Dynamicweb solution.
This plugin is a piece of standard software which reacts to XML requests by:
- Extracting data from AX
- Wrapping the data in an XML format understood by the Dynamicweb solution
- Returning it to the Dynamicweb solution via an encrypted connection
Download the Integration v2 AX2012 plugin from the downloads area.
This guide covers the following
- Importing and compiling the plugin in AX
- Creating a user authorized to work with the integration web service exposed by the plugin
- Activating the integration web service
- Use the Dynamicweb parameters to configure the integration
Prerequisites in AX2012
Please note that the Dynamicweb AX2012 R3 plugin will be configured as inbound HTTP port in Application Integration Framework (AIF) and thus requires the “Web services on IIS” component to be installed in the AX environment.
You can access a guide on setting up the Web services on IIS (AIF) component in an AX-solution here.
Import & compile the plugin
To import and compile the plugin (code unit):
- Run DAX, go to the development workspace
- Import the “DynamicwebIntegration_DAX2012.xpo” project file (Figure 3.1)
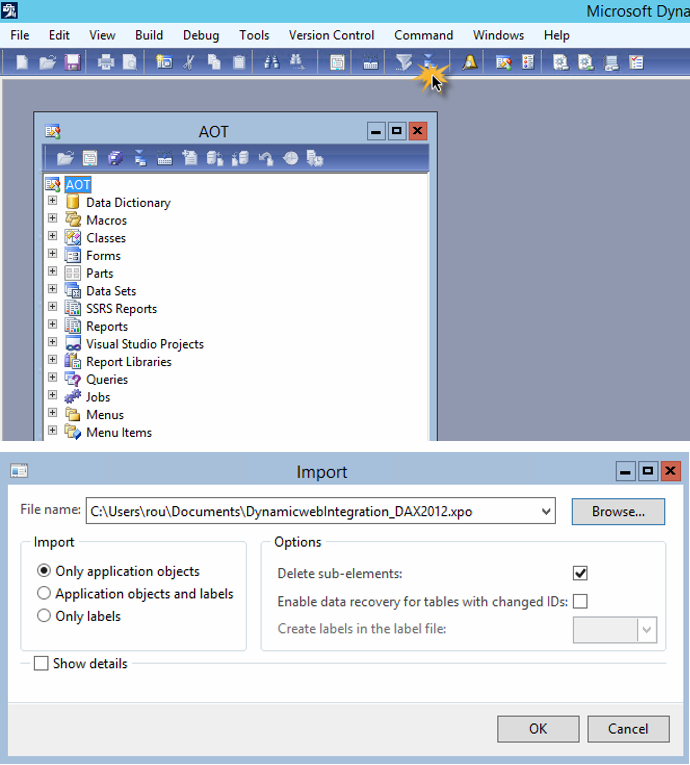
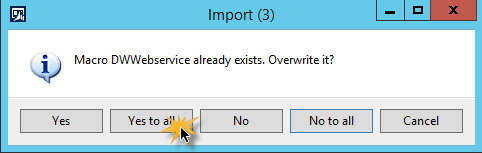
- Click “Yes to all” button in the overwriting existing objects request, it will replace all existing objects when importing (Figure 3.2)
- Compile the shared project DWProject
- Perform full CIL compilation (Figure 3.3)

- Launch SQL Server Management Studio and connect to the AX database
- Open AX_Stored_Procedures.sql and click Execute / F5
This will add the following stored procedures to the database:
- DWsp_CertifyBatch
- DWsp_GetChangedItems
- DWsp_SetTableForReimport
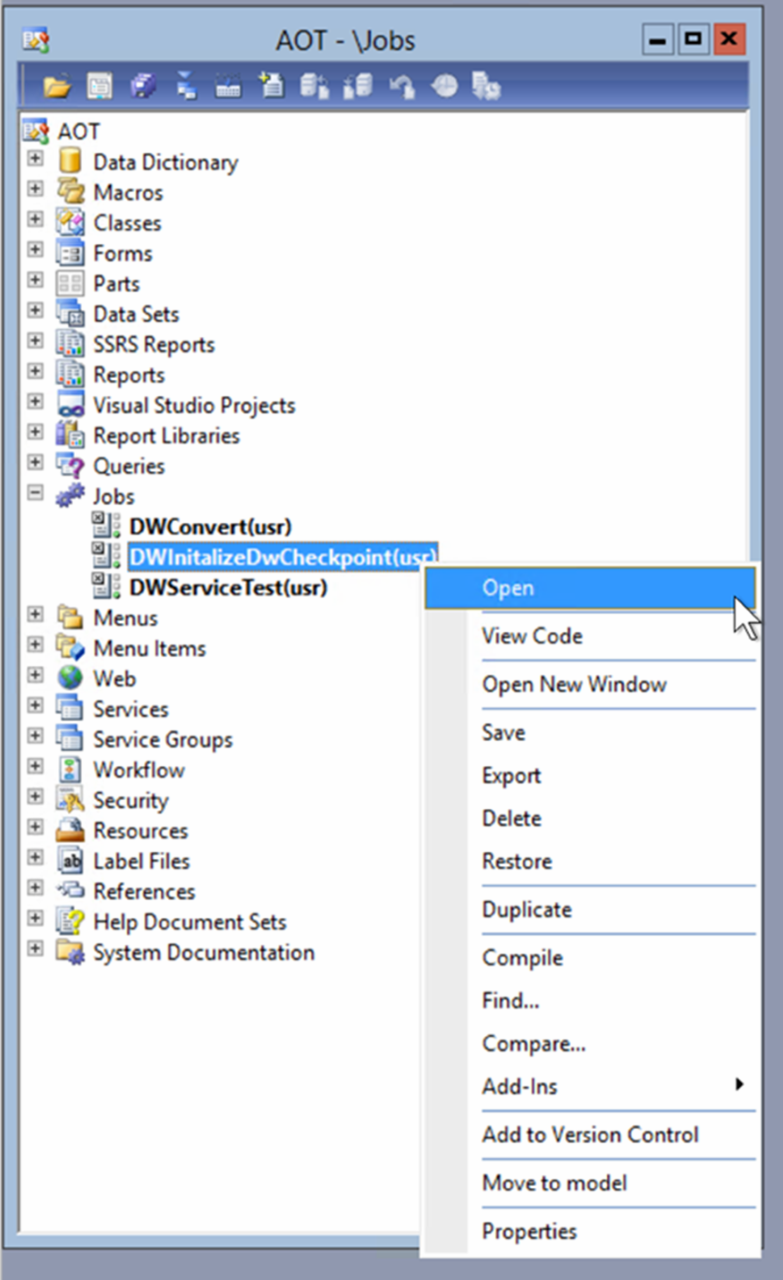
In the AOT, expand the Jobs node. Right click the DWInitializeDwCheckpoint and choose Open
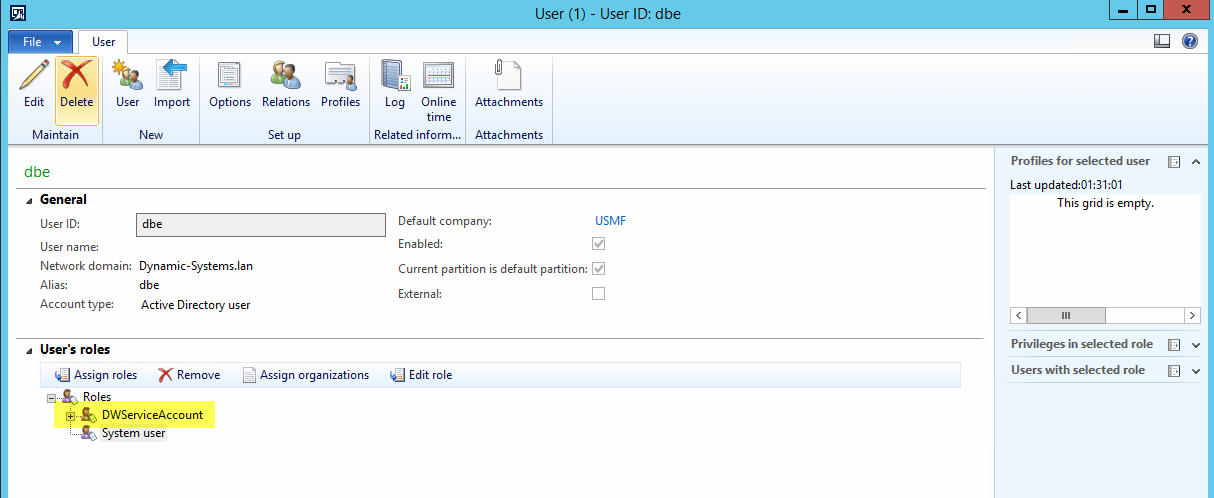
Creating an authorized user
Typically, you want to only provide select users with access to the Dynamicweb integration web service.
To create or select an authorized user:
- Navigate to System Administration – Common – Users
- Create a new user or select existing user who will be authorized to work with Dynamicweb integration web service
- Assign the DWServiceAccount role to the user (figureref})
Web service setup
Once the plugin has been installed, the web service must be registered in the AX server, and an inbound port must be created, configured and activated to expose the web service to external users and services - such the the DynamicwebConnector service.
Registering the web service on the AX server
To register the web service on the AX server:
- Open the AOT by pressing Ctrl-D or AOT button on toolbar (Figure 7.1)
- In the AOT go to Services > DWService.
- Right click on the selected service Add-Ins > Register service (Figure 7.2)
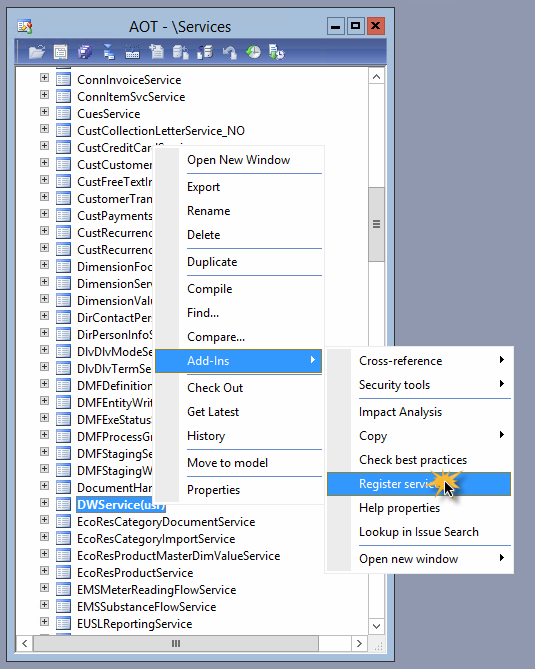
- Press the Refresh button on the top of the opened AIF services form.
The service is now registered. Close the AIF services form.
Creating an inbound port
An inbound port must be created to expose the web service to external users and services.
To create an inbound port:
- Click Area Page node: System administration -> Setup -> Services and Application Integration Framework -> Inbound ports (Figure 8.1)

- Click the New button (Figure 8.2)
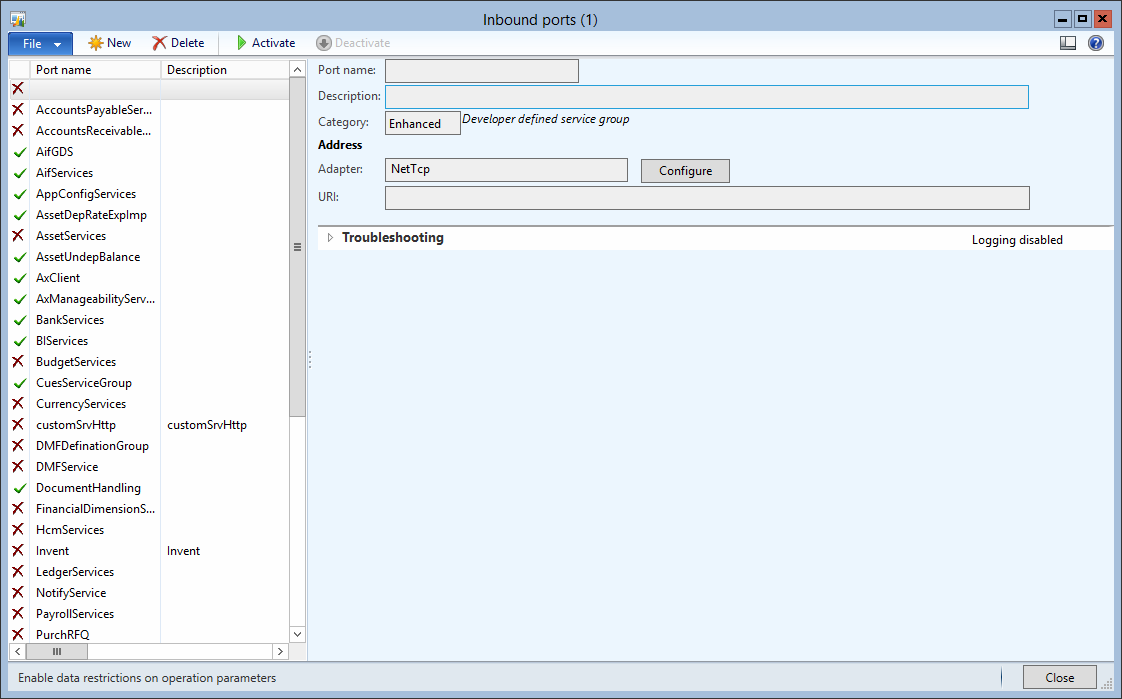
- Change Port name from '' to 'DWServicePort'.
- Change Description from '' to ' Dynamicweb service port'.
- Change Adapter from 'NetTcp' to 'HTTP'.
- Click the drop down in URI
- Expand the Web site, and choose the AIF webservice you want to deploy to
- Click the OK button.
The inbound port has now been created.
Service operations setup
After creating the inbound port, the service operation for the DWService must be added:
- Click the Service operations button
- Add DWService.Process to the list of selected service operations (Figure 9.1)
- Close select service operations form

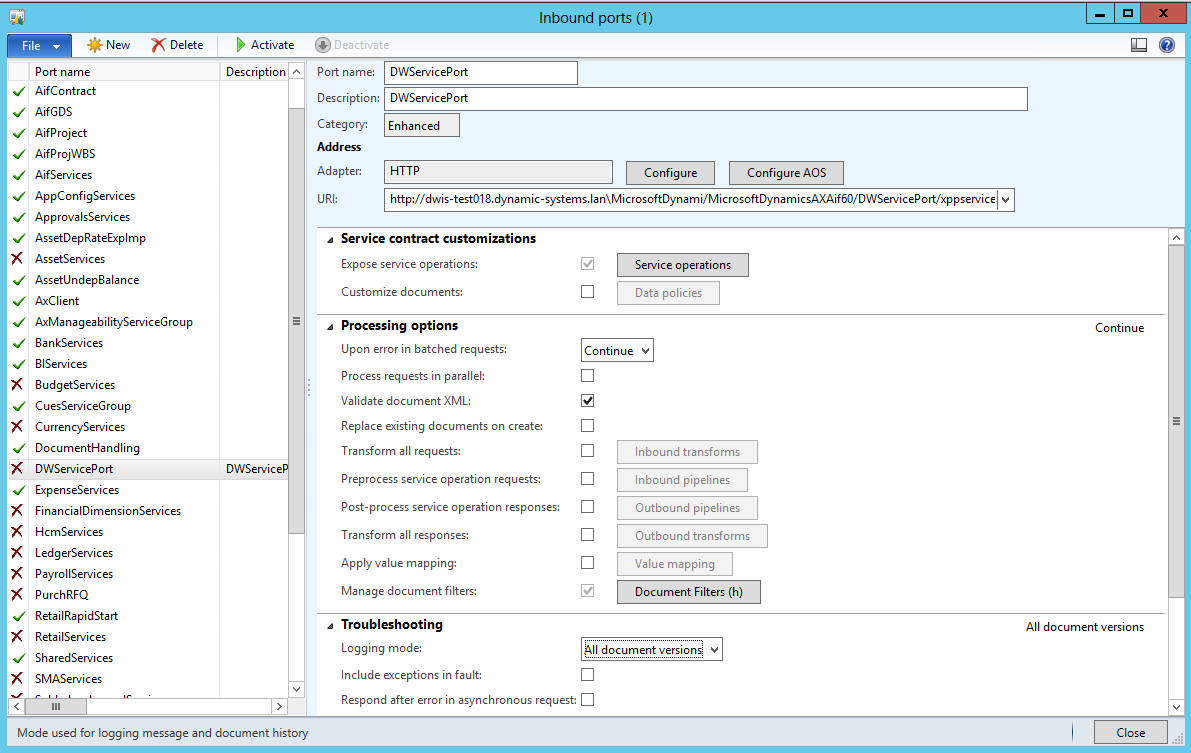
Processing options setup
Next, configure the processing options for the inbound form:
- Switch to the Processing options tab on the Inbound ports form
- Update parameters according to screenshot below (Figure 10.1)
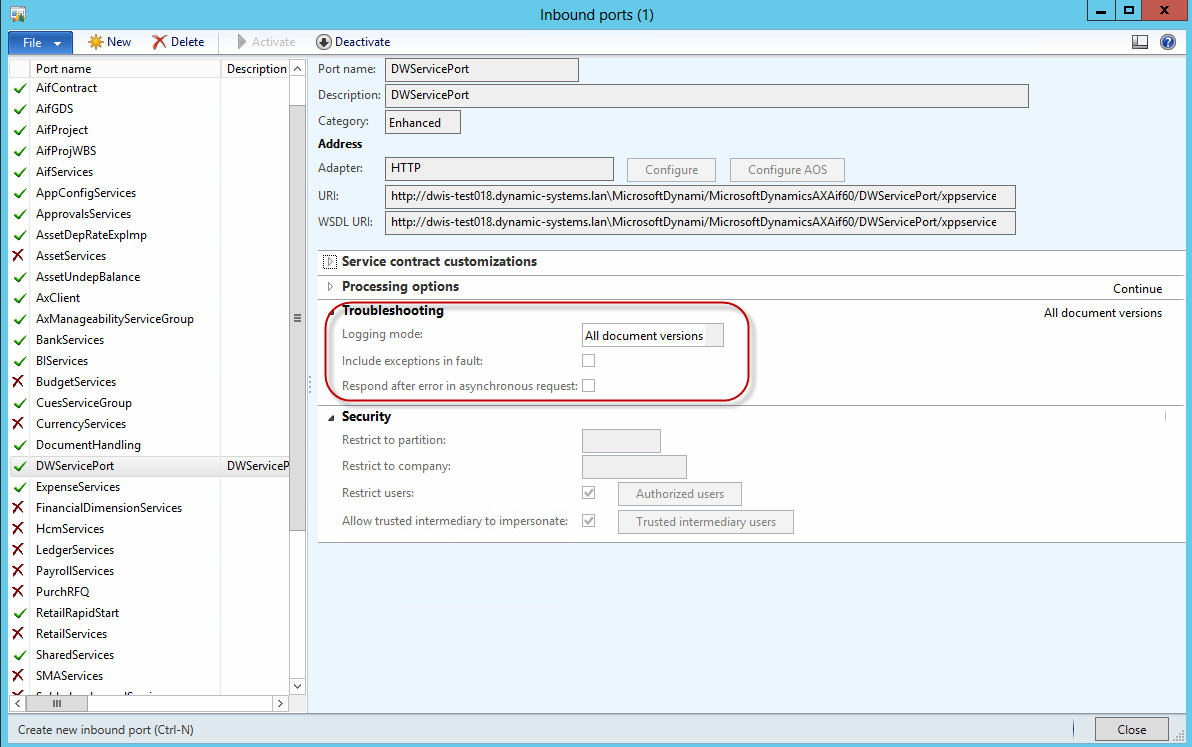
Troubleshooting setup
Then switch to the Troubleshooting tab (Figure 11.1) on the Inbound ports form and:
- Change Logging mode from 'Logging disabled' to 'All document versions'.
- Change Include exceptions in fault from 'false' to 'true'.
- Change Respond after error in asynchronous request from 'false' to 'true'.
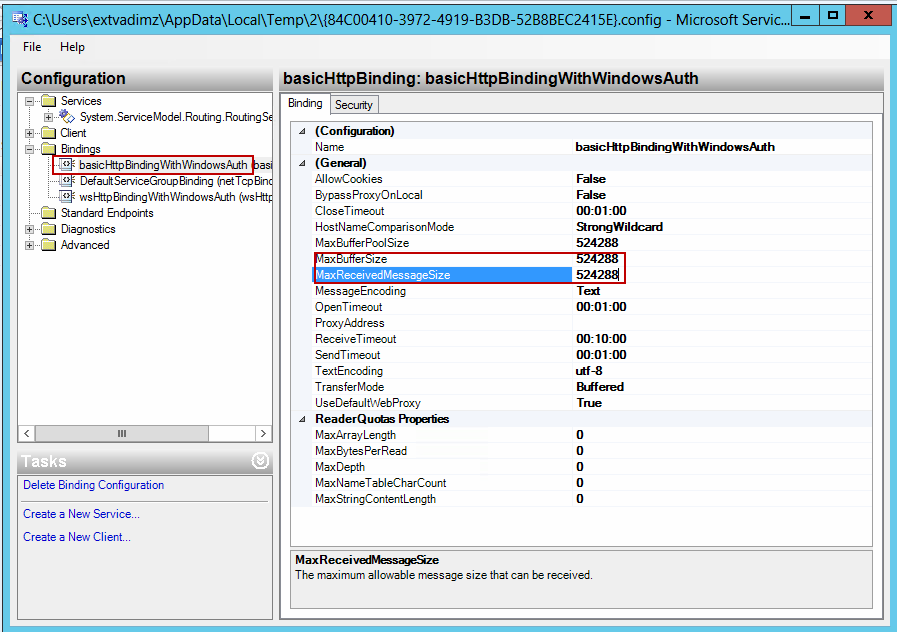
WCF Configuration
Next, open the WCF configuration form by clicking the Configure button on the general tab of Inbound ports form:
- Select Bindings node – basicHttpBindingWithWindowsAuth (Figure 12.1)
- Change the MaxBufferSize and MaxReceivedMessageSize from ‘65536’ to ‘524288’.
- Close WCF configuration form and save the changes.
Security Setup
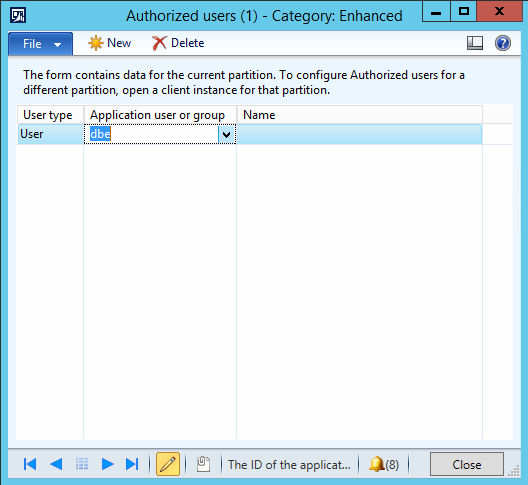
Setup Authorized users security, if needed:
- Check Restrict users flag and click Authorized users button to open Authorized users form (Figure 13.1). If authorized users aren’t set, any user with appropriate access will be able to work with Dynamicweb service.
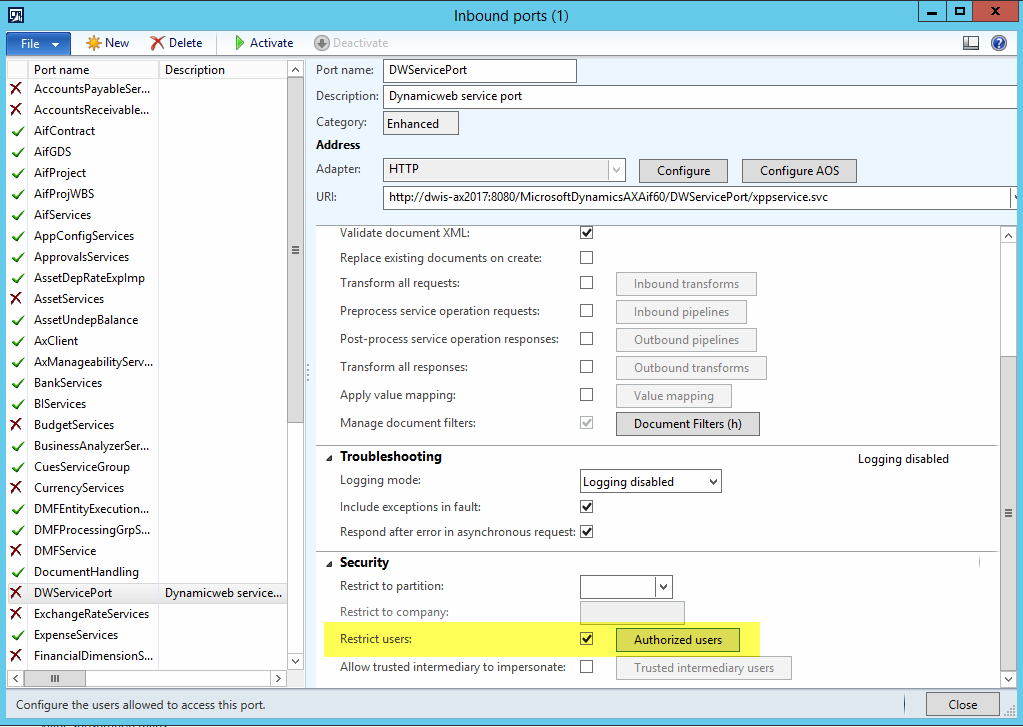
- Add users authorized to work with integration service to the list (Figure 13.2)
- Close the Authorized users form
Activate the inbound port
Finally, activate the inbound port:
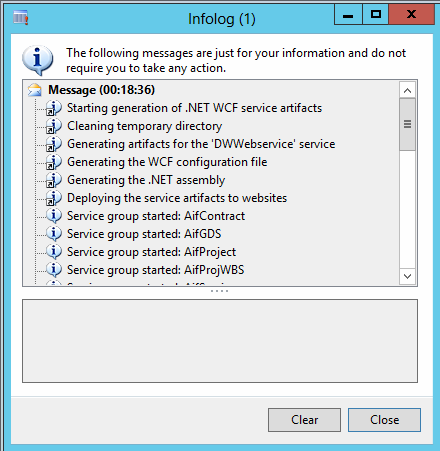
- Click the Activate button on the Inbound ports form (Figure 14.1)
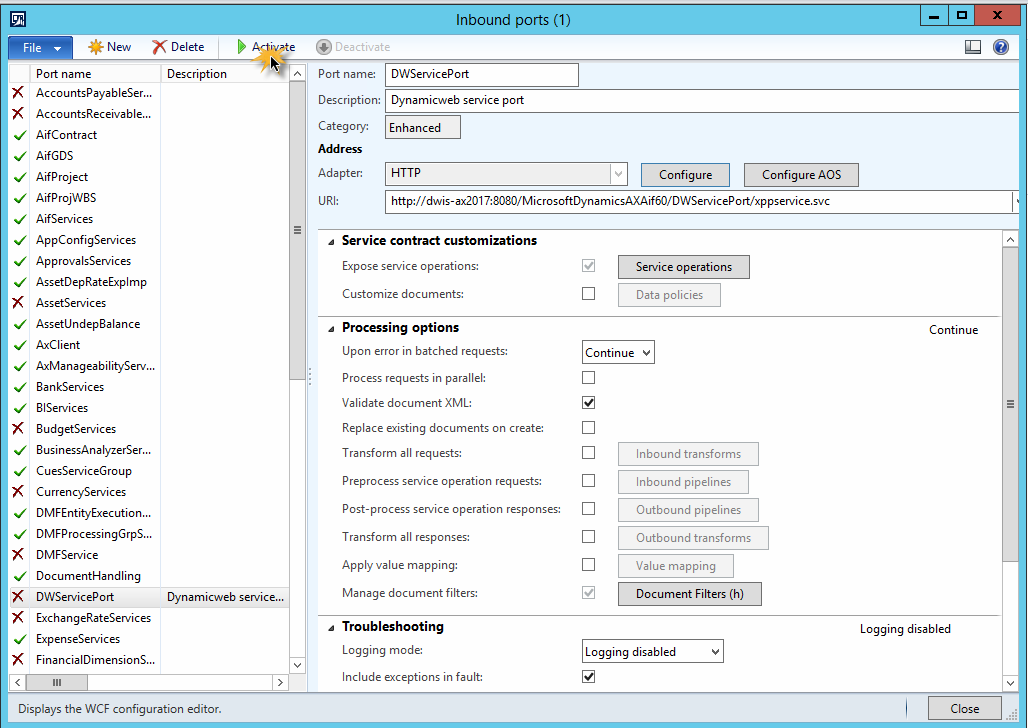
- Click the Close button on the Infolog form (Figure 14.2)
- Close the Inbound ports form.
The inbound port is now active, and the web service should be reachable by outside services with the right authorization.
Dynamicweb parameters
The plugin/code unit comes with a set of parameters, which are used to configure the behavior of the integration in general and for particular integration features like product sync, orders, customer sync, etc.
To set Dynamicweb parameter values:
- Go to Account receivable > Setup > Dynamicweb parameters
- Locate the relevant parameter and add/select a value
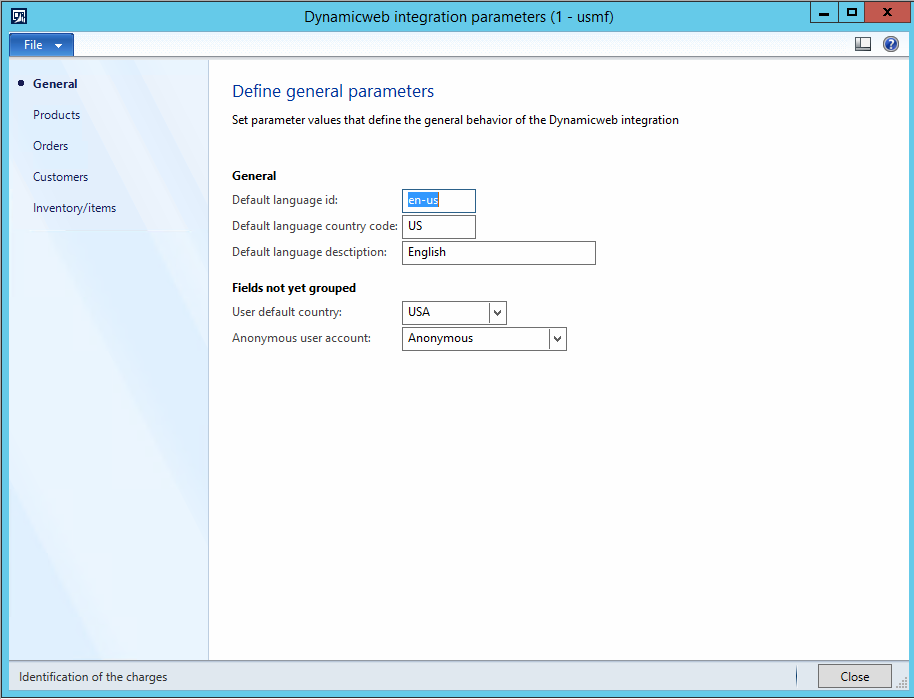
General parameters
The General parameters define the general behavior of the Dynamicweb integration. They can be accessed from the General tab of the Dynamicweb integration parameters form (Figure 16.1).
|
Parameter |
Use |
|
Default language id |
Sets the default language for multi-language data entities translation. Value must be a language code in AX format, e.g. en-us |
|
Default language country code |
Sets the country code for the default language defined in the default language id parameter. Used by the Languages export endpoint. |
|
Default language description |
Sets the description for the default language defined in the default language id parameter. Used by the Languages export endpoint. |
|
User default country |
Used by the Sales Orders import endpoint as the default country of a customer, if it isn’t specified. Select from a list of standard Ax countries. |
|
Anonymous user account |
Used by the Sales Orders import endpoint as the default customer, if a customer is not specified in the sales order request from Dynamicweb – e.g. if the customer is anonymous. Select a customer from the standard Ax list of customers. If necessary, create a customer for anonymous purchases from Account receivable > Customers > All customers. |
Product parameters
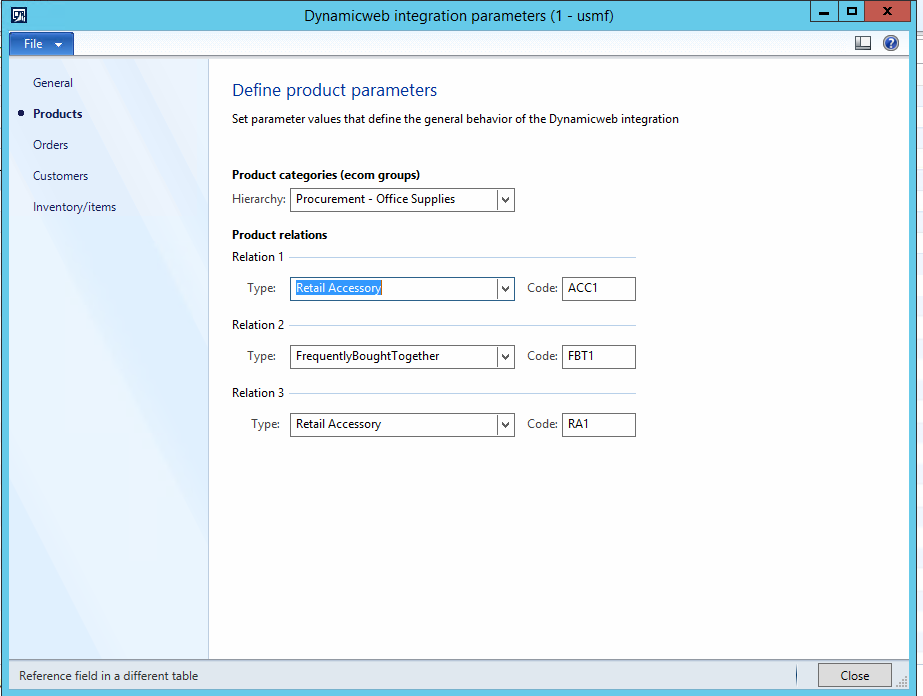
The Products parameters are used to configure and define the behavior of the product sync feature. They can be accessed from the Products tab of Dynamicweb integration parameters form (Figure 17.1).
|
Parameter |
Use |
|
Hierarchy |
Select a product hierarchy to use as the default product hierarchy in the Products, Product groups, and Product attributes endpoints. Select from a list of standard Ax Category hierarchies (Product information management – Setup – Categories - Category hierarchies). |
|
Product relation types |
Used to define 1-3 default relation types to use in the Related products export endpoint. Select a relation from the standard Ax product relations list (Product information management – Setup – Relationships – Product relationship types). |
|
Product relation codes |
Used to define a product relation group on the Dynamicweb-side for each default relation. Matches on RelatedGroupId, RelatedGroupName, and if both fail, a new product relation group with the code entered here as the name is created. Ask the Dynamicweb consultant for a list of appropriate codes. |
Order parameters
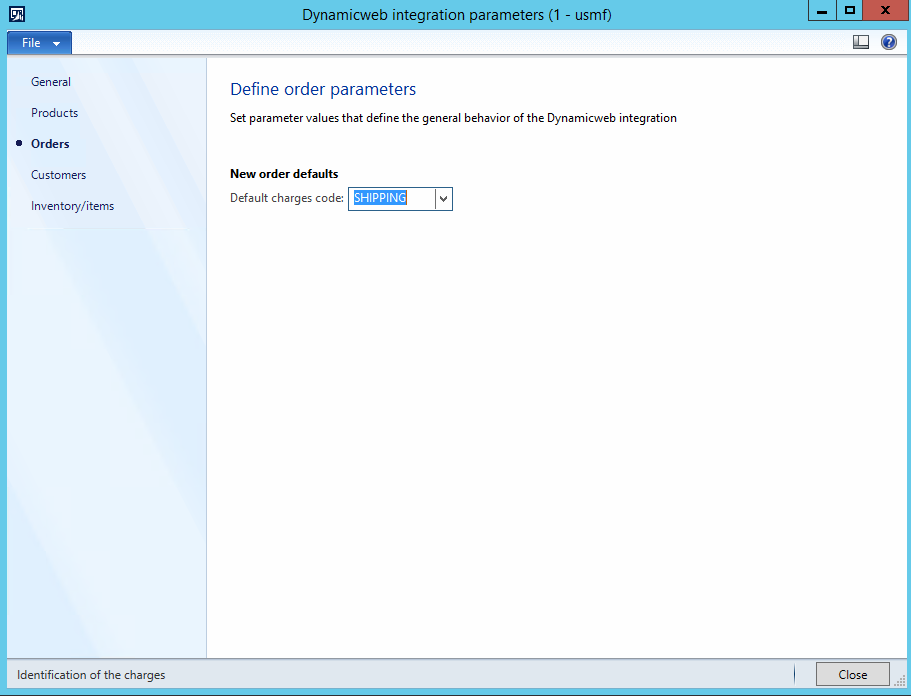
The Orders parameters are used to configure the behavior of the order sync feature. They can be accessed from the Orders tab of Dynamicweb integration parameters form (Figure 18.1).
|
Parameter |
Use |
|
Default charges code |
Used by the Sales orders import endpoint, if shipping charges are managed on the Ax side of the integration. If so, new shipping charge markup will be created using this code. Select a value from the standard Ax list of charge codes (Account receivable – Setup – Charges – Charges code). |
Customer parameters
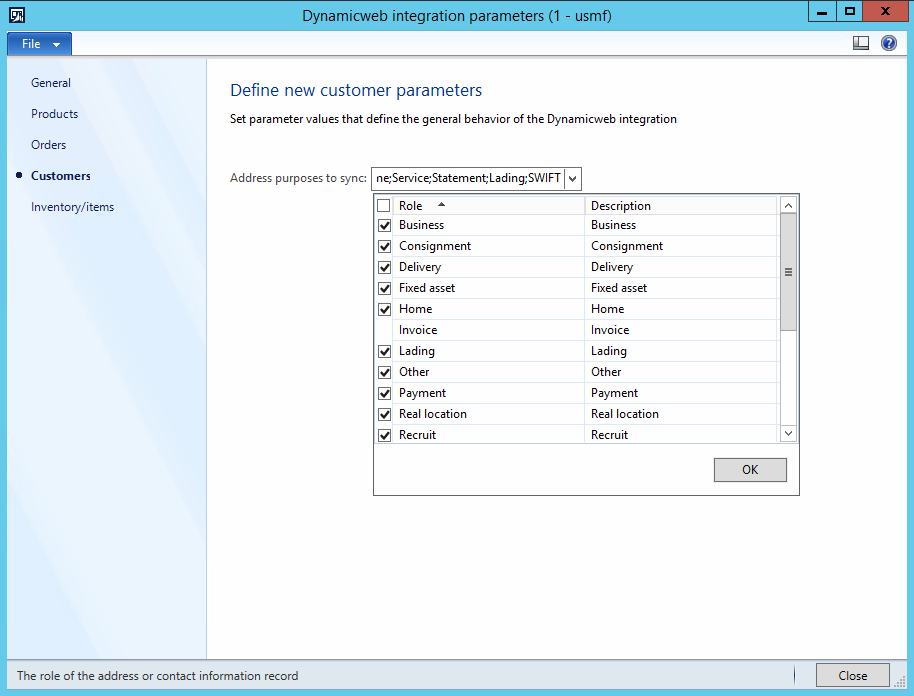
The Customers parameters are used to configure the behavior of the user sync feature. They can be accessed from the Customers tab of Dynamicweb integration parameters form (Figure 19.1).
|
Parameter |
Use |
|
Address purposed to sync |
Used by the Customers export endpoint to specify which customer addresses should be export to Dynamicweb. Select one or more required purposes to exports, from the standard list of Ax address purposes (Organization administration – Setup – Global address book – Address and contact information purpose). |
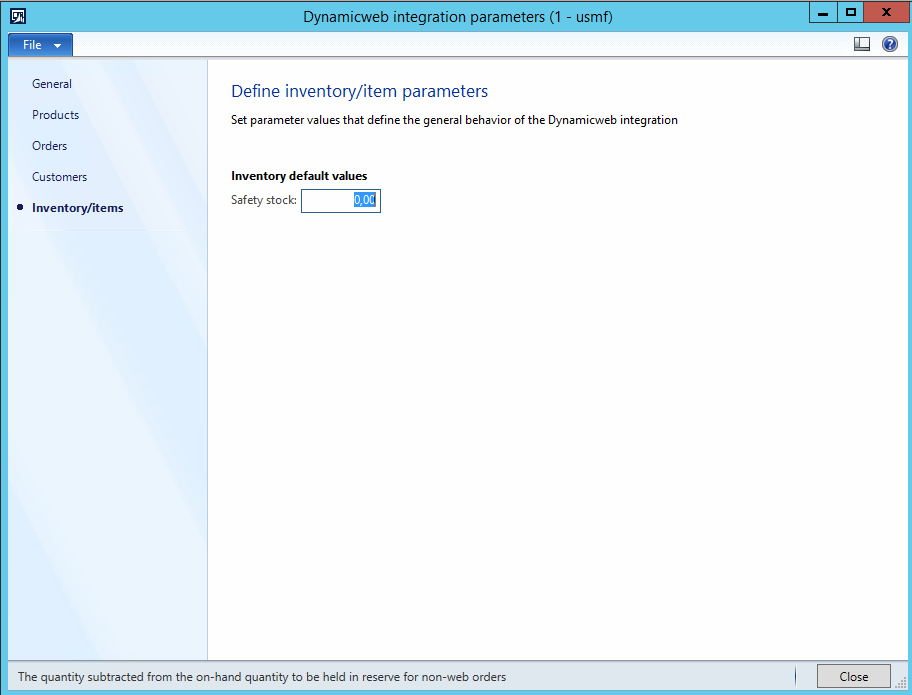
Inventory/Item parameters
The Inventory/Item parameters are used to configure the behavior of the stock sync feature. They can be accessed from the Inventory/Items tab of Dynamicweb integration parameters form (Figure 20.1).
|
Parameter |
Use |
|
Safety stock |
Used by the Product Stock export endpoint for product stock calculaton – displayed stock levels will be decreased by the Safety stock value. If the current stock is less than the safety stock, the displayed stock will be set to zero. |
Troubleshooting
An integration is a complicated piece of machinery – here are some common issues or difficulties you may encounter.
Request Entity Too Large Problem (413)
If you export large amount of data from Dynamicweb to AX – e.g. users or orders – you may encounter the “Request Entity Too Large” problem. To solve it, you must modify the BasicHttpBinding section of the AX web service web.config file: